This website contains affiliate links. Some products are gifted by the brand to test. As an Amazon Associate, I earn from qualifying purchases. The content on this website was created with the help of AI.
Looking to craft a unique, handmade gift? Sewing offers endless possibilities, whether you’re a beginner or an experienced seamstress. Here’s a list of sewing gift ideas that are both thoughtful and practical, covering everything from cozy accessories to home decor items. Let’s dive into some inspiring projects that are sure to delight any recipient!

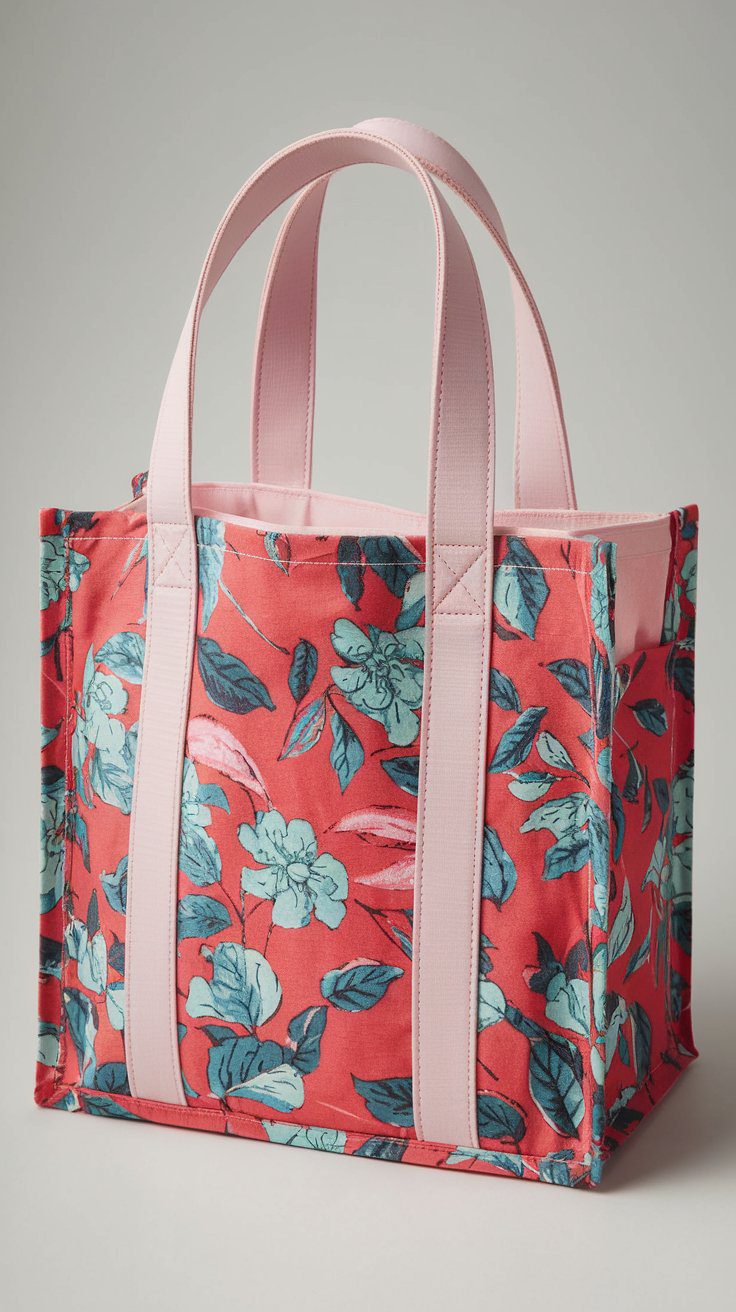
1. Tote Bags
If you’re making a beginner-friendly project that’s both practical and stylish, a tote bag is perfect. It’s reusable, customizable, and great for errands, books, or gifting. This simple pattern teaches straight stitching, topstitching, and basic handle construction — ideal for anyone learning sewing fundamentals.
Shopping List
- Canvas Fabric – sturdy and durable for long-lasting totes
- Cotton Webbing Straps – for strong, professional-looking handles
- Fabric Scissors – sharp, clean cuts make assembly easier
- Sewing Pins – to secure edges and seams before stitching
How to Make It
Cut two rectangles of sturdy fabric, each 16 x 18 inches. Cut two strips for handles, each 4 x 20 inches.
Fold each handle strip lengthwise, right sides together, and sew along the long edge. Turn right side out and press flat. Topstitch both edges for durability.
Place the two main fabric pieces right sides together. Sew along both sides and the bottom with a ½-inch seam allowance. Press seams open.
To create a flat bottom, pinch each bottom corner so the side and bottom seams line up, forming a triangle. Measure 2 inches from the tip and sew across; trim the excess fabric.
Fold the top edge of the bag down ½ inch, then again 1 inch to create a clean hem. Stitch all the way around.
Attach the handles by measuring 4 inches from each side seam and sewing them inside the hem. Reinforce with a box stitch or cross pattern at the base of each handle.
Press your seams, flip it right side out, and you’ve got a sturdy, custom tote ready for groceries, books, or gifts.
- Why It’s Great: Tote bags are functional and customizable. You can use different fabrics, add monograms, or include unique embellishments.
- Tips: Use a sturdy fabric like canvas and add pockets inside for extra storage.
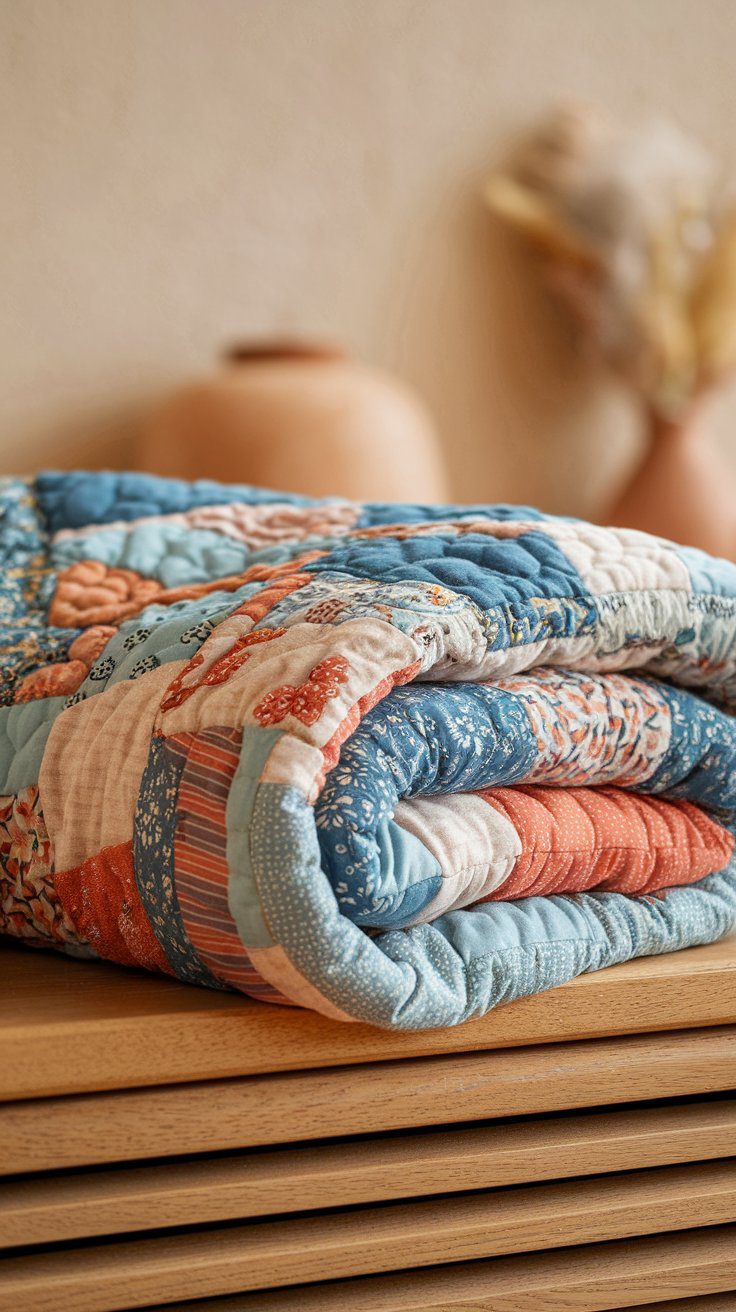
2. Quilted Throw Blanket
A quilted throw blanket is one of the most heartfelt handmade gifts you can sew. It’s cozy, beautiful, and full of personality — whether you go for a patchwork design or a simple solid with texture. This project teaches fabric cutting, piecing, and basic quilting techniques, making it a wonderful next step after beginner projects.
Shopping List
- Cotton Fabric Squares – pre-cut and coordinated for easy quilt layouts
- Quilt Batting – soft insulation that gives your quilt its warmth and thickness
- Rotary Cutter Set – for precise cutting of fabric pieces
- Quilting Ruler – keeps your squares perfectly measured and straight
- Safety Pins for Quilting – to hold the layers in place before stitching
- Why It’s Great: A cozy quilt is the perfect gift for chilly days and adds a personal touch to any home.
- Tips: Choose a color scheme that fits the recipient’s decor, and consider a simple patchwork design if you’re a beginner.
How to Make It
Cut 42 fabric squares, each 6 x 6 inches. Arrange them in a 6×7 grid on a flat surface until you like the pattern. Sew squares together in rows using a ¼-inch seam allowance, pressing seams open as you go.
Once all rows are done, sew the rows together to form the quilt top. Cut a piece of batting and a backing fabric to match the quilt’s size. Stack the layers in this order: backing (right side down), batting, then quilt top (right side up). Smooth everything flat and use safety pins or basting spray to hold layers in place.
Quilt through all layers by stitching straight lines along seams or diagonally across squares. Trim excess batting and backing.
To bind the edges, cut 2½-inch-wide strips of fabric long enough to go around the quilt. Join them end-to-end, fold in half lengthwise, and press. Align raw edges of binding with the quilt edge, sew around using a ¼-inch seam, fold the binding to the back, and stitch down by hand or machine.
Press it flat, and your cozy, handmade quilt is ready to wrap, gift, or keep for yourself.
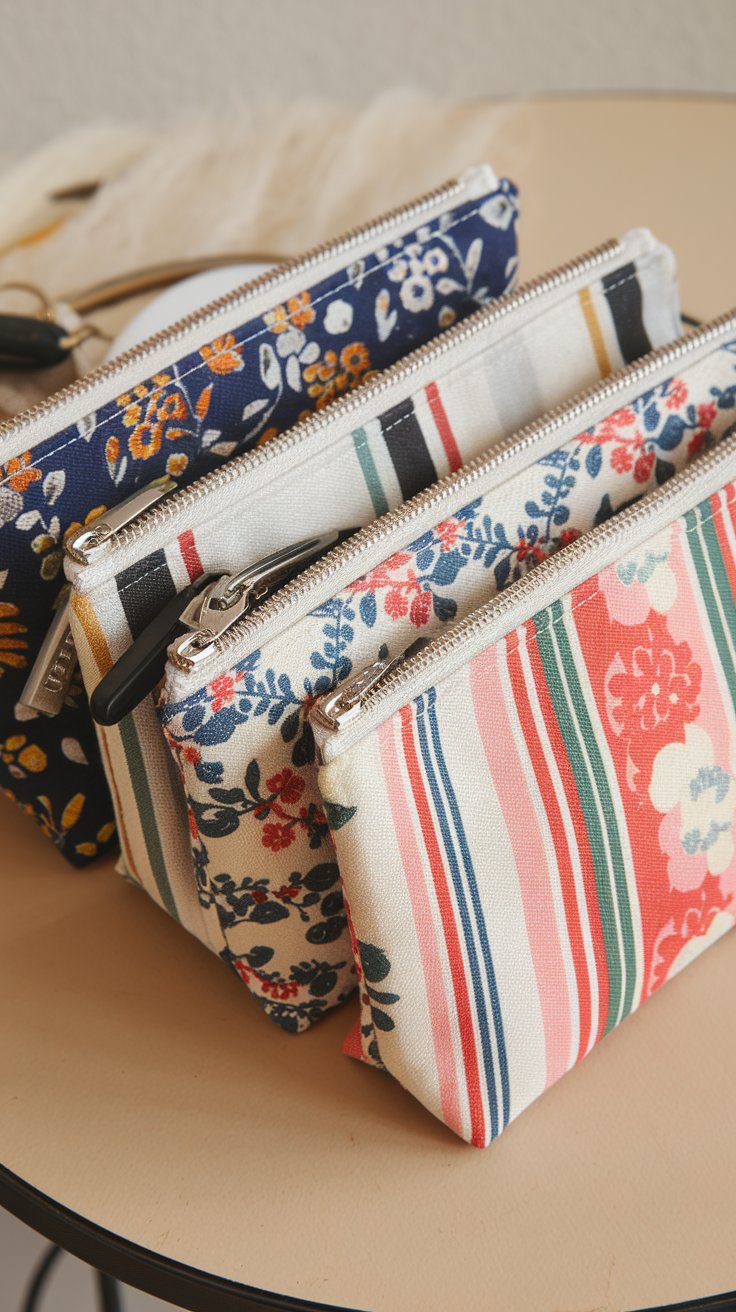
3. Zippered Pouches
Zippered pouches are a practical, quick-sew project that makes an amazing gift. They’re perfect for organizing makeup, tech cords, art supplies, or travel essentials. You’ll learn to install a zipper cleanly while sewing neat, lined fabric edges — a great skill-builder for beginners wanting to elevate their sewing technique.
Shopping List
- Assorted Zippers – a variety pack helps you match different fabric colors
- Cotton Fat Quarters – pre-cut fabric pieces ideal for pouch-making
- Zipper Foot Attachment – ensures smooth, close stitching along the zipper
- Fabric Clips – a great alternative to pins when working near zippers
- Why It’s Great: These are incredibly versatile and can be used as makeup bags, pencil cases, or coin purses.
- Tips: Experiment with fun fabrics and zippers to give each pouch a unique look.
Cut two pieces of outer fabric and two pieces of lining, each 9 x 6 inches. Choose a 7-inch zipper that matches your fabric.
Place one outer fabric piece right side up, lay the zipper face down along the top edge, then place one lining piece face down on top — sandwiching the zipper in between. Clip or pin the layers together.
Using a zipper foot, sew along the edge with a ¼-inch seam allowance. Fold the fabric away from the zipper and press flat. Topstitch close to the edge of the zipper to keep it neat.
Repeat the same steps for the other side of the zipper with the remaining fabric pieces. You should now have the zipper in the middle with lining on one side and outer fabric on the other.
Unzip the zipper halfway (important for turning later). Pin right sides of outer fabrics together and right sides of linings together. Sew all the way around, leaving a 3-inch opening in the bottom of the lining.
Clip corners, then turn the pouch right side out through the opening and the zipper. Stitch the lining opening closed, push the lining inside, and press the pouch flat.
You’ll end up with a clean, professional zip pouch perfect for makeup, art supplies, or travel essentials.
4. Fabric Coasters
Fabric coasters are the perfect blend of functional and decorative. They protect tabletops while adding a pop of handmade charm — and they’re one of the easiest sewing gifts to batch-produce. Great for beginners, this project teaches how to quilt small pieces, topstitch cleanly, and turn corners neatly for that polished finish.
Shopping List
- Cotton Fabric Bundles – absorbent, colorful fabric options ideal for coasters
- Cotton Batting Squares – adds structure and thickness for heat and moisture protection
- Mini Iron and Pressing Mat – makes pressing edges and seams easier in small projects
- Fabric Scissors – precise cuts help keep coaster edges even and clean
- Why It’s Great: These are practical, easy to sew, and perfect for adding a splash of color to any coffee table.
- Tips: Use absorbent cotton and add a layer of batting for extra thickness.
Cut two squares of cotton fabric, each 5 x 5 inches, and one square of cotton batting the same size. Layer them in this order: one fabric square right side down, batting in the middle, and the other fabric square right side up.
Pin the layers together. Sew around all four edges with a ¼-inch seam allowance, leaving a 2-inch opening on one side for turning. Clip the corners diagonally to reduce bulk.
Turn the coaster right side out through the opening, using a chopstick or pencil to push out corners. Press flat with an iron, making sure edges are crisp.
Topstitch around the entire coaster about ⅛ inch from the edge to close the opening and give it a finished look. For added texture and durability, sew a few decorative quilting lines across the coaster — diagonal, grid, or concentric squares all work well.
Repeat the process to make a full matching set. Stack them, tie with ribbon, and they’re gift-ready for any coffee or tea lover.

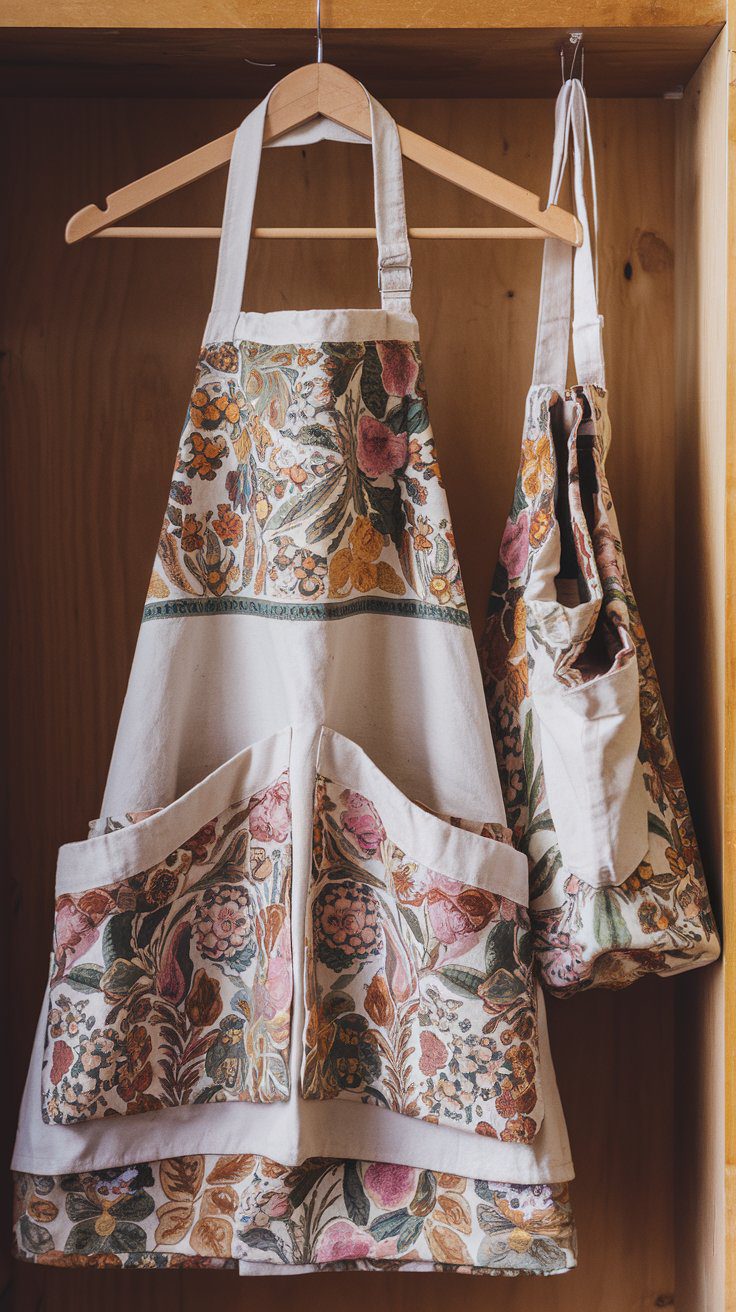
5. Aprons with Pockets
A custom apron with pockets makes a thoughtful, practical gift for anyone who loves cooking, gardening, or crafting. It’s easy to personalize with embroidery, fabric paint, or fun prints — and it’s a great project to practice hemming, shaping, and attaching straps. The roomy pockets make it as functional as it is beautiful.
Shopping List
- Canvas or Duck Cloth Fabric – sturdy base fabric that holds up to daily wear
- Cotton Webbing Straps – easy-to-use option for durable ties and neck straps
- Fabric Marking Chalk – helps you mark curves and pocket placement cleanly
- Bias Tape Maker Kit – perfect for creating matching trim and neat edges
- Why It’s Great: Perfect for cooking, gardening, or crafting, aprons with pockets are a thoughtful gift for anyone.
- Tips: Add extra-large pockets and personalize them with fun embroidery.
Cut one main rectangle 28 x 20 inches for the apron body, two straps 3 x 36 inches for the ties, and one neck strap 3 x 24 inches. For the pocket, cut a 10 x 14-inch rectangle.
Fold and press the edges of the pocket under ½ inch on all sides, then top hem the upper edge by folding it over again and stitching across. Place the pocket on the apron body about 6 inches from the bottom and centered horizontally. Pin in place and sew along the sides and bottom, leaving the top open. Add a vertical stitch down the center if you want to divide it into two compartments.
Fold and press the sides and bottom edges of the apron under ½ inch, then again another ½ inch, and topstitch all around for clean edges.
To shape the top corners, measure 4 inches in from the top edge and 8 inches down from the top side. Connect the two points with a gentle curve using chalk, then cut along the line.
Fold and press the edges of these curves, and stitch them down neatly. Attach the neck strap to the top corners and the waist ties to the sides just below the curved edge. Sew securely and reinforce with backstitching.
Press the entire apron flat, and it’s ready — durable enough for cooking, gardening, or crafting, and perfect for adding embroidery or iron-on personalization.
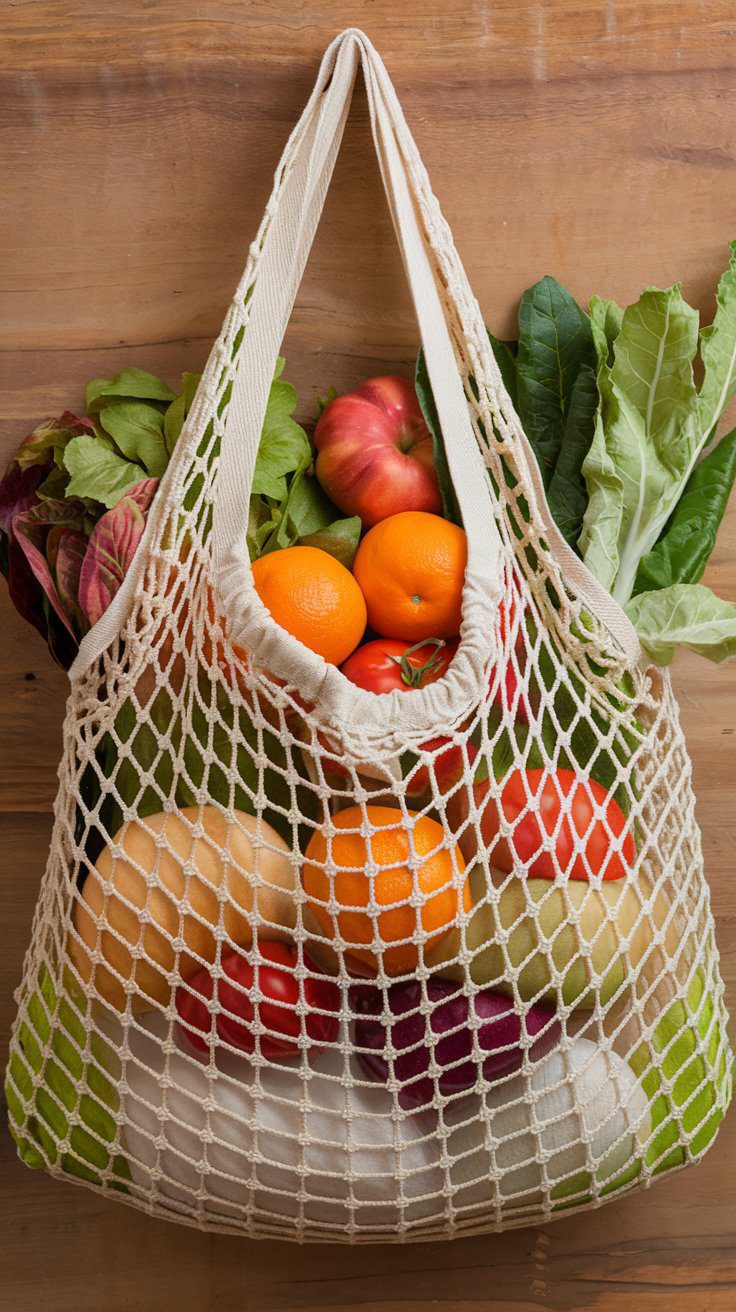
6. Reusable Produce Bags
Reusable produce bags are an eco-friendly, beginner-friendly project that make a genuinely thoughtful gift. Lightweight, washable, and practical, they’re a sustainable swap for single-use plastic bags — perfect for anyone who loves farmers markets or fresh grocery shopping. You can batch-make a set of three or four in under an hour using lightweight fabric scraps.
Shopping List
- Muslin or Mesh Fabric – lightweight and breathable, ideal for storing fresh produce
- Cotton Drawstring Cord – soft and durable for easy cinching
- Sewing Pins – to hold edges in place before stitching
- Fabric Scissors – for clean, straight cuts on lightweight fabric
- Why It’s Great: Eco-friendly and practical, these bags are great for grocery shopping and storing fresh produce.
- Tips: Use lightweight, breathable fabric like muslin or netting, and add a drawstring closure.
How To Make It
Cut two rectangles of lightweight fabric, each 14 x 18 inches. If using mesh or netting, make sure the edges won’t fray easily. For muslin or cotton, finish edges with a zigzag or serger stitch.
Place the two rectangles right sides together. Sew along both sides and the bottom with a ¼-inch seam allowance, leaving the top edge open. Press seams flat.
To create the drawstring channel, fold the top edge down ¼ inch, then again ¾ inch, and sew around close to the lower folded edge, leaving a 1-inch opening near one side seam for the cord.
Turn the bag right side out. Cut a 28-inch length of cotton cord or ribbon. Attach a safety pin to one end and thread it through the channel until it comes out the other side. Tie the ends together to form the drawstring.
If you want a double drawstring closure, repeat on the opposite side with another cord so it cinches evenly from both ends.
Press the bag flat, and it’s ready to use — perfect for fruits, veggies, or even gift packaging with a sustainable twist.
7. Custom Pillow Covers

- Why It’s Great: Change up home decor with pillow covers in fun patterns and textures.
- Tips: Use an envelope closure or invisible zipper for a polished look.
Measure your pillow insert and add 1 inch to both the length and width for seam allowance. For example, if your pillow is 18 x 18 inches, cut one front piece 19 x 19 inches and two back pieces 19 x 13 inches each.
On each back piece, fold one long edge under ½ inch, press, then fold again 1 inch to create a clean hem. Stitch along the folded edge. These two pieces will overlap to form the envelope closure.
Lay the front piece right side up. Place the two back pieces right side down on top, with the hemmed edges overlapping in the center. Pin or clip all around the edges.
Sew around all four sides with a ½-inch seam allowance. Backstitch at the beginning and end to secure seams. Trim the corners diagonally to reduce bulk.
Turn the cover right side out through the envelope opening, push out the corners with a blunt tool, and press flat. Insert your pillow, smooth it out, and you’ve got a polished, removable pillow cover that can be washed or swapped seasonally.
8. Handmade Pot Holders
Handmade pot holders are a classic, practical gift that every kitchen needs. They’re simple to make, endlessly customizable, and a perfect project for using up fabric scraps. You’ll learn quilting basics and bias binding — plus, they pair beautifully with tea towels or aprons for a coordinated handmade gift set.

Shopping List
- Insul-Bright Heat Resistant Batting – essential for protecting hands from hot pans and trays
- Cotton Quilting Fabric – durable and easy to work with for layered sewing projects
- Bias Tape Binding – gives your pot holders a clean, professional edge
- Quilting Clips – keeps multiple layers secure without pin distortion
- Why It’s Great: Pot holders are easy to sew and can be customized with heat-resistant fabric.
- Tips: Add a loop for hanging and choose colors that match the recipient’s kitchen.
How to Make It
Cut two squares of cotton fabric, each 8 x 8 inches, and one square of heat-resistant batting (like Insul-Bright) the same size. For extra protection, you can add a second layer of batting.
Stack your layers in this order: one outer fabric square right side down, batting in the middle, and the second outer fabric square right side up. Pin or clip all layers together.
Quilt the layers by stitching straight lines diagonally across the square from corner to corner, then repeat in the opposite direction to create an “X” pattern. Add more quilting lines if you prefer a grid look — this helps secure the layers.
To finish the edges, cut 2-inch-wide strips of fabric for binding. Fold the strip in half lengthwise, wrong sides together, and press. Align the raw edge of the binding with the edge of the pot holder and sew around using a ¼-inch seam allowance, leaving a few inches unsewn at the end.
Fold the binding over to the back, tuck in the raw edge, and hand-stitch or machine-stitch it closed for a neat finish.
For the hanging loop, cut a small strip of fabric 2 x 6 inches, fold lengthwise, sew along the edge, and attach it to one corner before finishing the binding.
Press flat — it’s ready for the kitchen or a handmade gift set.
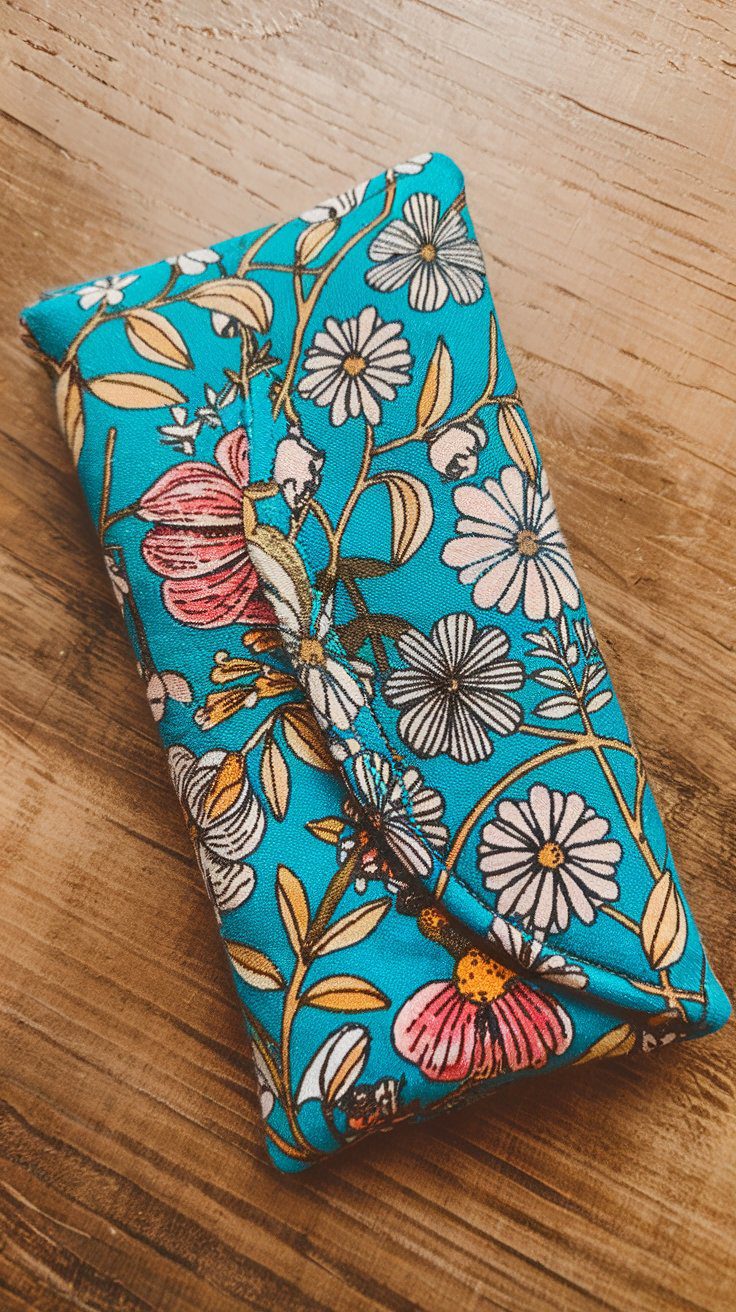
9. Eyeglass Case
Handmade eyeglass cases make practical yet stylish gifts. They’re soft, protective, and can be sewn in under an hour — a perfect project for beginners who want to practice lining, padding, and precision topstitching. You can personalize them with prints, snaps, or buttons to fit anyone’s style.
Shopping List
- Fusible Fleece – adds structure and padding to protect lenses
- Soft Lining Fabric – gentle interior fabric to prevent scratches
- Metal Snap Kit – easy, durable closure option
- Fabric Clips – ideal for securing layers without leaving pin holes
- Why It’s Great: Soft and protective, a handmade eyeglass case is a thoughtful gift for anyone who wears glasses.
- Tips: Add a snap closure or use an elastic band to keep glasses secure.
How to Make It
Cut two rectangles of outer fabric and two of soft lining fabric, each 4 x 8 inches. For extra padding, cut one piece of fusible fleece or thin batting the same size as the outer fabric.
Fuse or baste the fleece to the wrong side of each outer fabric piece. Place one outer and one lining piece right sides together and sew along one short edge using a ¼-inch seam allowance. Repeat with the remaining pair.
Open both sewn pieces and place them right sides together — matching outer fabric to outer fabric and lining to lining. Pin around the edges, leaving a 2-inch opening in the bottom of the lining for turning.
Sew around the entire case with a ¼-inch seam allowance, curving slightly at the corners if you want a rounded top. Clip corners and trim excess seam bulk.
Turn the case right side out through the opening, then push the lining inside the outer shell. Stitch the lining opening closed with a small hand stitch or by machine.
Press flat and, if desired, topstitch around the upper edge for a crisp finish. You can add a snap, button, or elastic loop closure to keep glasses secure.
10. Scrunchies in Fun Fabrics
Scrunchies are the ultimate quick-sew project — cute, trendy, and endlessly giftable. They’re perfect for beginners who want to master basic tube construction and elastic insertion. Plus, you can make them in batches using leftover fabric scraps or luxe materials like satin or velvet for an elevated finish.

Shopping List
- Elastic Cord – soft and stretchy for a comfortable hold
- Velvet Fabric – gives scrunchies a luxe, trendy texture
- Cotton Fabric Scraps – ideal for colorful, everyday styles
- Safety Pins Set – helps guide the elastic through the fabric tube easily
- Why It’s Great: Scrunchies are back in style, and they’re an excellent way to use up fabric scraps.
- Tips: Experiment with different textures like velvet or satin for a luxe look.
How to Make It
Cut a strip of fabric 3 x 22 inches and one piece of elastic 8 inches long. Fold the fabric lengthwise, right sides together, and sew along the long edge using a ¼-inch seam allowance, forming a tube.
Turn the tube right side out using a safety pin or turning tool, then press it flat with the seam centered along the back. Attach a safety pin to one end of the elastic and feed it through the fabric tube until it comes out the other side.
Overlap the elastic ends by about ½ inch and sew them together securely with several zigzag stitches.
Tuck one fabric end inside the other about ½ inch to hide the raw edges. Stitch the opening closed by hand with an invisible ladder stitch or by machine close to the edge.
Distribute the fabric evenly around the elastic, fluff it up, and you’ve got a soft, stretchy scrunchie that can be made from cotton, satin, velvet, or any leftover fabric scraps.

11. Tea Towel Sets
Handmade tea towels are elegant, functional gifts that add charm to any kitchen. They’re quick to sew, easy to personalize, and perfect for pairing with aprons or pot holders for a coordinated set. This project helps you practice hemming and decorative stitching while creating a boutique-quality finish.

Shopping List
- Linen Fabric – absorbent and long-lasting, ideal for kitchen use
- Flour Sack Towels – pre-made blanks that are easy to embellish
- Embroidery Thread Kit – adds a decorative, handmade touch
- Fabric Paint Set – for custom prints, stencils, or lettering
- Why It’s Great: A set of custom tea towels adds a lovely touch to any kitchen.
- Tips: Use flour sack towels and embellish them with embroidery, appliqué, or fabric paint.
How to Make It
Cut fabric rectangles 18 x 28 inches from linen or 100% cotton for best absorbency. Fold each raw edge under ½ inch, press, then fold under again ½ inch to hide raw edges completely. Pin in place.
Topstitch around all four sides close to the inner folded edge, pivoting neatly at each corner. Press well for crisp, straight hems.
If you want to add decorative trim, sew lace, ribbon, or fabric strips across the short ends before hemming. For embroidery, mark your design with fabric chalk and stitch by hand or machine before hemming the towel.
You can also personalize the towels using fabric paint or appliqué — just be sure to heat-set any painted or iron-on designs for washability.
Once finished, fold your towels into sets of two or three, tie with twine or ribbon, and you’ve got a thoughtful, handmade kitchen gift that looks boutique-ready.
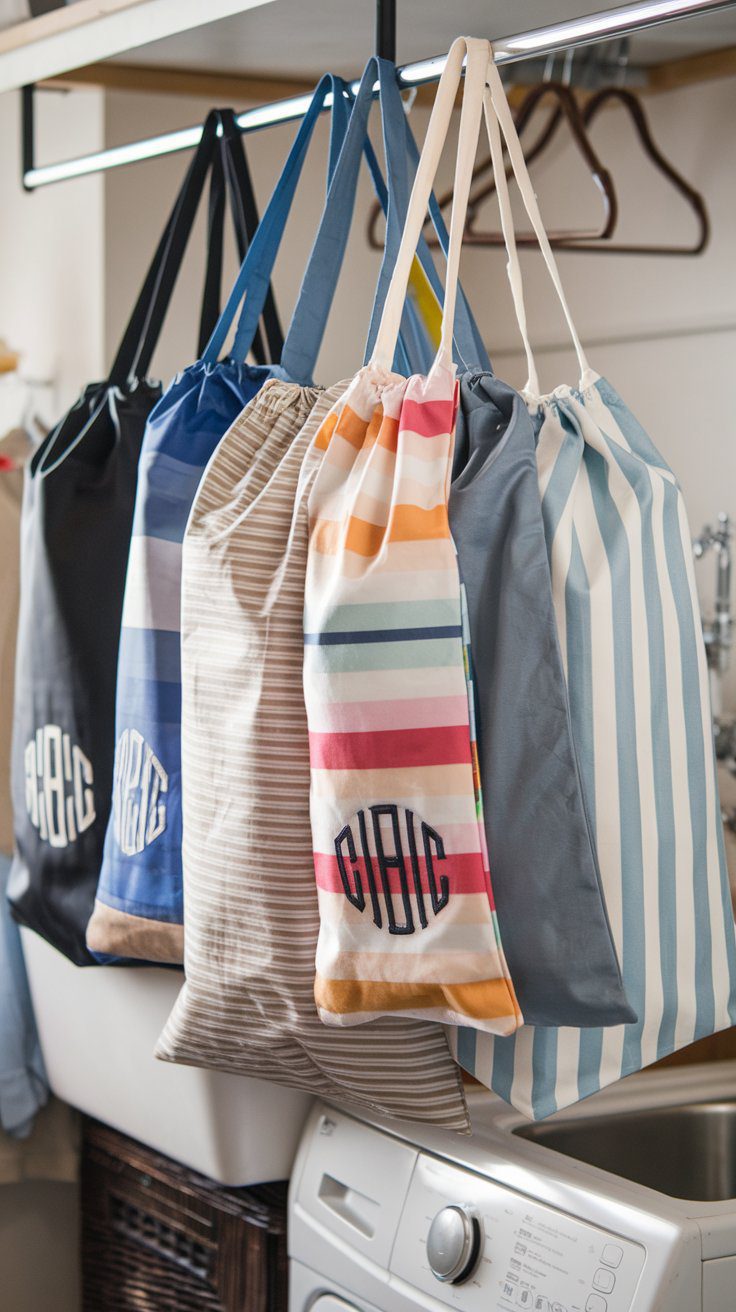
12. Drawstring Laundry Bags
Drawstring laundry bags are a practical and stylish sewing gift — great for travel, dorm rooms, gyms, or kids’ bedrooms. They’re simple to make yet feel polished, especially when customized with fun fabrics, prints, or embroidered initials.
Shopping List
- Canvas Fabric – sturdy material that holds shape and lasts through washes
- Cotton Cording – soft, durable drawstring for easy closure
- Iron-On Vinyl Sheets – perfect for adding names or custom designs
- Embroidery Thread – for personalizing with initials or decorative stitching
- Why It’s Great: Great for travel, gym gear, or kids’ rooms, these bags are practical and stylish.
- Tips: Choose a durable fabric and add a fun print or monogram for personalization.
How to Make It
Cut two rectangles of durable cotton or canvas fabric, each 20 x 28 inches. If you want a contrasting top edge, cut an additional strip 6 inches tall the same width as the bag to attach as a decorative band.
Place the two main pieces right sides together and sew along both sides and the bottom with a ½-inch seam allowance, leaving the top open. Press seams open.
To form a channel for the drawstring, fold the top edge down ¼ inch, press, then fold again 1 inch and stitch along the lower folded edge, leaving a 1-inch gap near one side seam.
Turn the bag right side out. Cut two lengths of cotton cording or thick ribbon, each 32 inches long. Use a safety pin to thread the first cord through the channel and back out the same opening. Thread the second cord from the opposite side so the ends meet on both sides.
Knot each set of cord ends securely, then pull both sides to close the bag — it should cinch evenly.
Press the finished bag flat. Optional: personalize with an embroidered name, monogram, or iron-on vinyl to make it perfect for travel, the gym, or kids’ rooms.
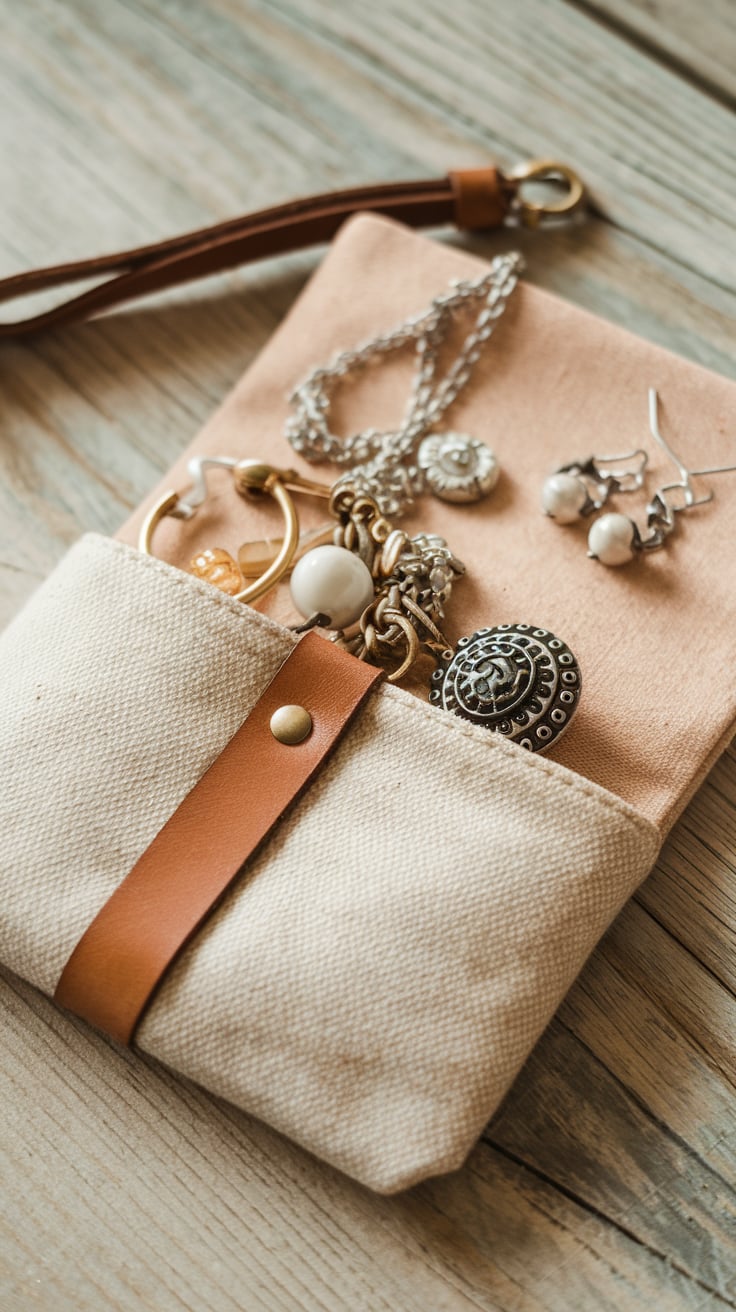
13. Travel Jewelry Organizer
A travel jewelry organizer is the perfect handmade gift for anyone who loves to accessorize. Compact yet functional, it keeps necklaces tangle-free, earrings secure, and rings neatly stored while on the go. This project helps you practice quilting, adding zippers, and creating structured pockets — all while looking beautifully polished.
Shopping List
- Fusible Fleece – adds structure and softness to protect jewelry
- Zipper Set – ideal for secure pocket compartments
- Cotton Fat Quarters – pre-cut prints for coordinating inner and outer fabrics
- Elastic Bands – perfect for holding rings or small items in place
- Why It’s Great: A travel jewelry case with compartments and zippered pockets is perfect for keeping jewelry organized.
- Tips: Use soft, padded fabric inside to prevent scratches, and consider adding a zipper for secure closure.
Cut two rectangles of outer fabric and two of lining fabric, each 9 x 12 inches. For padding, cut one piece of fusible fleece the same size and fuse it to the wrong side of one outer piece.
To create interior storage, cut smaller fabric pieces for pockets — one 9 x 6 inches for necklaces and one 9 x 4 inches for rings or earrings. Fold the top edge of each pocket under ¼ inch, press, then fold again ½ inch and stitch to hem.
Place pockets on one lining piece, aligning the raw edges at the bottom. Stitch the sides and bottom to attach, then sew vertical lines to divide pockets into sections.
Add a small 7-inch zipper pouch by sewing the zipper between two 9 x 3-inch fabric strips, then attach the pouch above the lower pocket for secure storage.
Lay the two outer pieces right sides together and sew around all edges, leaving a 3-inch opening on one side for turning. Trim corners, turn right side out, and press. Stitch the opening closed.
Fold the organizer in half, add a ribbon or elastic loop closure at the center edge, and topstitch around the perimeter for strength.
This portable case keeps necklaces tangle-free, earrings in place, and rings secure while traveling.
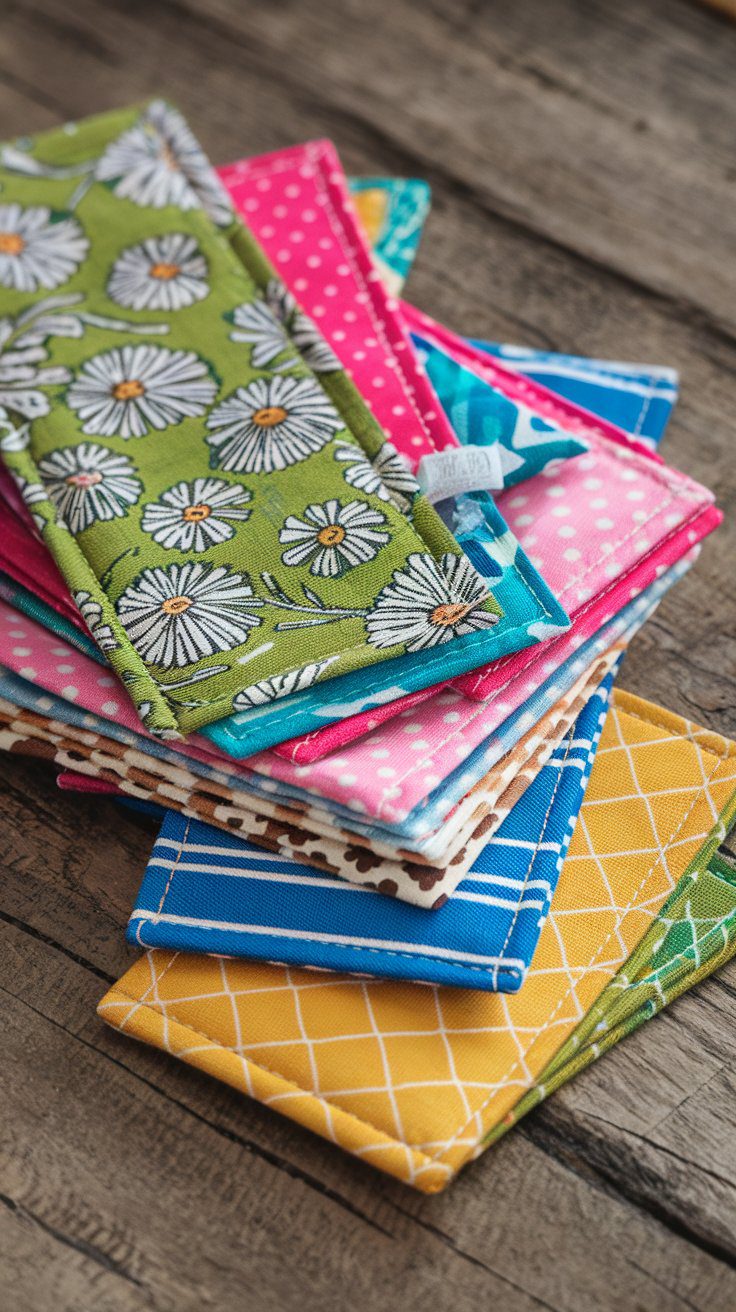
14. Fabric Bookmarks
Fabric bookmarks are the perfect quick-sew gift — practical, charming, and ideal for using up scrap fabric. They take just minutes to make and can be personalized with ribbons, lace, or tiny charms, making them a thoughtful add-on to any handmade journal or book lover’s gift set.
Shopping List
- Fabric Scraps – use leftover pieces from other sewing projects
- Lightweight Interfacing – keeps bookmarks firm and flat
- Ribbon Trim – adds a decorative top edge or tail
- Metal Charms – attach to corners for a creative finish
- Why It’s Great: Perfect for book lovers, these bookmarks are quick to make and can be personalized with fabric scraps.
- Tips: Use interfacing for added stiffness and add ribbon or lace for a decorative touch.
Cut two fabric rectangles, each 2 x 7 inches, and one piece of lightweight interfacing the same size for stiffness. Fuse the interfacing to the wrong side of one fabric piece using an iron and pressing cloth.
Place both fabric pieces right sides together and sew around the edges with a ¼-inch seam allowance, leaving a 1-inch opening along one short side for turning. Clip the corners diagonally to reduce bulk.
Turn the bookmark right side out using a chopstick or pencil, push out the corners neatly, and press flat. Fold the open edge under and topstitch all the way around about ⅛ inch from the edge to close the opening and give a polished finish.
For decoration, sew a ribbon or lace trim across one end before assembling, or add a small charm to a corner for extra flair.
Press one last time, and you’ve got a beautiful, durable bookmark perfect for any reader or as an add-on gift with a handmade journal or book sleeve.
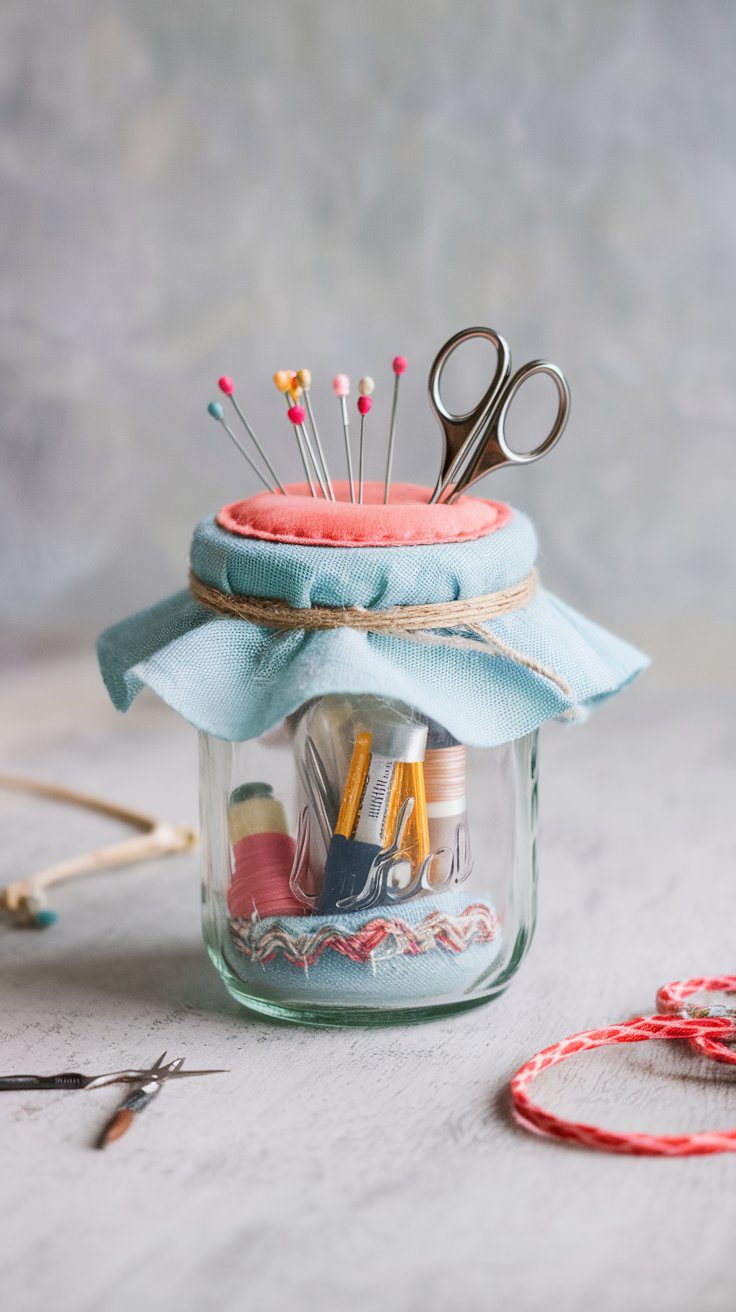
15. Sewing Kit Jar
A sewing kit jar is the perfect mix of charm and function — a thoughtful handmade gift for anyone who loves to create. It’s compact, decorative, and endlessly useful, making it a favorite for beginners and seasoned crafters alike.
Shopping List
- Mason Jars – ideal size for portable sewing kits
- Polyester Stuffing – creates a cushioned pin cushion lid
- Mini Sewing Kit Tools – includes thread, needles, scissors, and tape measure
- Decorative Ribbon – for tying around the jar or lid
- Why It’s Great: A small jar with a mini sewing kit (think needles, thread, and small scissors) makes a charming gift for anyone who loves sewing.
- Tips: Decorate the jar lid with fabric and a bit of padding to create a mini pin cushion on top.
Grab a clean mason jar with a lid — an 8-ounce size works best. Cut a circle of fabric about 1 inch larger than the lid. Place a small handful of polyester stuffing or cotton batting on top of the lid insert, then stretch the fabric circle over it to create a dome.
Hold it in place and screw the jar ring down tightly, trapping the fabric and stuffing to form a pin cushion lid. Trim any excess fabric underneath for a clean finish.
Fill the jar with sewing essentials: a small pair of scissors, mini spools of thread, hand-sewing needles, safety pins, buttons, and a tape measure. You can also tuck in a few fabric clips or a thimble if space allows.
Add a ribbon or twine bow around the jar’s neck for decoration, or label it with vinyl or a tag for a personalized touch.
This charming little jar is both decorative and practical — perfect as a gift for crafters, beginners, or anyone who loves handmade organization.
Each of these projects is customizable, allowing you to match colors, fabrics, and styles to the personality of the gift recipient. With just a little fabric and some creativity, you can create thoughtful, handmade gifts that will be treasured for years! Happy sewing!
This post contains affiliate links. As an Amazon Associate, I earn from qualifying purchases.
This website contains affiliate links. Some products are gifted by the brand to test. As an Amazon Associate, I earn from qualifying purchases. The content on this website was created with the help of AI.