This website contains affiliate links. Some products are gifted by the brand to test. As an Amazon Associate, I earn from qualifying purchases. The content on this website was created with the help of AI.
11 Tote Bags You Can Actually Finish This Weekend
From a classic canvas everyday bag to a zip-top structured tote, every project here uses the same basic skills — just remixed into a totally different look.
Shop the tote bag supply list →Affiliate links · As an Amazon Associate I earn from qualifying purchases.

Your fabric stash has been staring at you for months, and every “quick weekend project” you’ve googled either needs a pattern you don’t own or skills you haven’t learned yet. Tote bags fix that — they’re forgiving, endlessly customizable, and every version below uses the same handful of sewing basics: straight seams, boxed corners, and handles. Here is exactly how to sew eleven totally different totes, from a five-minute drawstring bag to a structured zip-top carryall.
Every tote style, sorted
Everyday Carry
The classic tote and its fully reversible cousin — grab-and-go basics for daily errands.
Made It Yours
Quilted patchwork and monogrammed totes built to be gifted, sold, or shown off.
On the Go
Drawstring, oversized, grocery, and fold-up totes for beach days, road trips, and errands.
Structured & Statement
Clear vinyl, bucket-style, and zip-top totes with real shape and finished construction.
Picture this: a whole shelf of totes, each one a different fabric and finish, so there’s always the right bag ready for the right day — and every single one started from the same fat quarter of fabric you already own.
Six totes to start with
The tote you’ll actually reach for every day

Clean lines, a sturdy boxed bottom, and handles sewn right into the seam — this is the tote that earns a permanent spot by your front door. It’s fully lined, beginner-friendly, and polished enough to double as a market bag or a book bag.
Picture this: A structured canvas tote with a subtle leaf print and clean seams, resting on a sunlit table — its soft straps standing tall and ready for a trip to the market or a walk to the library.
You’ll need:
How to sew it:
- Cut fabric: two 16″ x 16″ squares from your outer fabric, two 16″ x 16″ squares from lining, and two 22″ x 2″ strips (or webbing) for handles.
- Make the handles: fold each strap lengthwise, right sides together, sew the long edge, turn right side out, press, and topstitch both sides.
- Attach handles to the outer panels 4″ in from each side seam, raw edges aligned with the top — baste with a 1/4″ seam.
- Sew the outer bag: right sides together, stitch both sides and the bottom with a 1/2″ seam, then box the corners by measuring 2″ from each tip and trimming.
- Sew the lining the same way, but leave a 4″ gap at the bottom for turning — box those corners too.
- Assemble: turn the outer bag right side out, keep the lining inside out, slide the outer bag into the lining so handles are sandwiched between the layers, pin the top.
- Sew around the entire top edge with a 1/2″ seam, then turn the whole bag right side out through the gap in the lining.
- Finish: topstitch the top edge to reinforce the handles, then close the lining gap with a narrow or invisible stitch.
💡 Tip: Baste your handles in place before you sew the final seam — it keeps them from twisting while you’re stitching around the top.
A tote with no wrong side — ever

This is a true reversible tote — fully finished seams, hidden handles, and two complete outer layers, so you can flip the whole bag inside out with zero raw edges showing. Two prints, one bag.
Picture this: A tote with two fully finished outer fabrics — no lining, no raw seams — flipping inside out from a floral print to a geometric pattern, with handles that move seamlessly from one side to the other.
You’ll need:
How to sew it:
- Cut two 16″ x 16″ squares from Fabric A, two from Fabric B, and two handle strips (or use cotton webbing).
- Make the handles: fold each strap lengthwise, sew a 1/4″ seam down the long edge, turn, press, and topstitch both sides.
- Sew each shell separately — Fabric A pieces right sides together down the sides and bottom, then repeat with Fabric B. Optional: box the corners on both shells.
- Turn the Fabric A shell right side out and pin the handles to the top edge, 4″ from each side seam, making sure they’re not twisted — baste in place. Leave the Fabric B shell wrong side out.
- Slide the Fabric A shell into the Fabric B shell, right sides together, handles tucked inside. Align top edges and side seams and pin all the way around.
- Sew around the top with a 1/2″ seam, leaving a 3″ opening for turning.
- Pull the bag through the gap, push one shell inside the other, and press the top edge flat.
- Topstitch all the way around the top edge to close the gap and reinforce the seam.
💡 Tip: Keep one shell wrong-side-out and one right-side-out while you sandwich them together — it’s the step most people get backwards on a reversible bag.
Quilted patchwork that looks boutique, not scrap bin

This tote isn’t just cute — it’s crafted. Nine quilted, puffy squares topstitched for definition give it a structured silhouette that looks straight off a handmade boutique table, and it’s the perfect project for using up your favorite fabric scraps.
Picture this: A color-coordinated tote made from nine puffed fabric blocks — each quilted with batting and topstitched for definition — framed with crisp seams, firm sides, and soft cotton webbing handles. It’s both durable and beautiful.
You’ll need:
- Assorted quilting cotton fat quarters
- 100% cotton quilt batting
- ByAnnie Soft and Stable 58″ (optional)
- Lightweight cotton lining/muslin
- 1″ cotton webbing (handles)
- All-purpose polyester thread
- 45mm rotary cutter
- Wonder clips (50 pack)
- 6″ x 24″ acrylic quilting ruler
- Self-healing cutting mat 24″ x 36″
How to sew it:
- Quilt nine 6″ x 6″ squares: layer each outer fabric square with batting (leave a 1/4″ border), quilt with straight lines or a pattern, then trim even.
- Arrange the squares in a 3×3 grid and sew into rows with a 1/4″ seam, pressing seams open. Join the rows into one 18″ x 18″ front panel and repeat for the back. Topstitch every seam line.
- Optional: fuse interfacing or foam to the back of each panel for extra structure.
- Sew the outer bag: front and back right sides together, both sides and the bottom with a 1/2″ seam, then box the corners at 2″ from each tip.
- Cut and sew two 18″ x 18″ lining panels the same way, boxing the corners, but leave a 4″ gap at the bottom for turning.
- Pin cotton webbing handles to the outer bag 4″ in from each side seam, raw edges aligned with the top — baste in place.
- Insert the outer bag (right side out) into the lining (right side in), align seams, and sew all the way around the top with a 1/2″ seam.
- Pull the bag through the lining gap, press the top edge, topstitch all the way around, and close the lining gap with an invisible stitch.
💡 Tip: Topstitch every seam on the patchwork front before you assemble the bag — that’s what gives each square its crisp, quilted definition.
A cinch-top tote for gym gear and beach days

Lightweight, casual, and quick to sew, this tote’s cinched top adds function and flair — everything stays secure but is still easy to open. It’s the one you’ll grab for summer outings, gym gear, or a fast errand run.
Picture this: A breezy cotton tote with bold stripes, gathered at the top with a drawstring cord, hanging on a sunny wall hook — ready for a beach towel, flip-flops, and a day out.
You’ll need:
- Lightweight cotton fabric (by the yard)
- All-purpose polyester thread
- 1/4″ cotton drawstring cord
- Satin ribbon 3/8″ (alternative to cord)
- Drawstring threader / bodkin set
- Grommet kit (optional)
- Universal sewing machine needles 80/12
- Sewing clips
- 45mm rotary cutter
- Self-healing cutting mat 24″ x 36″
- Fabric marking pen/chalk
How to sew it:
- Cut two 15″ x 18″ rectangles for the body and two 2.5″ x 15″ strips for the drawstring casing.
- Sew the casing strips: fold lengthwise and press, fold each long edge to the center crease, fold again, then topstitch both long edges.
- Attach a casing strip 1.5″ down from the top edge of each body panel, stitching the top and bottom edges and leaving the short ends open.
- Sew the bag body: right sides together, down both sides and across the bottom with a 1/2″ seam — being careful not to sew over the casings. Optional: box the corners.
- Cut your cord into two 36″ pieces. Thread one through both casings left to right, and the second right to left, then tie the ends of each cord together.
- Pull both sides of the drawstring to cinch the top — your tote is done. Optional: add grommets at the casing openings to guide the cord.
💡 Tip: Thread your two drawstring cords in opposite directions through the casing — that’s what lets both sides cinch evenly when you pull.
A monogrammed tote that’s ready to gift
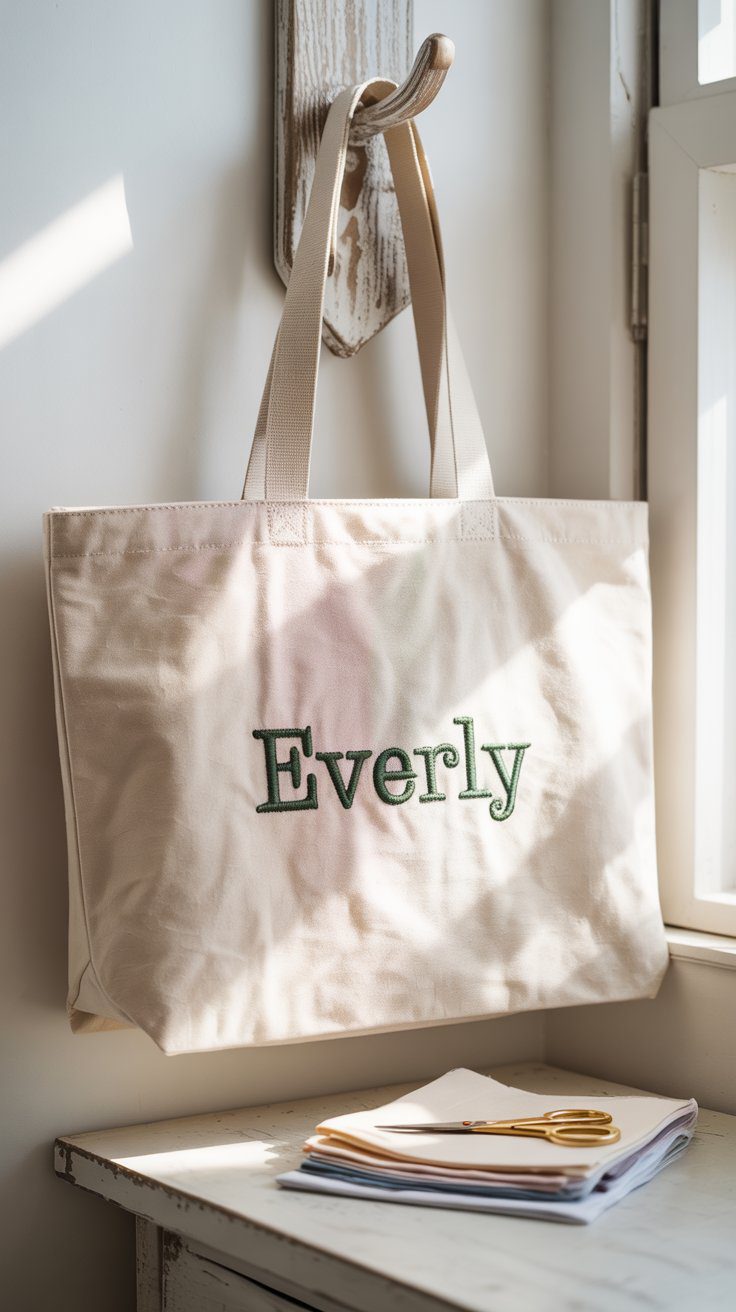
A basic tote becomes something special the moment you add a personal touch. This one is built for custom gifts, brand merch, or just showing off your style — you sew a simple flat or boxed tote, then add the design before assembly for a clean, pro-level finish.
Picture this: A crisp canvas tote with a bright monogram stitched perfectly across the front, hanging on a chair or gift hook — ready to be wrapped or filled with goodies.
You’ll need:
- Cotton canvas (1/2 yard)
- Cotton lining fabric (optional, 1/2 yard)
- Heat transfer vinyl sheets
- HeatnBond fusible appliqué adhesive
- Embroidery floss set
- Fabric paint set
- 1″ cotton webbing straps
- Cricut EasyPress mini heat press
- All-purpose polyester thread
- Rotary cutter 45mm
- Self-healing cutting mat 24″ x 36″
- Fabric scissors
- Sewing clips
How to sew it:
- Cut two 16″ x 18″ rectangles from your main fabric, two from lining (optional), and two 22″ x 2″ strips or webbing for handles.
- Personalize the front panel before sewing — iron-on vinyl with a heat press, a fused fabric appliqué, hoop embroidery, or fabric paint over a stencil all work. Center the design 3–4″ from the top edge and let it fully dry or set.
- Assemble the outer bag: front and back right sides together, sew both sides and the bottom, then box the corners for extra depth if you’d like.
- If lining, sew the lining panels the same way, leaving a 4″ gap at the bottom for turning, and box those corners to match.
- Pin handles to the outer bag 4″ in from each side seam and topstitch or baste in place with a square or X reinforcement.
- Assemble the bag: if lined, insert the outer bag into the lining, sew around the top with a 1/2″ seam, turn through the gap, and press the top.
- Topstitch around the top edge to secure the handles and close the lining gap — your personalized tote is ready for gifting.
💡 Tip: Always apply your design to a single flat panel before you sew the bag together — it’s the difference between a crisp monogram and a puckered one.
An oversized weekend hauler that fits it all

Roomy, durable, and made to haul it all, this oversized tote is the ultimate grab-and-go for road trips, beach days, or busy weekends. Sturdy handles, reinforced seams, and an inner pocket make it just as functional as it is stylish.
Picture this: A striped, oversized tote packed with a beach towel, sunscreen, and a good book, sitting next to a pair of flip-flops on a sandy beach.
You’ll need:
- Heavyweight cotton canvas/duck cloth (3/4 yard)
- Cotton twill or lining fabric (3/4 yard)
- Fusible interfacing, medium/heavy (1/4 yard)
- All-purpose polyester thread
- Wide cotton webbing straps 1.5″–2″ (24″ length)
- Rotary cutter 45mm
- Self-healing cutting mat 24″ x 36″
- Fabric scissors
- Sewing clips
- Universal sewing machine needles 90/14
- Iron and pressing mat
- Optional: pocket zippers 7–9”
How to sew it:
- Cut two 20″ x 22″ rectangles each from outer and lining fabric, two 24″ x 3″ handle strips, and optionally a 7″ x 9″ rectangle for an interior pocket.
- Fuse interfacing to the outer panels, and if sewing your own straps, fold, sew, turn, press, and topstitch both edges.
- Build the interior pocket: fold in half right sides together, sew around leaving a 2″ gap, turn, press, topstitch the top, then center it on a lining panel 3″ down and stitch the sides and bottom.
- Sew the outer bag: both sides and the bottom with a 1/2″ seam, then box the corners 3″ from each point.
- Sew the lining the same way, but leave a 5″ gap in the bottom seam for turning, and box those corners too.
- Pin the handles to the outer bag 5″ in from each side seam and baste in place, making sure they aren’t twisted.
- Insert the outer bag into the lining right sides together, pin around the top, and sew with a 1/2″ seam.
- Pull the bag through the lining opening, press the top edge, topstitch all the way around, and stitch the lining gap closed.
💡 Tip: Size your handles 5″ in from each seam instead of the usual 4″ on an oversized bag — it spreads the load better once it’s loaded down.
Picture this: six finished totes lined up on your sewing table — a classic, a reversible, a patchwork, a drawstring, a monogrammed gift, and an oversized weekend bag — and every one of them started from the same box of scraps.
Grab the whole supply list in one place
Cotton canvas, cotton webbing, thread, and a rotary cutter cover almost every tote on this list — here’s everything in one search.
Shop the full supply list →Five more totes for every occasion
A sturdy grocery tote that replaces the plastic bag

Sturdy, washable, and made from fabric you probably already have, this eco-friendly tote is a real alternative to plastic bags. Reinforced corners and wide straps mean it’s built to carry produce, pantry staples, and anything in between.
Picture this: A durable denim tote made from upcycled jeans, stuffed with fresh veggies and a baguette, sitting on a kitchen counter ready to unpack.
You’ll need:
- Upcycled denim jeans (outer fabric)
- Heavyweight cotton canvas scraps
- Cotton muslin (lining, 1/2 yard)
- All-purpose polyester thread
- 1″ cotton webbing straps (24″)
- Fusible interfacing (optional, 1/4 yard)
- Rotary cutter 45mm
- Self-healing cutting mat 24″ x 36″
- Fabric scissors
- Sewing clips
- Universal sewing machine needles 90/14
- Iron and pressing mat
How to sew it:
- Cut two 16″ x 18″ rectangles from upcycled denim (or your outer fabric of choice) and two from lining. Patch smaller pieces together with flat-felled seams if needed, and fuse interfacing for structure.
- Prep the handles: cut two 24″ x 2.5″ strips, fold, and stitch, or use ready-made cotton webbing.
- Sew the outer bag right sides together down both sides and the bottom with a 1/2″ seam, then box the corners at 2″ from each point.
- Sew the lining the same way, leaving a 4″ gap at the bottom for turning, and box those corners.
- Pin the handle ends to the outer bag 4″ from each side seam, raw edges aligned with the top, and baste in place.
- Insert the outer bag into the lining, pin around the top, and sew with a 1/2″ seam.
- Pull the bag through the gap, push the lining inside, press the top edge, and topstitch all the way around for a reinforced finish.
💡 Tip: Old denim already has the structure a grocery tote needs — flat-fell your patch seams instead of just overlapping them so they hold up under a full load.
A tote that folds into its own pocket
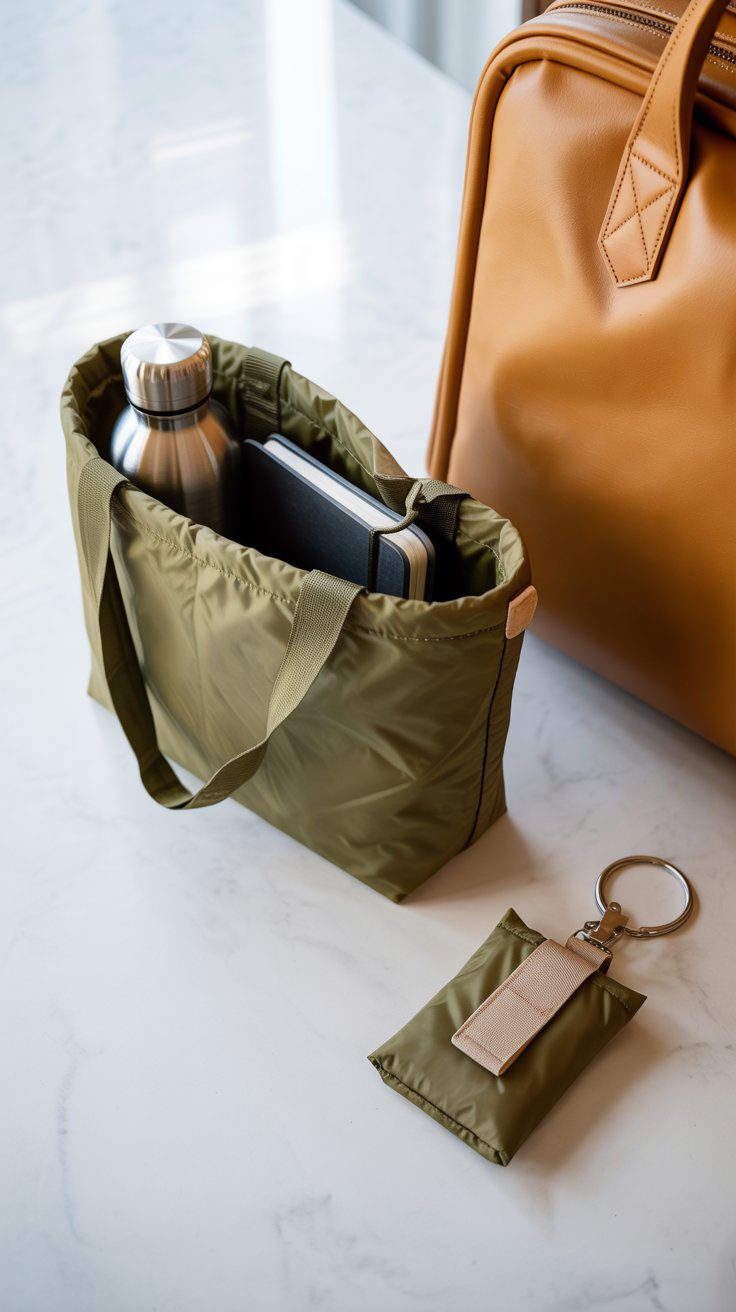
Lightweight, compact, and made for on-the-go convenience, this tote folds into itself for easy storage. Keep it in the glove box, a suitcase, or a backpack and unfold it whenever you need extra carrying space.
Picture this: A simple nylon or cotton tote that folds into a built-in pouch, tucked into the corner of your carry-on or clipped to your keychain — ready for spontaneous shopping, farmers markets, or travel days.
You’ll need:
- Lightweight ripstop nylon (1/2 yard)
- Quilting cotton (alternative outer fabric)
- All-purpose polyester thread
- Velcro sew-on strips (1″ wide)
- Plastic snap kit (alternative to Velcro)
- Small carabiner keychain clips
- Rotary cutter 45mm
- Self-healing cutting mat 24″ x 36″
- Fabric scissors
- Sewing clips
- Universal sewing machine needles 80/12
- Iron and mini pressing mat
How to sew it:
- Cut two 16″ x 18″ panels for the body, two 22″ x 2″ strips for handles, a 5″ x 5″ square for the fold-up pouch, and a 1″ x 2″ strip of hook-and-loop or a snap.
- Make the handles: fold, sew, turn, press, and topstitch both long edges.
- Prep the pouch: hem one edge of the 5″ square, attach the closure opposite the hem, then baste it to the inside of one body panel with the hemmed edge at the top.
- Sew the tote body right sides together down both sides and the bottom with a 1/2″ seam — box the corners if you want a structured base — then turn right side out and press.
- Pin the handles to the right side of the bag, 4″ from each side seam, and topstitch securely.
- Fold the bag into its own pouch: fold the sides inward, roll up, and tuck into the pocket, closing it with the hook-and-loop or snap. Optional: clip on a carabiner.
💡 Tip: Attach the closure to the pouch panel before you sew the tote together — it’s nearly impossible to add cleanly once the bag is assembled.
A see-through tote built for stadium rules

Perfect for concerts, sporting events, or anywhere security rules require see-through bags, this tote combines style and function with minimalist construction and a polished finish.
Picture this: A clear vinyl tote with sturdy fabric handles and contrasting bias tape edges, holding event essentials like a wallet, sunglasses, and phone — easy to check and easy to carry.
You’ll need:
How to sew it:
- Cut two 14″ x 14″ vinyl panels for the body, plus a 4″ x 14″ bottom gusset strip (and optional 4″ x 14″ side gussets for extra depth).
- Clip — don’t pin — webbing handles to the top of each panel, 4″ from each edge, and stitch with a square and X-box reinforcement.
- Clip the bottom edge of each panel to the gusset strip and stitch with a 3/8″ seam allowance; attach the side gussets the same way if using them.
- Bind every raw edge with double-fold bias tape — top edge first, then sides and bottom — stitching carefully to fully encase the raw vinyl.
- No turning required: this tote is built right side out from the start. Wipe it clean and it’s ready for game day.
💡 Tip: Use sewing clips instead of pins on vinyl — pin holes don’t close back up, and they’ll show permanently on a clear bag.
A round-bottom bucket tote with real depth

This tote gives you more depth than a flat tote and a more stylish silhouette than a typical grocery bag. With a round base and a gathered drawstring top, it’s ideal for yarn, makeup, baby essentials, or just an everyday casual carryall.
Picture this: A soft canvas or linen tote with a gathered top and circular base, cinched with rope or fabric ties, sitting by your front door ready to grab and go.
You’ll need:
- Medium-weight cotton canvas/linen (1/2 yard outer)
- Cotton fabric (1/2 yard lining)
- Cotton rope cord (1/4″, 30″ length x2)
- Satin ribbon (alternative drawstring)
- Metal grommet kit (optional)
- All-purpose polyester thread
- Rotary cutter 45mm
- Self-healing cutting mat 24″ x 36″
- Fabric scissors
- Sewing clips
- Universal sewing machine needles 90/14
- Iron and pressing mat
How to sew it:
- Cut two 22″ x 12″ rectangles each from outer and lining fabric, two 6″ diameter circles for the base, and two 1.5″ x 22″ strips for the drawstring channel.
- Sew the side seams of each outer rectangle into a cylinder, repeat with the lining, then sew a circular base to the bottom of each, clipping the edges to ease it in.
- Fold each channel strip lengthwise wrong sides together, fold in the short ends 1/2″ and press, then sew to the top of the outer cylinder, leaving the ends open for the cords.
- Place outer and lining right sides together, sew around the top with a 1/2″ seam, leaving a 3–4″ gap for turning.
- Turn the bag right side out through the gap, press the top, and topstitch all the way around.
- Thread one cord through both channels left to right and the second right to left, then tie or add cord stops. Optional: reinforce with grommets or rivets.
💡 Tip: Clip the edges of your fabric circle before you sew it to the cylinder — that’s what lets a round base ease in smoothly without puckers.
A zip-top tote structured enough for work

Structured, stylish, and functional, this tote has a full zipper top, a flat bottom, an interior zip pocket, and clean boxed corners — ideal as a work bag, overnight tote, or carry-on.
Picture this: A mustard-yellow canvas tote with navy leaf print, unzipped to reveal a bold lining and interior zipper pocket. Sturdy handles run down the sides, sewn into the seams for structure and style.
You’ll need:
- Heavy cotton canvas (by the yard)
- Cotton twill or quilting cotton lining
- Fusible interfacing (medium/heavy)
- 18″ handbag zipper
- 7–9″ zipper for pocket
- Cotton webbing straps (1″–1.5″, 24″)
- All-purpose polyester thread
- Zipper foot presser attachment
- Rotary cutter 45mm
- Self-healing cutting mat 24″ x 36″
- Fabric scissors
- Sewing clips
- Universal sewing machine needles 90/14
- Iron and pressing mat
How to sew it:
- Interface all outer panels for structure, then prep handles by folding strips in half lengthwise, folding raw edges to center, pressing, and topstitching both sides.
- Build the interior zipper pocket: fold pocket fabric right sides together to 8″ x 5″, center the zipper along the fold and stitch, topstitch, then sew onto a lining panel 3–4″ down from the top.
- Assemble the outer panels — sides to front and back, bottom panel connecting the sides — then repeat for the lining, leaving a 4″ gap in the lining’s bottom seam.
- Install the top zipper: center it face down on the outer top edge with the lining on top (right sides together), stitch with a zipper foot, repeat on the other side, then topstitch both zipper seams.
- Form the bag body: fold right sides together, sew both short sides through the zipper ends, then box the corners 2.5″ from each point — repeat with the lining.
- Turn the outer bag right side out, keep the lining inside out, insert one into the other, align seams, and sew all the way around the top.
- Turn through the lining gap, press the top seam, topstitch around the zipper, and close the lining gap with a narrow topstitch.
- Attach the handles 4″ in from each side seam, sewing directly onto the exterior with a square or X-box reinforcement.
💡 Tip: Install the zipper before you box the corners — trying to fit a zipper foot around a fully boxed bag is the fastest way to end up with crooked topstitching.
Picture this: a grocery tote by the door, a fold-up stashed in your glove box, a clear bag ready for game day, a bucket bag for yarn, and a structured zip-top for work — five totes, five completely different jobs.
Build a patchwork tote, start to finish

Want the slow, no-shortcuts version of a scrap-fabric tote? This is the full build — simple squares (not quilted blocks), a lining sewn separately, and buttons for a finishing touch. It’s the most forgiving project on this whole list, and a great one to learn boxed construction on before you try anything more structured.
- Prepare your fabric scraps: gather a mix of colors, patterns, and textures, then cut each into equal 6″ x 6″ squares or rectangles.
- Arrange the patchwork: lay your pieces out in a pattern you like on a flat surface or design board, then pin them together to hold the arrangement.
- Sew the patchwork: join pieces into rows with a straight stitch, iron each row flat, then keep adding rows until the whole front panel is covered. Sew the rows together into one large piece.
- Prepare the lining: cut two pieces to match the finished patchwork size, then sew the sides and bottom together, leaving the top open.
- Make the bag’s body: place the patchwork front and lining together right sides facing, pin the sides and bottom, and sew.
- Create the handles: cut two 22–24″ x 4–5″ strips, fold lengthwise right sides together, sew the edge, turn right side out with a safety pin or turning tool, and press flat.
- Attach the handles: pin them centered to the top edges of the bag and sew securely, backstitching for extra strength.
- Finishing touches: turn the bag right side out, sew on decorative buttons if you’d like, and give it a final press with the iron.
💡 Takeaway: sew your patchwork rows together before you cut the panel to size — trimming a finished patchwork square is much easier than trying to square up loose scraps mid-assembly.
Picture this: a stack of fabric scraps that would’ve gone in the trash, now a finished tote with hand-sewn buttons on the front — proof that the “boring” leftover fabric was the good stuff all along.
Loved this? Pin it.
Hover or tap the image below and hit save to keep all eleven tote tutorials on your Pinterest sewing board.
Save now, sew this weekend.
Pick your first tote and start sewing this weekend
You don’t need a pattern stash or an expensive machine — just fabric, thread, and about an hour. Start with the classic everyday tote, then work your way down the list.
Shop my tote bag supplies →This website contains affiliate links. Some products are gifted by the brand to test. As an Amazon Associate, I earn from qualifying purchases. The content on this website was created with the help of AI.
This website contains affiliate links. Some products are gifted by the brand to test. As an Amazon Associate, I earn from qualifying purchases. The content on this website was created with the help of AI.
