This website contains affiliate links. Some products are gifted by the brand to test. As an Amazon Associate, I earn from qualifying purchases. The content on this website was created with the help of AI.
Winter is the coziest time to unleash your creativity, and what better way to do that than with these fun, easy-to-make crafts? Whether you’re transforming your home into a winter wonderland or simply keeping your hands busy while you relax, these 6 winter DIY projects will add warmth and charm to your season. From plush chunky knit blankets to sparkling mason jar lanterns, each craft is designed to bring comfort and beauty to your home — and it’s all simple enough for anyone to do. Ready to dive into these cozy projects? Let’s get crafting and make this winter the most creative yet!
1. DIY Chunky Knit Blanket
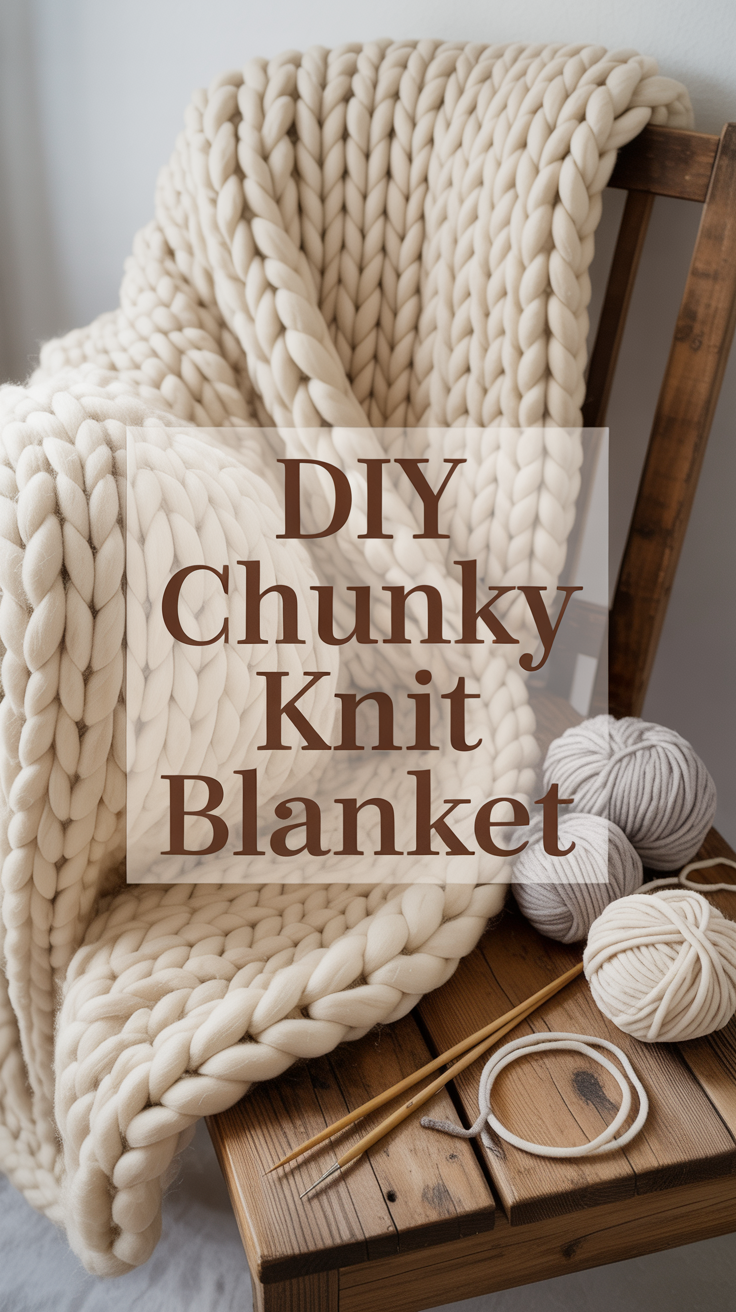
You’re making a thick, hand-knit blanket using jumbo yarn — no needles required. This project is perfect for beginners and makes a cozy, modern statement piece for your bed or sofa.
Steps:
- Measure your space to decide blanket size (lap throw: ~40×60”, full: ~50×70”).
- Use 5–7 skeins of jumbo yarn depending on thickness and size.
- Create a slip knot and form your foundation chain by looping the yarn with your hands or arms.
- Continue arm-knitting (or hand-looping) row by row, keeping loops even for consistent stitches.
- Once you reach your desired length, pull the tail through the final loop to secure.
- Weave in or tuck ends underneath the loops for a clean finish.
- Lightly shake or stretch to even out the stitches.
Shopping List:
- Jumbo Chenille Yarn, 8.8 lbs Skein – Amazon
- Large Surface Mat for Arm Knitting – Amazon
- Fabric Scissors for Thick Yarn – Amazon
- Storage Basket for Yarn – Amazon
Dos and Don’ts:
- Do choose high-quality jumbo chenille or merino yarn — cheaper blends shed easily.
- Do measure your space before starting; arm-knit blankets stretch.
- Don’t pull loops too tight; it ruins the soft, chunky look.
- Don’t machine wash; spot clean or hand wash gently to preserve texture.
2. Snowflake Window Clings

You’re making reusable, handmade snowflake clings that turn any window into a frosted winter display. They look delicate but are durable enough to reuse year after year.
Steps:
- Lay a sheet of wax paper or a clear plastic sheet flat on your workspace.
- Place a printed snowflake stencil underneath it (or freehand your own).
- Use white puffy paint to trace or draw your snowflakes, keeping lines slightly thick for durability.
- Let the designs dry undisturbed for 24 hours until they’re firm to the touch.
- Carefully peel them off and press onto clean, dry windows — no adhesive needed.
- When winter’s over, store them flat between parchment sheets to reuse next year.
Shopping List:
- White Puffy Paint – Amazon
- Wax Paper Roll – Amazon
- Reusable Plastic Sheets for Crafts – Amazon
- Snowflake Stencil Set – Amazon
Dos and Don’ts:
- Do keep the paint layer even — too thin and it will tear, too thick and it won’t dry properly.
- Do clean your windows first so clings stick smoothly.
- Don’t move them before they’re fully dry; puffy paint needs full curing time.
- Don’t store in direct sunlight or heat — they’ll warp or lose flexibility.
3. Cinnamon Stick Candles
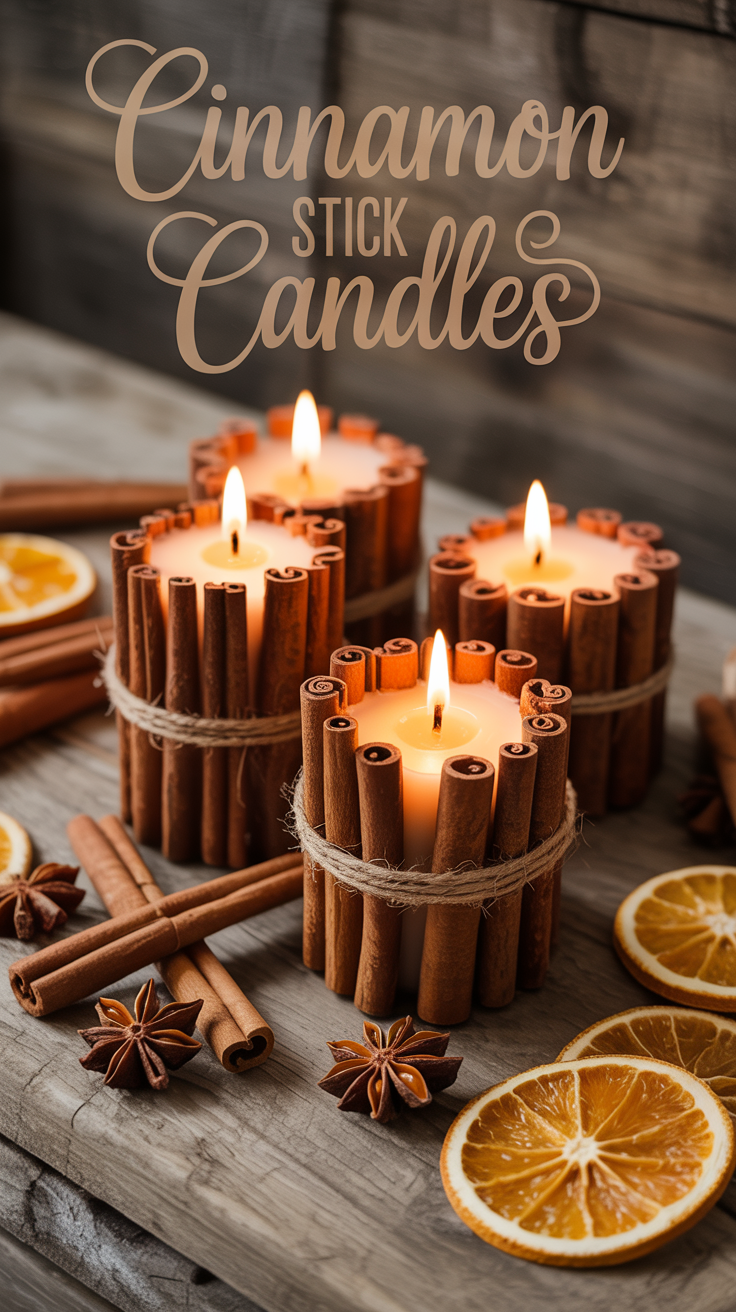
You’re making rustic, aromatic candles by wrapping plain pillars in natural cinnamon sticks. These look high-end on mantles and smell like pure winter comfort when the wax warms.
To make cinnamon stick candles safely, start by selecting a safe wick that burns at a low temperature. Use a wax with a low melting point, such as soy or beeswax, and ensure it’s melted properly before pouring. Bundle the cinnamon sticks tightly around the wick, making sure they don’t touch the flame directly. The wax surrounding the sticks will act as a barrier, preventing them from catching fire. Always ensure the cinnamon sticks are dry and not too thick, as this will reduce any risk of combustion. Lastly, avoid leaving the candle unattended while burning.
The best wick for cinnamon stick candles is a cotton or wooden wick. Cotton wicks provide a stable burn and work well with the low-melting point of soy or beeswax, ensuring a clean burn. Wooden wicks give a pleasant crackling sound and work well with thicker wax blends. Choose a wick with a size appropriate for the diameter of your candle to ensure proper burning without causing the cinnamon sticks to catch fire. Always test the wick in your candle to ensure it burns evenly.
To choose the right wick size for candles, consider the diameter of your container or mold. A larger wick is needed for larger candles to ensure it burns evenly without tunneling. For small candles, a thinner wick is more appropriate. The wick should match the size of the candle to create an even melt pool and steady flame. You can use a wick size chart as a guideline, but it’s important to test different sizes to ensure optimal performance based on the wax type, fragrance load, and the specific size of your candle.
Steps:
- Choose pillar candles about 3–4 inches in diameter. White or cream gives the cinnamon color a clean contrast.
- Break or cut cinnamon sticks to match the candle height.
- Add a small line of hot glue vertically down each stick and press it firmly against the candle, side by side, all the way around.
- Wrap twine around the middle to hold them securely or finish with a decorative ribbon for a festive touch.
- Optional: place the finished candle on a wood coaster or small dish to protect surfaces from wax drips.
Shopping List:
- Plain Pillar Candles (3-Pack) – Amazon
- Cinnamon Sticks (Bulk Pack) – Amazon
- Hot Glue Gun Kit – Amazon
- Natural Jute Twine – Amazon
Dos and Don’ts:
Don’t glue sticks too tightly; a bit of spacing allows air to circulate and prevents cracking.
Do use real cinnamon sticks, not decorative ones; the scent comes alive when gently warmed.
Do place your candle on a heat-safe surface before lighting.
Don’t let the flame burn close to the cinnamon — it’s flammable; keep it centered.
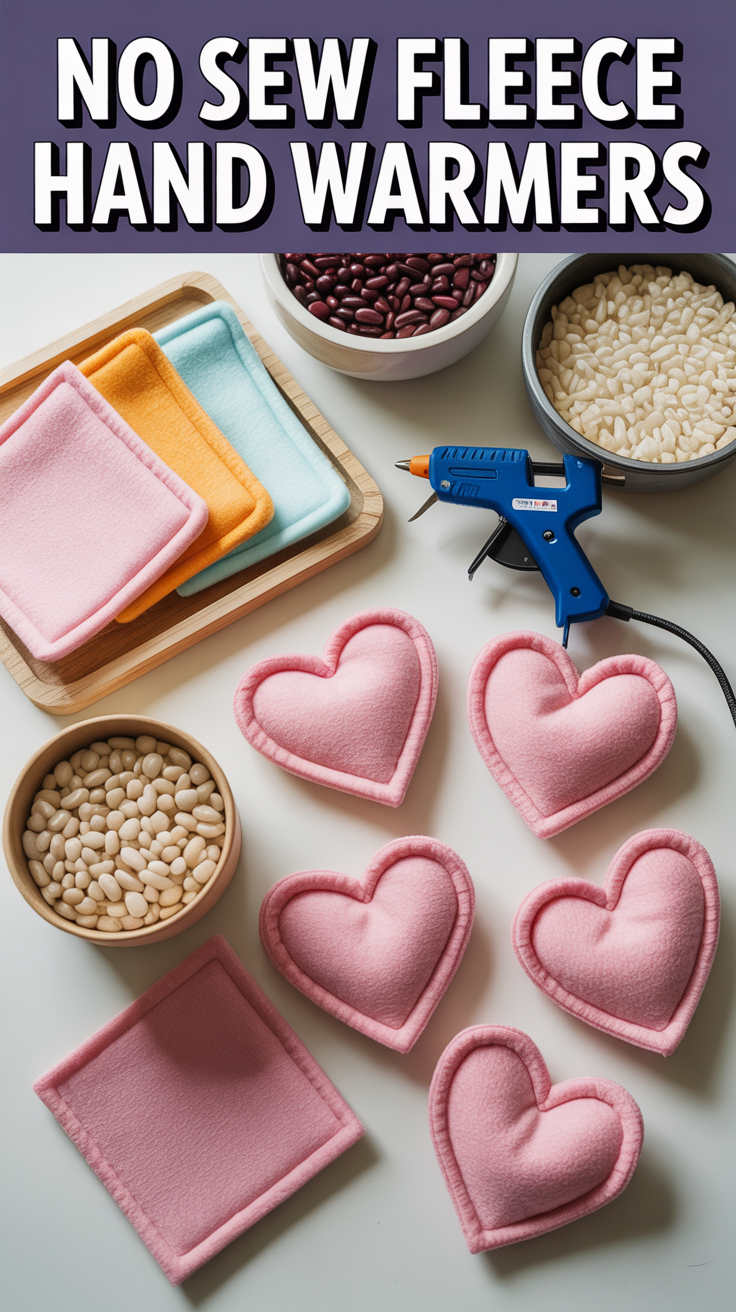
4. No-Sew Fleece Hand Warmers
You’re making cute, customizable hand warmers using fleece fabric and rice or beans. These are perfect for keeping your hands warm during chilly days or as a thoughtful gift. To make no-sew fleece crafts like hand warmers, start by cutting your fleece fabric into desired shapes, such as small squares (about 4×4 inches) or heart shapes. Use fabric glue or a hot glue gun to seal three sides of each piece, leaving one side open for filling. Fill the open side with rice or dried beans, but be sure not to overpack it so that the warmer remains flexible. Once filled, glue the last edge shut and allow the glue to dry completely. You can heat the warmers in the microwave for 20-30 seconds before use. These hand warmers are ideal for gifting or personal use during chilly weather.
The best type of fleece for making hand warmers is soft, medium-weight fleece. Fleece that is thick enough to hold rice or beans without tearing but not so thick that it restricts flexibility works best. Microfleece or polar fleece are popular choices because they are soft to the touch, durable, and retain heat well. Choose fleece that is non-pill and non-stretch for a lasting and comfortable hand warmer. Avoid using flimsy or overly thin fleece, as it may not hold up well to repeated microwaving.
Shopping List:
- Fleece Fabric Scraps (Assorted Colors) – Amazon
- Rice or Dried Beans (Bulk Pack) – Amazon
- Fabric Glue (Non-Toxic) – Amazon
- Hot Glue Gun Kit – Amazon
To prevent fleece from pilling in crafts, use fleece that is tightly woven and non-stretch. Pre-wash the fabric to remove any loose fibers and avoid washing it repeatedly once it’s made into a craft item. When cutting fleece, ensure you use sharp scissors to avoid fraying. Additionally, avoid over-drying fleece in the dryer as this can cause the fabric to pill. After crafting, keep fleece items away from rough surfaces that may cause friction, which can lead to pilling.
You can use beans instead of rice for hand warmers. Dried beans are an alternative filler material, though they tend to retain heat slightly longer than rice. However, beans may not heat as evenly as rice, so it’s important to avoid using very small beans. Additionally, ensure that the beans are not packed too tightly in the hand warmer to allow flexibility and even heat distribution when microwaving.
To make fleece hand warmers in different shapes, first cut the fleece fabric into your desired shapes, such as squares (about 4×4 inches) or hearts. Once cut, use fabric glue or a hot glue gun to seal three sides of each piece, leaving one side open for filling. Fill the open side with rice or dried beans, but make sure the filler is not overpacked to allow for flexibility. Then, glue the last edge shut and allow it to dry completely. For a polished look, ensure that the edges are sealed neatly to create a smooth, rounded finish.
Dos and Don’ts:
Don’t use beans if they are too small; they might not heat evenly.
Do choose soft fleece for comfort — a flannel or cotton fabric works too but might not last as long.
Do make sure the filler isn’t over-packed to allow the warmer to mold to your hands.
Don’t overheat in the microwave — test the first few to ensure they’re not too hot.
5. Pinecone Fire Starters

These rustic fire starters are both functional and decorative, perfect for a cozy fire on winter nights. With the addition of essential oils, they also offer a lovely fragrance to enhance your environment.
Shopping List:
- Pinecones (Bulk Pack) – Amazon
- Paraffin Wax or Old Candles – Amazon
- Twine (Natural Jute) – Amazon
- Essential Oils (Lavender, Cinnamon) – Amazon
To make pinecone fire starters, you will need pinecones, wax (such as paraffin or beeswax), cotton wicks, and optional materials like dried autumn leaves, birch bark, and twine for decoration. First, melt the wax in a double boiler. Once the wax is melted, dip the pinecones into the wax, ensuring they are fully coated. After coating, attach a cotton wick to the top of each pinecone while the wax is still soft. Allow the wax to harden completely. For a decorative touch, you can nestle the pinecones among dried leaves, bark, or tie them with twine. These fire starters can be used to start fires easily, especially in fireplaces or outdoor fire pits.
The best wax for pinecone fire starters is beeswax, as it burns slowly and produces a steady flame. Beeswax is a natural, non-toxic option that works well for fire starters. Paraffin wax is also a good choice as it is more affordable and easy to work with, but it may burn faster than beeswax. Both waxes work effectively, but beeswax offers a longer burn time and a more pleasant aroma when burned.
You can also enhance the pinecone fire starters by adding fragrance oils, such as cinnamon or pine, to the wax before coating the pinecones. Additionally, you could incorporate glitter or small decorative elements to make them visually appealing, especially for gifts. To increase their functionality, consider adding a bit of essential oil for a pleasant scent while burning. For safety, make sure the cotton wick is long enough for proper burning without risk of it being smothered by the wax coating.
You could also consider adding color to the pinecone fire starters by mixing dye into the wax before coating the pinecones. Additionally, for a more unique touch, try incorporating small decorative elements like dried flowers, cinnamon sticks, or even small pine needles to enhance the look. If you want to make them extra festive, you could also use scented oils like cinnamon, pine, or vanilla to give off a pleasant aroma when the fire starters burn. These small tweaks can make the fire starters more personalized and appealing, whether for gifting or personal use.
Dos and Don’ts:
Don’t use too much essential oil — a few drops go a long way to avoid overwhelming the scent.
Do make sure the pinecones are fully dry before waxing to avoid trapping moisture.
Do choose wax that burns cleanly, like paraffin or soy wax.
Don’t dip pinecones too deep; you want to coat them halfway for the best burn.
6. Frosted Mason Jar Lanterns
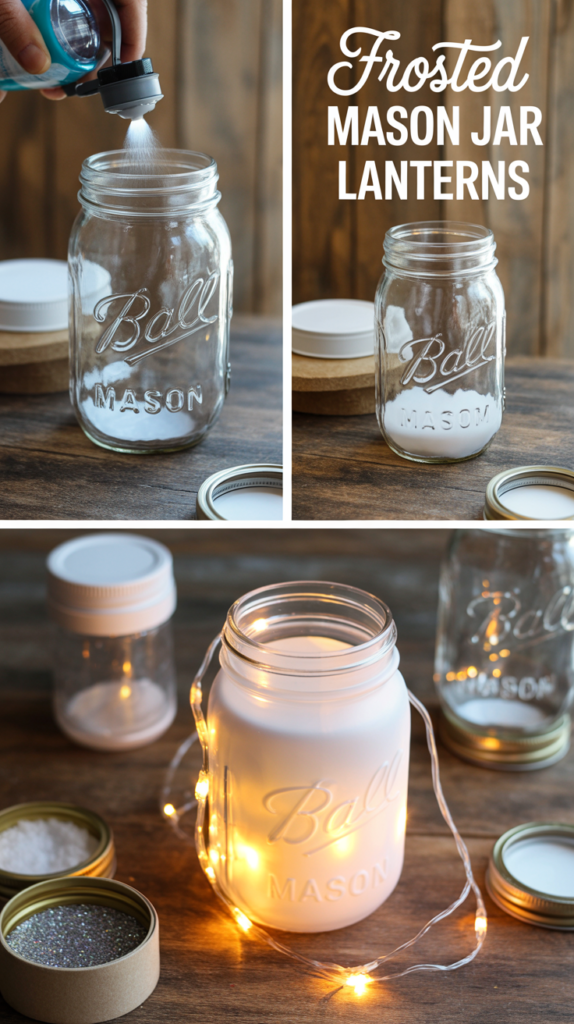
To make a frosted mason jar lantern, first clean the mason jar thoroughly. Then, apply a frosted glass spray or create a DIY frost effect using a mixture of Epsom salt and water or by applying Mod Podge and fine glitter. Spray or brush the solution evenly over the jar’s exterior and let it dry completely. Once the jar is frosted, insert a small LED string light or a battery-operated candle inside. The frosted glass will diffuse the light beautifully, creating a soft glow perfect for decoration or ambiance.
Steps:
- Start by spraying the outside of each mason jar with frosted glass spray paint. Apply evenly and cover the entire surface, leaving a slight opening near the top for the light.
- Let the jars dry completely (at least 1–2 hours).
- Once dry, tie a piece of twine or ribbon around the neck of the mason jar for added decoration.
- Place a small candle or LED light inside the jar to complete the look. LED lights are a safe option for creating a long-lasting glow without any fire hazards.
- Arrange your lanterns along windowsills, on mantels, or around the house for a festive, cozy atmosphere.
Shopping List:
- Mason Jars (12-Pack) – Amazon
- Frosted Glass Spray Paint – Amazon
- Twine or Ribbon – Amazon
- LED Candles (Set of 6) – Amazon
Dos and Don’ts:
- Do use LED lights for safety and longer-lasting glow.
- Do apply the spray paint in light layers for an even frosted effect.
- Don’t overuse ribbon; a simple tie works best for a rustic, minimalist look.
- Don’t place candles near anything flammable if using a real candle.
For mason jar lanterns, the best lights to use are small LED string lights or battery-operated tea light candles. LED string lights offer flexibility and a soft glow that diffuses well through frosted glass, creating an ambient lighting effect. Battery-operated candles are a great option for a more traditional lantern look, providing a flickering flame effect without the need for an open flame. Both options are safe and easy to use inside mason jars, making them ideal for creating cozy, decorative lighting.
To make DIY frosted glass spray for mason jars, mix Epsom salt with water to create a solution that will give the jar a frosted appearance. Alternatively, you can use Mod Podge mixed with fine glitter or a premade frosted glass spray. Apply the mixture or spray evenly on the outside of the mason jar using a paintbrush or by spraying. Let it dry completely before using it in your lantern project. This creates a soft, frosted look that beautifully diffuses light when you insert LED string lights or a battery-operated candle.
This final craft will keep your home warm and inviting all season long. Enjoy these cozy DIYs and embrace the winter vibes!
A glowing mason jar on your windowsill, its frosted surface diffusing the light beautifully. The rustic twine adds a handmade touch that’s perfect for winter nights.
Final Thoughts
These six cozy winter crafts are the perfect way to embrace the season and add a personal, creative touch to your home. Whether you’re making a chunky knit blanket or lighting up your space with frosted mason jars, these projects will keep your hands busy and your heart warm all winter long.
This website contains affiliate links. Some products are gifted by the brand to test. As an Amazon Associate, I earn from qualifying purchases. The content on this website was created with the help of AI.