
This website contains affiliate links. Some products are gifted by the brand to test. As an Amazon Associate, I earn from qualifying purchases. The content on this website was created with the help of AI.
The holiday season feels more meaningful when your home is filled with handmade touches. These projects bring that cozy, homespun charm — think burlap, pine, twine, and pops of red and gold — that make every corner of your space feel festive and warm. Whether you’re crafting solo or turning it into a family afternoon, these easy Christmas DIYs deliver boutique-style results with everyday materials.
1. Cardboard Christmas Trees
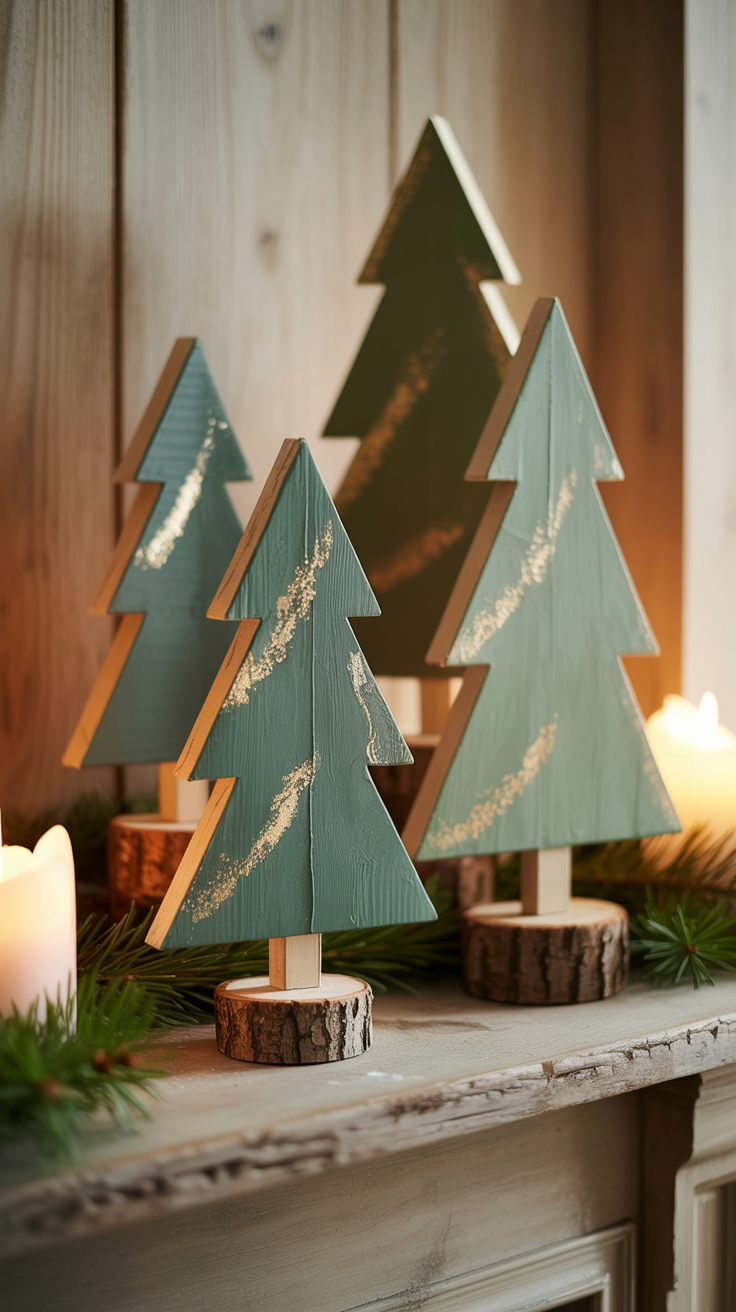
We’re starting with something simple and stylish — rustic cardboard Christmas trees. These can be displayed on mantels, bookshelves, or dining tables and made from recycled boxes.
Shopping List
How-To Instructions
- Cut your cardboard into various-sized triangles — small, medium, and tall — for layering depth.
- Paint each triangle in different shades of green for contrast. Let dry.
- Add gold foil dots or brush strokes across the surface to mimic ornaments or tinsel.
- Glue each tree to a small wood base or thick slice of log.
- Optional: lightly brush white paint on the tips for a snow-dusted look.
Dos & Don’ts
Do use thick cardboard so it stands firm.
Don’t skip painting both sides — it warps unevenly.
Do mix matte and metallic finishes for visual texture.
Don’t overload with glitter or they’ll look store-bought instead of handmade.
Finished Look & Display
Once complete, your cardboard Christmas trees will have a modern farmhouse feel — matte greens, touches of gold, and organic edges. They look beautiful clustered together on a mantel, used as a table centerpiece, or mixed into a shelf vignette with candles and pine garland.
2. Yarn Christmas Trees
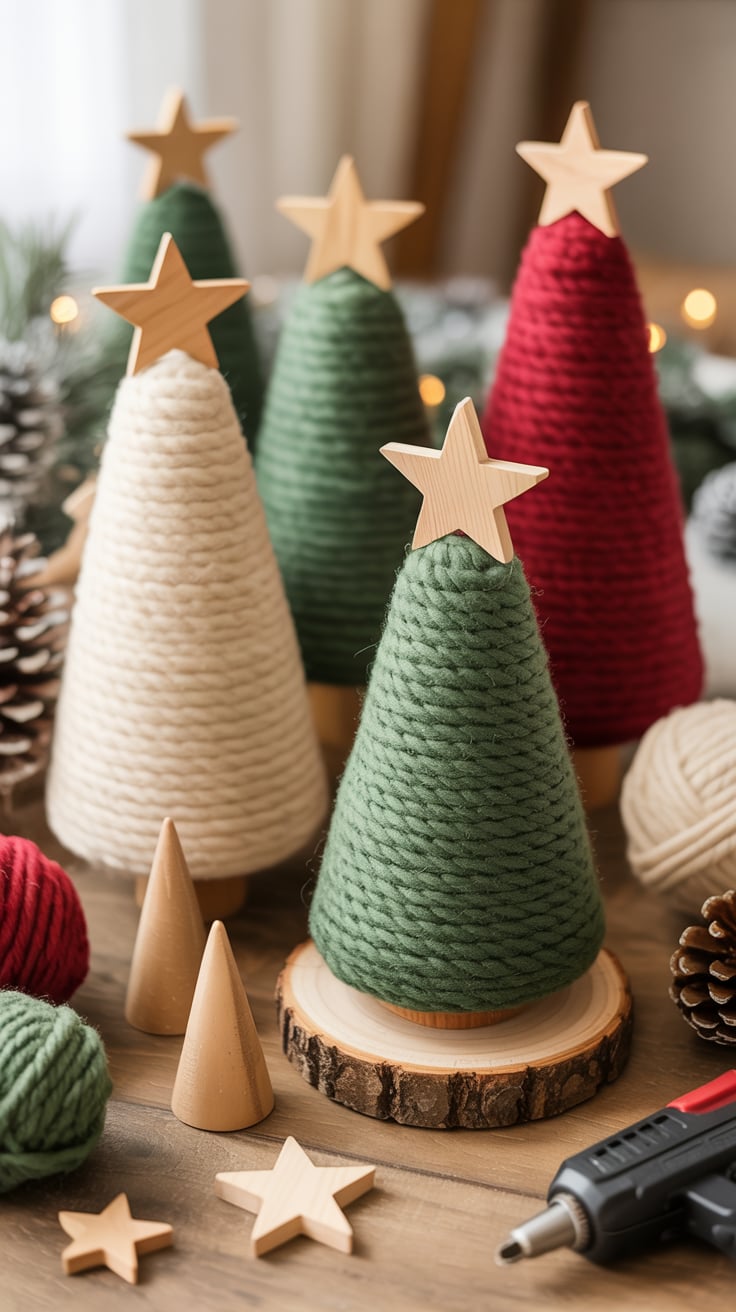
For this next craft, we’re making soft, textural yarn trees that bring instant warmth to your holiday décor. These can sit on a mantel, line a window ledge, or serve as a table centerpiece in any cozy corner of your home.
Shopping List
- Foam cones
- Chunky yarn in cream, green, and cranberry red
- Mini wooden stars
- Hot glue gun
- Gold spray paint
How-To Instructions
- Begin by applying a small dab of hot glue to the bottom of your foam cone and attach the end of the yarn.
- Wrap the yarn around the cone tightly, working your way upward in a spiral pattern. Keep each layer snug so no foam shows through.
- When you reach the top, trim the yarn and secure it with a final drop of glue.
- Lightly mist your mini wooden star with gold spray paint, let it dry, and glue it to the top of the tree.
- For extra charm, wrap a thin gold string around the tree or add tiny pearl pins as ornaments.
Dos & Don’ts
Do choose yarns in varied thickness for contrast.
Don’t use too much glue—it can seep through the fibers.
Do secure the base before wrapping.
Don’t skip finishing the underside if your trees will be viewed from above.
Finished Look & Display
Your yarn trees will have a soft, Scandinavian-inspired look — cozy textures, natural tones, and subtle shimmer. Cluster them in groups of three on a wood tray with faux snow, or pair them with candles and pinecones for a neutral yet festive display.
3. DIY Advent Calendar
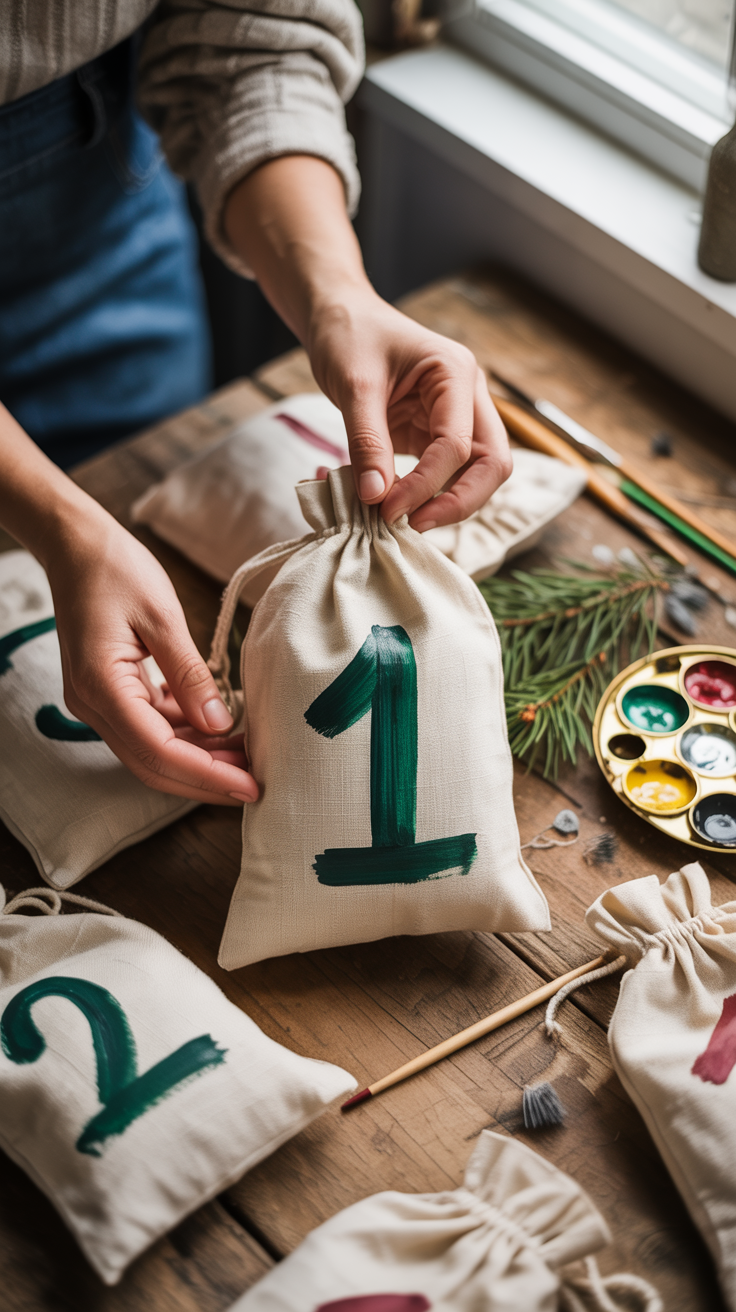
We’re making a rustic Advent calendar that doubles as wall décor and daily December magic. This one brings texture, charm, and anticipation — every bag hides a small surprise, note, or treat leading up to Christmas.
Shopping List
- Muslin drawstring bags (24 count)
- Stencil numbers or rubber stamps
- Mini clothespins
- Jute twine or rope
- Faux pine garland
How-To Instructions
- Lay out your muslin bags and number each one 1 through 24 using stencils or stamps. Let dry fully before handling.
- Cut a length of jute twine about 6 feet long (or longer for a wider display).
- Use the mini clothespins to clip each bag to the twine, spacing them evenly.
- Weave or layer faux pine garland behind the bags to add texture and fill.
- Hang your finished Advent garland across a mantel, entryway, or window frame, securing the ends with small nails or command hooks.
Dos & Don’ts
Do mix neutral fabric with greenery for balance.
Don’t overcrowd — let each bag breathe.
Do alternate bag heights for a relaxed look.
Don’t fill the bags with heavy gifts that stretch the twine.
Finished Look & Display
This DIY Advent Calendar has a Scandinavian farmhouse vibe — linen texture, wood accents, and natural greenery. When hung, it feels cozy and intentional, like something from a boutique holiday market. Display it over the fireplace, along a hallway wall, or even down a staircase banister for a warm, festive countdown that fits seamlessly into rustic décor.
4. Christmas Tree Craft Kit

This craft kit brings everything you need to create personalized mini Christmas trees. Perfect for kids or a fun family project, these tree kits add a charming, handmade touch to your holiday décor.
Shopping List
How-To Instructions
- Unbox your craft kit, which includes foam cones, glitter, mini ornaments, and tree toppers.
- Attach the foam cone to a base (typically included in the kit).
- Begin decorating your tree by gluing on the ornaments in a pattern you like. Use the included glitter for extra sparkle.
- Top the tree with the mini tree topper, and add any additional embellishments like tiny beads or ribbon if desired.
Dos & Don’ts
- Do make sure the glue is fully dry before moving the tree.
- Don’t skip the glitter — it’s part of the charm!
- Do get creative with your decoration choices for a unique, personalized look.
- Don’t overstuff the tree with ornaments—keep it balanced.
Finished Look & Display
These mini Christmas trees will have a festive, handmade feel with glittering ornaments and a variety of colors. Display them on a shelf, table, or mantel to bring cozy charm to your home this holiday season.
5. Beaded Bow Ornaments

Add a touch of elegance to your Christmas tree with these beaded bow ornaments. Perfect for a refined, handmade holiday look, these bows bring sparkle and texture to your décor.
Shopping List
How-To Instructions
- Cut a piece of wire long enough to form a bow.
- Thread your beads onto the wire, creating a beaded strand that can form the shape of a bow.
- Twist the wire at each end to secure the beads in place, shaping the wire into a bow.
- Optional: Tie a small piece of ribbon in the middle of the bow to add extra color or texture.
- Use hot glue to attach a loop at the top for hanging on the tree.
Dos & Don’ts
- Do vary the bead sizes for a more dynamic look.
- Don’t overcrowd the bow — leave some space between the beads for visual interest.
- Do use strong wire for durability.
- Don’t use too much glue, as it can seep through the beads.
Finished Look & Display
These beaded bows will shimmer on your tree, catching the light with every turn. The textured, sparkling design will complement both traditional and modern holiday themes, adding a subtle elegance to your festive décor. Hang them in clusters or as solo ornaments for a sophisticated touch.
6. Beaded Candy Cane

These beaded candy canes are a festive, fun craft that adds a personalized touch to your holiday tree or gift wrapping. They combine classic candy cane shapes with sparkling beads for a playful yet elegant ornament.
Shopping List
How-To Instructions
- Cut a piece of wire to your desired candy cane length.
- Thread red and white beads onto the wire in an alternating pattern.
- Shape the beaded wire into a candy cane form by gently bending it into a curved shape.
- Twist the ends of the wire to secure the beads in place.
- Optionally, use hot glue to add a small ribbon bow at the top of the candy cane for extra decoration.
Dos & Don’ts
- Do mix bead sizes to create a more dynamic pattern.
- Don’t overcrowd the wire — keep the beads spaced evenly for a neat look.
- Do use pliers to twist the wire securely and avoid any sharp ends.
- Don’t use wire that’s too thick — it can be hard to bend into shape.
Finished Look & Display
These beaded candy canes will add a vibrant pop of color to your tree. Their shiny, textured design makes them perfect for hanging individually or in groups, and they make a charming addition to wreaths, garlands, or as gift embellishments.
7. Cardboard Gnome
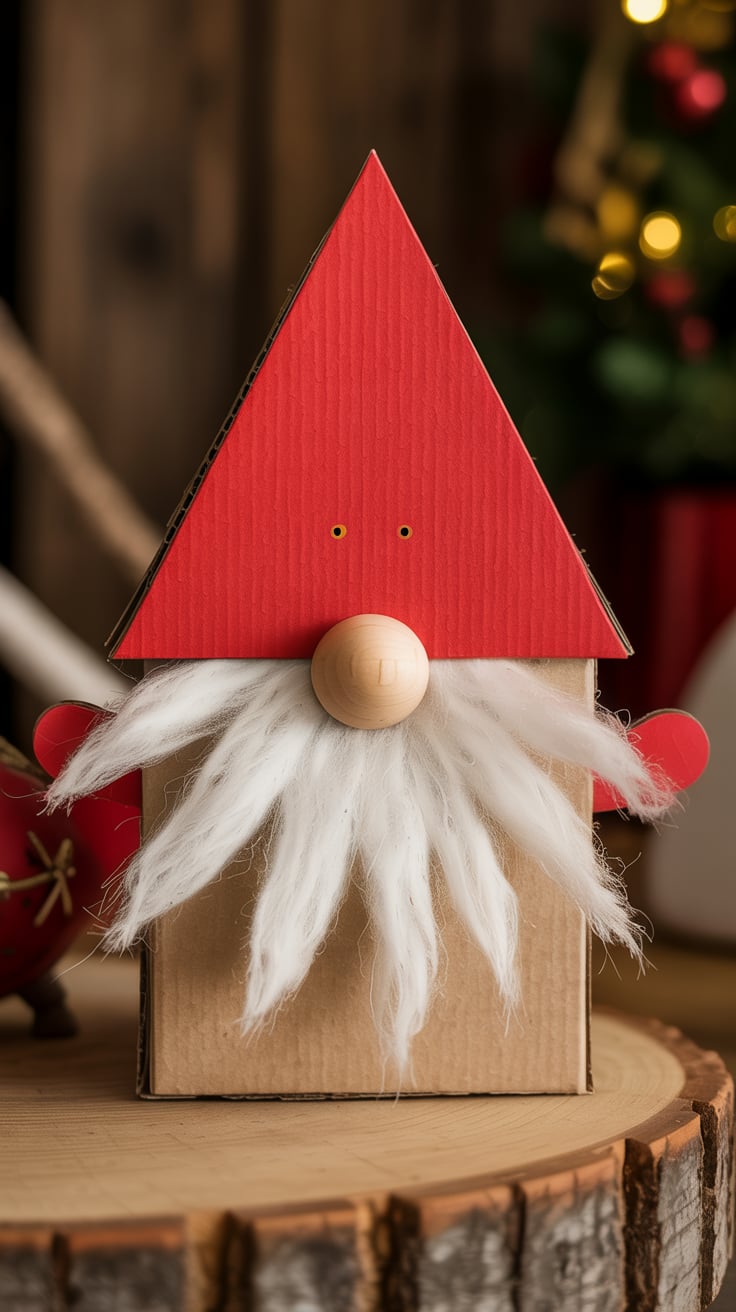
These adorable cardboard gnomes bring a whimsical touch to your holiday décor. Easy to make and customize, they can be displayed on mantels, tabletops, or alongside your Christmas tree for a fun, rustic look.
Shopping List
- Cardboard sheets
- Acrylic paints (red, white, brown, black)
- Cotton balls or faux fur
- Hot glue gun
- Scissors
How-To Instructions
- Cut a large triangle from the cardboard for the gnome’s hat and a small rectangle for the base of the body.
- Paint the hat in red and the body in a neutral color like brown or beige. Let dry.
- Cut small pieces of faux fur or cotton balls and glue them onto the bottom of the body for the gnome’s beard.
- Use a cotton ball or a wooden bead for the gnome’s nose and glue it in place above the beard.
- Optionally, add details like eyes or a button to the body for extra personality.
Dos & Don’ts
- Do use a sturdy cardboard for the gnome’s base to ensure it stands firm.
- Don’t overload with too much cotton or fur for the beard — keep it proportionate.
- Do experiment with colors and textures for a unique look.
- Don’t forget to add little details like buttons or bows to enhance the gnome’s charm.
Finished Look & Display
Your cardboard gnome will have a playful, rustic charm with its bright hat, fluffy beard, and simple features. Perfect for standing alone or as part of a festive display, these gnomes will bring a touch of holiday magic to any corner of your home.
This website contains affiliate links. Some products are gifted by the brand to test. As an Amazon Associate, I earn from qualifying purchases. The content on this website was created with the help of AI.