
This website contains affiliate links. Some products are gifted by the brand to test. As an Amazon Associate, I earn from qualifying purchases. The content on this website was created with the help of AI.
Think craft night is just glue sticks and glitter? Think again. This is grown-up DIY with wine, vibes, and Pinterest-worthy projects. It’s time to unleash your inner artist! Gather a few friends, sip some wine, and dive into these 12 creative ideas for an unforgettable adult craft night. Whether you’re a seasoned crafter or just starting out, these DIY projects will spark joy, creativity, and a whole lot of fun. Let’s get crafty!
1. DIY Elegant Candle Pots
Grab your cozy socks and favorite playlist because these DIY elegant candle pots will upgrade your space from “meh” to “wow, who lives here?!” Even if your crafting skills peak at gluing popsicle sticks together, you’ve totally got this. They look like something from a boutique home store and take about 10 minutes to make.

Shopping List from Amazon:
- Glass Jars: Hoa Kinh 2-Ounce Glass Jars (24 Pack)
- Floating Candles: Homemory Flameless Tealights (24 Pack)
- Dried Flowers: Jiva USDA Organic Dried Rose Petals
- Essential Oils (optional): Plant Therapy Essential Oil Set
Step-by-Step Instructions:
- Wash and dry the glass jars thoroughly.
- Place a small handful of dried flower petals at the bottom of each jar.
- Gently pour water into each jar, filling it about ¾ full.
- Add a few drops of essential oil to the water if you’d like fragrance (totally optional).
- Place a floating candle carefully on top of the water in each jar.
- Arrange your elegant candle pots where you want them and light ’em up. You’re curled up on the couch, sipping your go-to tea, feeling super proud because, yep, you made those.
2. Personalized Wine Glasses
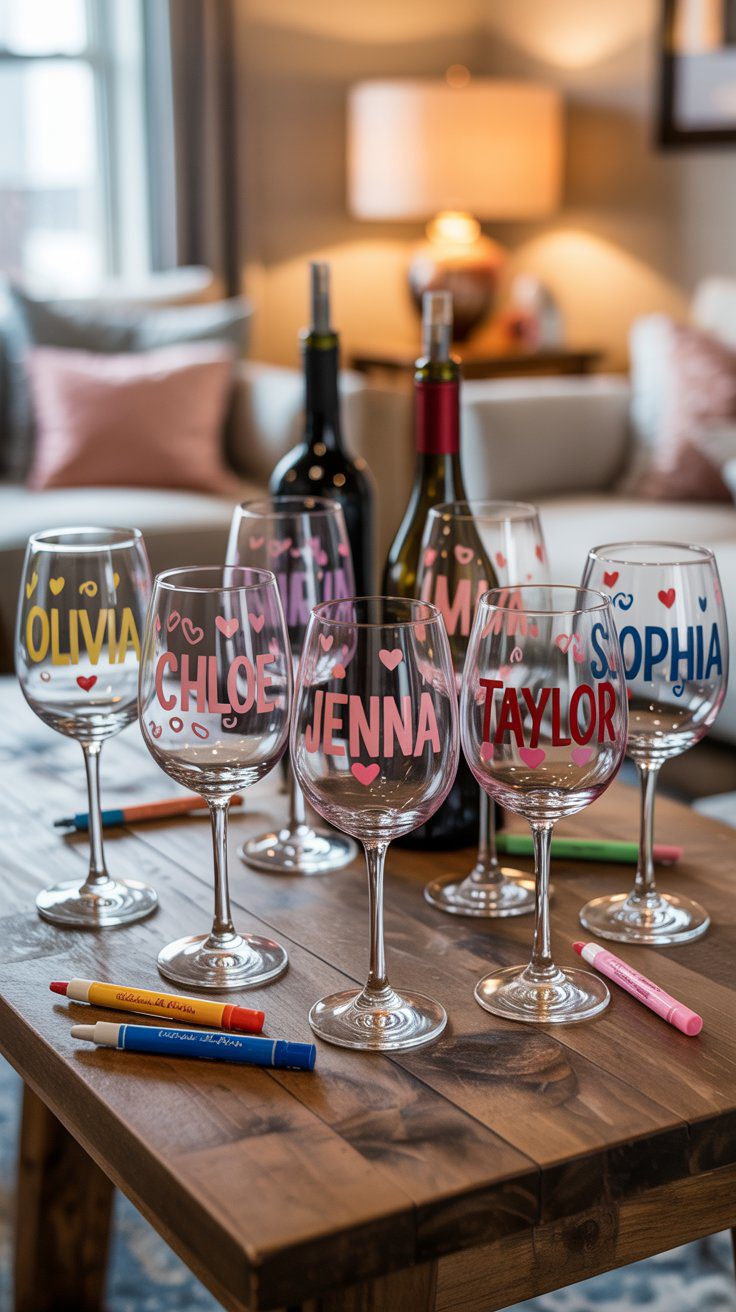
Get ready to upgrade girls’ night with your own custom wine glasses—cute, colorful, and totally handmade. Everyone goes home with a glass that has their name on it, which means no more mix-ups and a whole lot more personality on the table.
Shopping List from Amazon:
- Classic stemmed wine glasses
- Oil-based paint pens
- Paper towels or parchment
Step-by-Step Instructions:
- Clean and dry the wine glasses completely.
- Lay out paper towels or parchment to catch any mess.
- Use the paint pens to write names on each glass in big, loopy letters—Olivia, Chloe, Jenna, whatever fits your crew.
- Add dots, hearts, stars—make them playful and personal.
- Let them dry overnight before using.
Picture This:
The table’s set, glasses lined up with everyone’s name on them, and your crew’s already picking favorites. You didn’t just host a craft night—you made it personal.
3. Homemade Bath Bombs
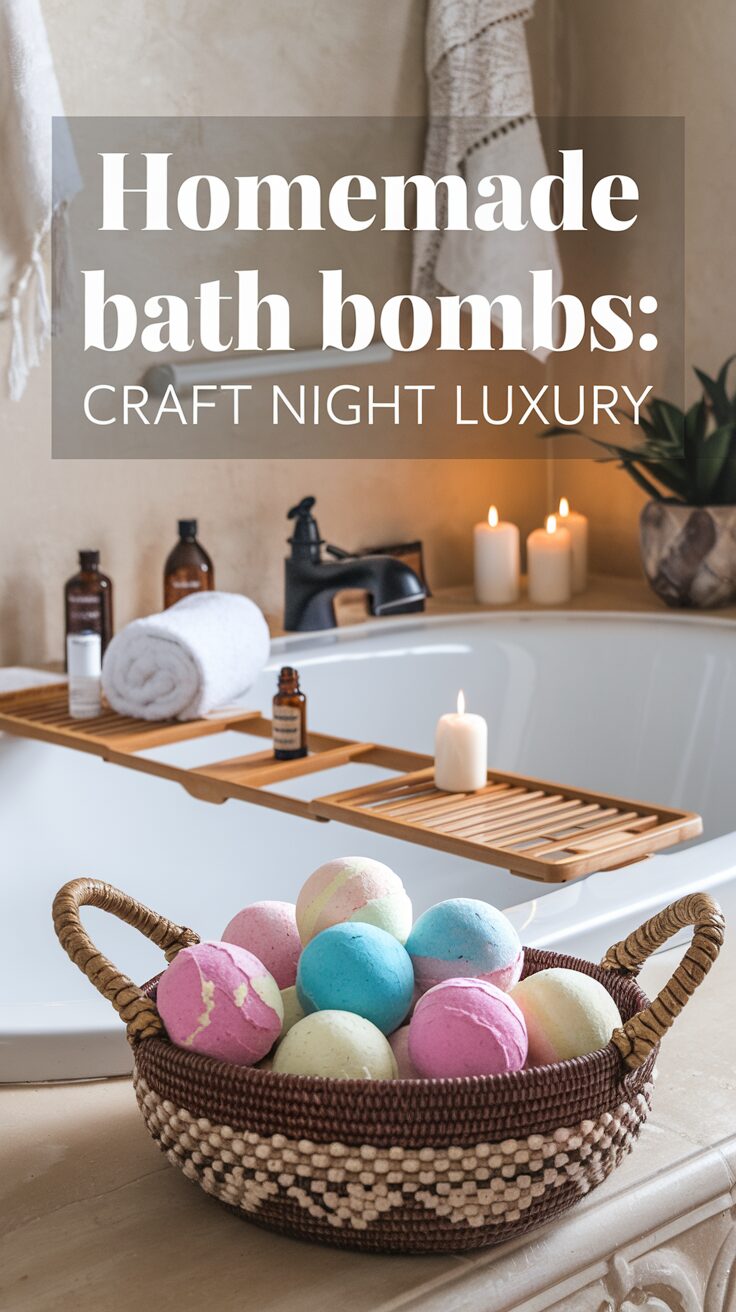
Turn your bathroom into a spa with these DIY bath bombs. They fizz, smell amazing, and look adorable stacked in a jar or basket. This is one of those craft night projects where everyone goes home with something they’ll actually use — and feel fancy doing it.
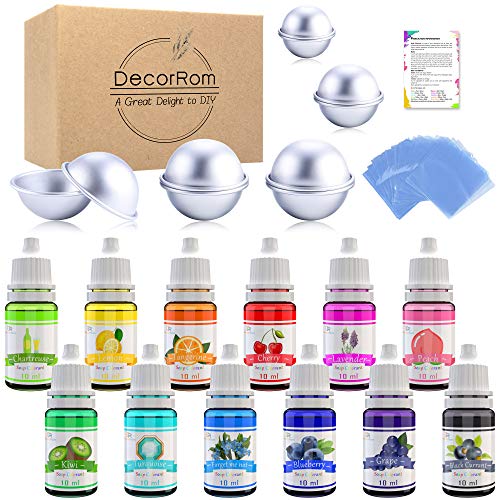
Shopping List from Amazon:
- Baking soda
- Citric acid
- Epsom salt
- Essential oils
- Spray bottle (for water or witch hazel)
Step-by-Step Instructions:
- Mix 1 cup baking soda, ½ cup citric acid, and ½ cup Epsom salt in a bowl.
- Add 10–15 drops of essential oil and stir to combine.
- Lightly spritz with water or witch hazel, stirring quickly after each spritz, until the mixture holds together when pressed (don’t over-wet or it will start fizzing).
- Pack firmly into your bath bomb molds, pressing both halves together tightly.
- Let them sit undisturbed for a few hours, then gently unmold and air dry overnight before gifting or using.
4. DIY Mini Terrariums
Mini terrariums are one of the most satisfying craft projects because you end up with a tiny, living piece of art that you actually keep. They’re low maintenance, endlessly customizable, and look stunning on a desk, shelf, or windowsill. Perfect for anyone who wants more plants in their life but keeps forgetting to water them.
What You’ll Need: Glass jar or open bowl, small rocks or pebbles, activated charcoal, potting soil, small succulents or moss, decorative elements like miniature figurines or crystals.
Step-by-Step Instructions:
- Add a 1-inch layer of small rocks or pebbles to the bottom of your jar for drainage.
- Add a thin layer of activated charcoal on top of the rocks to keep the environment fresh.
- Spoon in a 2-inch layer of potting soil, making a small well for each plant.
- Gently place your small plants or succulents, pressing roots into the soil.
- Fill gaps with moss or decorative pebbles and add any tiny figurines or crystals you want.
- Mist lightly with a spray bottle and find a bright spot to display it.
Picture This: The sunlight shines through the window, casting a warm glow on your mini terrarium. The tiny plants sway gently, adding a splash of greenery and life to your space — and you made it with your own hands in about 20 minutes.
5. Hand-Stitched Notebook Covers
If you’ve never tried embroidery, a notebook cover is the perfect place to start. The fabric is forgiving, the stitches are simple, and the end result looks like something you’d pay $30 for at a boutique stationery shop. It’s also deeply satisfying in a slow-craft, screen-free kind of way.
What You’ll Need: Plain hardcover notebooks, embroidery thread in your favorite colors, a medium-sized embroidery needle, a pencil or water-soluble fabric marker, and a simple pattern or design idea.
Step-by-Step Instructions:
- Lightly sketch your design onto the notebook cover with a pencil — florals, stars, a monogram, or abstract lines all work beautifully.
- Thread your needle and tie a knot at the end. Use a thumbtack to pre-punch holes along your design lines so the needle passes through the cover easily.
- Stitch along your design using a basic running stitch, backstitch, or cross-stitch depending on the look you want.
- Switch thread colors as you go for a more vibrant, layered effect.
- When finished, tie off the thread on the inside of the cover and trim any excess.
Picture This: Your workspace filled with beautifully hand-stitched notebooks, each one a colorful reflection of your personality — and a perfect companion for journaling, planning, or gifting.
6. Homemade Lip Balm
Homemade lip balm is one of those projects that feels way more impressive than it actually is. You’re essentially melting things together and pouring them into tubes — but the result is a completely customizable, all-natural beauty product you can tweak endlessly. Add a cute label and it becomes a perfect little gift.
What You’ll Need: Beeswax pellets, coconut oil, a drizzle of honey, essential oils in your favorite scent, lip balm tubes or small tins, and a glass measuring cup for melting.
Step-by-Step Instructions:
- Combine 1 tablespoon beeswax pellets and 2 tablespoons coconut oil in a glass measuring cup.
- Microwave in 30-second intervals, stirring between each, until fully melted and combined.
- Remove from heat and stir in a small drizzle of honey and 10–15 drops of your chosen essential oil (peppermint, lavender, and vanilla are all great options).
- Carefully pour the mixture into lip balm tubes or small tins. Work quickly — it sets fast.
- Let cool completely at room temperature (about 30 minutes) before capping and labeling.
Picture This: A little basket of your homemade lip balms, their sweet natural scents filling the air, ready to be handed out to your crew at the end of the night. Zero plastic guilt, maximum cute.
7. DIY Wall Art
You don’t have to be an artist to make wall art you’re proud of — you just have to show up with a canvas and some paint. Abstract art is incredibly forgiving, and honestly, the “mistakes” usually end up being the best parts. This is a great craft night activity because everyone’s piece looks completely different and uniquely theirs.
What You’ll Need: A stretched canvas (8×10 or larger), acrylic paints, a variety of brush sizes, a palette or paper plate, and a cup of water for rinsing.

Step-by-Step Instructions:
- Start with a base coat — cover the whole canvas in one light color and let it dry for a few minutes.
- Pick a simple theme: abstract color blocks, a sunset gradient, florals, or a word or phrase in bold lettering.
- Layer colors from dark to light, blending edges while still wet for a soft, painterly look.
- Add details or texture with a dry brush technique — dip a dry brush in paint and drag it lightly across the canvas for interesting effects.
- Let dry completely, sign your name in the corner, and hang it up.
Picture This: Your wall becomes a gallery, showcasing vibrant DIY artwork that reflects your personality — and every guest who comes over asks where you got it.
8. Upcycled Shabby Chic Furniture
Got an old side table, chair, or wooden frame that’s seen better days? Chalk paint is your new best friend. Shabby chic furniture flips are one of the most dramatic craft projects you can do — something dull becomes completely charming with a little paint and wax, and you’ll wonder why you ever threw anything out.
What You’ll Need: A small piece of old furniture or a wooden item, fine-grit sandpaper, chalk paint in a soft color (white, sage, dusty blue), clear or dark finishing wax, and paintbrushes.
Step-by-Step Instructions:
- Lightly sand the surface to remove any gloss or rough spots. Wipe off the dust with a damp cloth and let dry.
- Apply the first coat of chalk paint with a wide brush, working in long strokes. Don’t worry about being perfectly even — texture adds charm.
- Let dry fully (about 30–45 minutes), then apply a second coat.
- Once completely dry, use fine-grit sandpaper to lightly distress the edges and raised details for that authentic shabby chic look.
- Apply clear finishing wax with a brush or cloth, working in circular motions, then buff to a soft sheen. For a more aged look, use dark wax in the crevices.
Picture This: A worn-out chair transformed into a stunning rustic piece, adding charm and character to your living space — and it cost you nothing but an afternoon and a can of paint.
9. DIY Scented Candles
Making your own scented candles is one of those crafts that feels wildly therapeutic. The whole process — melting wax, blending scents, pouring into pretty jars — is as enjoyable as the finished product. And the end result? Candles that smell exactly the way you want, in whatever container makes you happy.
What You’ll Need: Soy wax flakes, candle wicks, glass jars or tins, essential oils or fragrance oils, a double boiler or microwave-safe pitcher, and a thermometer.

Step-by-Step Instructions:
- Melt soy wax flakes in a double boiler or microwave (in short bursts), stirring until fully liquid. Aim for around 170°F.
- While the wax melts, secure a wick at the center of each jar using a wick sticker or a drop of melted wax. Use a pencil or chopstick laid across the top to hold the wick upright.
- Let the wax cool to around 140°F, then add your fragrance or essential oils (about 1 oz per pound of wax). Stir gently for 30 seconds.
- Slowly pour the wax into your prepared jars, leaving about ½ inch of space at the top.
- Let cool completely at room temperature for several hours. Trim the wick to ¼ inch before lighting.
Picture This: The warm glow of your DIY scented candles fills the room with a soothing fragrance, making your home feel cozy and inviting — and you know exactly what’s in them.
10. Homemade Greeting Cards
In a world of texts and DMs, a handmade card hits different. These aren’t your average drugstore cards — they’re layered, textured, and completely one-of-a-kind. Card making is a perfect craft night activity because it’s easy to set up, everyone can work at their own pace, and you end up with a stack of meaningful cards ready to send for birthdays, holidays, or just because.
What You’ll Need: Cardstock in assorted colors, decorative paper or patterned scrapbook sheets, embellishments like stickers, washi tape, or ribbon, markers or stamp sets, and a bone folder or ruler for clean folds.
Step-by-Step Instructions:
- Cut a piece of cardstock to your desired size — 5×7 inches folded in half is a standard card size. Score and fold cleanly using a bone folder.
- Cut a slightly smaller piece of decorative paper and layer it on the front of the card using a glue stick or double-sided tape.
- Add embellishments — a stamped image, a small piece of ribbon, a handwritten quote, or sticker lettering for the main message.
- Write your personal message inside by hand for that extra-thoughtful touch.
Picture This: A collection of personalized greeting cards, each one brimming with personality and care, ready to send warm wishes to friends and family in a way that no emoji ever could.
11. DIY Jewelry
Making your own jewelry sounds intimidating until you actually try it — then you realize it’s just stringing beads and attaching hooks, and suddenly you’ve got three new bracelets and a pair of earrings before the wine is even half gone. It’s one of the most addictive craft night activities because the feedback loop is instant: you make it, you wear it.
What You’ll Need: Beads in your favorite colors and sizes, charms, earring hooks, jump rings, elastic cord or jewelry wire, needle-nose pliers, and a bead mat or tray to keep everything organized.
Step-by-Step Instructions:
- For bracelets: cut a length of elastic cord, string your beads in any pattern you like, then tie the ends together with a secure knot and trim the excess.
- For earrings: open a jump ring with your pliers, thread on your chosen charm or bead dangle, then attach to an earring hook and close the jump ring securely.
- For a layered necklace look, use varying lengths of chain and attach different charms to each.
- Lay out a few combinations before committing so you can mix and match colors and shapes.
Picture This: A set of vibrant, personalized jewelry pieces displayed on your vanity, each one adding a pop of color and style — and every time you wear them, you get to say “I made this.”
12. Custom Painted Flower Pots
Terracotta pots are basically blank canvases waiting for a glow-up. A little acrylic paint transforms them from basic to beautiful in under an hour, and you can go as simple or as detailed as you want — solid color dip-dye effects, geometric patterns, hand-lettered quotes, or wild abstract designs. Everyone in your craft night crew will end up with something totally different.
What You’ll Need: Terracotta pots in your preferred size, acrylic paint, a selection of brush sizes, painter’s tape for clean lines, a sealant or mod podge for weatherproofing, and newspaper to protect your work surface.
Step-by-Step Instructions:
- Clean the pot and let it dry completely. Apply a thin base coat of white paint if you want your colors to pop — especially on the dark terracotta.
- Plan your design and use painter’s tape to mask off any clean lines or color blocks you want.
- Paint your design and let each color dry before adding the next layer or removing tape.
- Add details like dots, stripes, or lettering with a fine brush or paint pen.
- Once fully dry, seal with a coat of mod podge or outdoor sealant to protect the paint from watering and weather.
Picture This: A cheerful corner of your home bursting with colorful painted pots that add personality and life to your greenery — and zero two are exactly alike.
Conclusion
From personalized wine glasses to beautiful mini terrariums, these 12 craft ideas are sure to make your next adult craft night a memorable one. So grab your supplies, call up your friends, and unleash your creativity! What craft project will you tackle next? Share your experiences and inspire others to join the fun — creativity is always better when it’s shared.
This website contains affiliate links. Some products are gifted by the brand to test. As an Amazon Associate, I earn from qualifying purchases. The content on this website was created with the help of AI.
