This website contains affiliate links. Some products are gifted by the brand to test. As an Amazon Associate, I earn from qualifying purchases. The content on this website was created with the help of AI.
Ever wanted to make your own luxurious, detoxifying soap, but the thought of handling chemicals like lye just screamed “danger zone”? Well, what if I told you that in just a few hours, you could be holding one of these stunning charcoal soap bars, made by you, with a super simple and safe recipe? This is soap making, simplified—all the fun, none of the fear.
Today, we’re jumping into the wonderfully creative world of melt-and-pour soap. We’re going to use the purifying power of activated charcoal to create a soap that looks incredibly chic and feels fantastic on your skin. If you’ve ever scrolled through Pinterest admiring those gorgeous handcrafted soaps, you might’ve thought, “I could never do that.” Maybe you’ve heard horror stories about traditional soap making, which involves lye, safety goggles, and a whole lot of chemistry. That process is a fantastic skill, but it requires precise measurements and a four-to-six-week waiting period for the soap to “cure.”
But here’s the secret: there’s a way to skip all of that. Melt-and-pour soap is your ticket to the fun part—designing, scenting, and getting creative—without the hassle. The soap base we use is already, well, soap. The scary chemical reaction has been done for us. All we have to do is melt it down, customize it, and pour it. It’s safe, easy, and incredibly satisfying.
In this guide, I’ll walk you through everything, starting with a simple, elegant charcoal bar. Then, for those feeling adventurous, we’ll explore some eye-catching variations, like layered designs and exfoliating scrubs. By the end of this, you’ll have the skills and confidence to create your own beautiful Charcoal melt-and-pour soaps for yourself or as amazing handmade gifts.
📌 Quick Recipe Card: Basic Charcoal Soap
Yield: 4–6 standard bars | Active time: 20 minutes | Total time: 2–4 hours (mostly cooling)
Ingredients & Supplies:
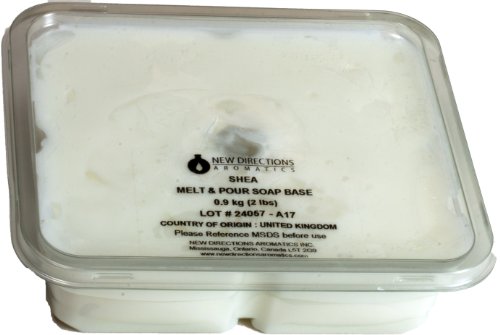
- 1 lb (454 g) shea butter melt and pour soap base
- 1–2 tsp activated charcoal powder
- 1 Tbsp 99% isopropyl alcohol in a small spray bottle
- 1 tsp carrier oil — jojoba, rosehip, or fractionated coconut (optional)
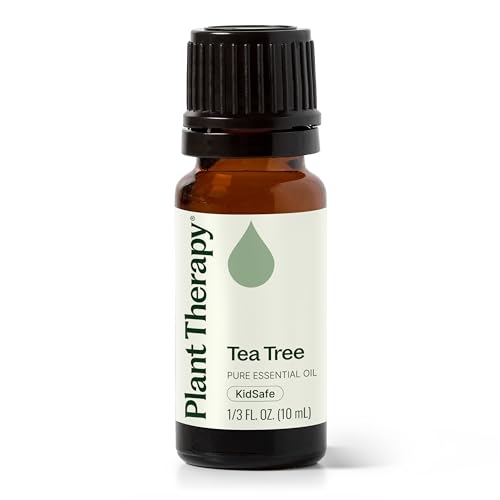
- 20 drops tea tree essential oil (or your chosen blend)
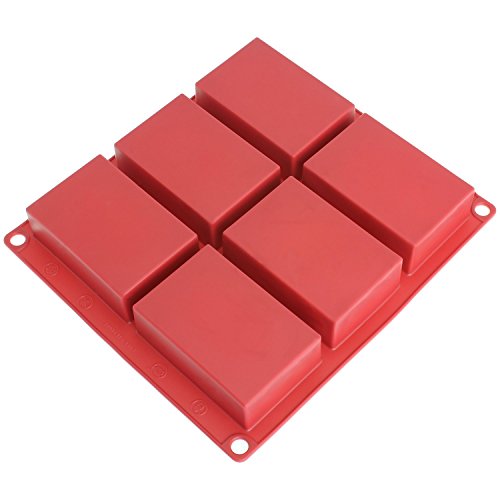
- A silicone soap mold (6-cavity rectangle works perfectly)
- Microwave-safe bowl, kitchen scale, silicone spatula, small mixing cups
The Beauty of Melt and Pour: Why It’s Your Perfect Starting Point

So, before we get our hands soapy, let’s talk about why this method is such a game-changer. The biggest hurdle for would-be soap makers is usually lye, or sodium hydroxide. In traditional soap making, it’s essential. But it’s also caustic and can cause serious burns if you’re not careful. That’s a valid fear!
Melt and pour soap completely removes that step for you. You’re starting with a pre-made block of real, stable, and safe-to-handle soap. The base is often packed with glycerin, a natural humectant. In simple terms, glycerin pulls moisture from the air to your skin, leaving it feeling soft and hydrated. That’s why these soaps feel so gentle.
The perks for a beginner are huge. First, safety. You don’t need heavy-duty goggles or gloves. The main thing to watch out for is the hot, melted soap, so while it can be a great project to do with older kids or teens, adult supervision is an absolute must when handling the hot liquid.
Second, you get instant gratification. From start to finish, you can have a ready-to-use bar of soap in just a few hours. There’s no long curing time. If you try a design and don’t love it, no big deal. You can often just remelt it and try again, or whip up a new batch in no time.
Third, it’s a dream for creativity. Melt and pour is perfect for creating soaps with sharp lines, distinct layers, and cool embedded objects—things that are much trickier to pull off with traditional methods.
Now, for the full picture, there are a couple of quirks. Because it’s so rich in that moisture-loving glycerin, your finished soap might “sweat” in humid weather, forming tiny beads of moisture on the surface. It doesn’t hurt the soap and washes right off, but to prevent it, just wrap your hardened bars tightly in plastic wrap. Also, you can’t control the base oils like you can in from-scratch soap making. However, with so many bases available—from shea butter and goat’s milk to aloe vera—you have plenty of great options to choose from.
Your Creative Palette: Gathering Ingredients and Tools
[NEW IMAGE PLACEHOLDER: Add the supplies-flatlay image here once uploaded — soap base cubes, charcoal powder in a small bowl, essential oil bottle, silicone mold, and spatula arranged on a marble counter.]
Alright, let’s get everything you need to make these charcoal beauties. It’s always a good idea to have all your ingredients and tools laid out before you start. It just makes the whole process smoother and way more fun.
First, the star of the show: your soap base. You’ll need about one pound (454 grams) of melt and pour soap base, which will make four to six standard bars. A white base will give you a cool, slate-grey soap, while a clear base will create a deeper, semi-translucent black. For extra skin-loving goodness, you could grab a shea butter or oatmeal base.
Next, our key ingredient: activated charcoal. You’ll need one to two teaspoons per pound of soap. Activated charcoal is a fine black powder famous for its detoxifying skills. Its porous surface acts like a magnet for dirt and oil, making it awesome for all skin types, but especially oily or acne-prone skin. You can find it as a loose powder or in capsules at a pharmacy—if you get capsules, you’ll just need to pull them apart.

To get that charcoal mixed in smoothly, we have a secret weapon: 99% isopropyl alcohol in a small spray bottle. We’ll use about a tablespoon of it to mix with the charcoal powder. This little step prevents clumps and ensures a sleek, uniform color. Plus, it has another magic trick: a quick spritz pops any bubbles on your soap after you pour.
Now for the extras. While optional, a little carrier oil can make your soap even more moisturizing. About one teaspoon of jojoba, rosehip, or fractionated coconut oil will do the trick. For scent, we’ll use essential oils. About 20 drops of tea tree oil is a classic choice, known for its natural antibacterial properties that pair perfectly with charcoal. Eucalyptus offers a spa-like scent, while lavender is more calming. Just make sure they’re skin-safe!
Finally, your tools. You don’t need anything fancy.
- A microwave-safe bowl or a double boiler to melt the base.
- A kitchen scale to weigh your soap base.
- A few small cups for mixing.
- A silicone spatula or spoons for stirring.
- And a soap mold. Silicone molds are best because they’re flexible and make it super easy to pop the soap out.
The Main Event: A Step-by-Step Guide to Basic Charcoal Soap
Okay, everything’s ready? Let’s make some soap! Take your time and enjoy the process.
Step 1: Prepare and Weigh Your Soap Base
First things first, chop your one-pound block of soap base into small, one-inch cubes. The more consistent the size, the more evenly they’ll melt. If you have big chunks and little bits, the small pieces can scorch before the big ones are melted. Overheating can make the base rubbery, so a little prep here goes a long way. Pop the cubes into your microwave-safe bowl.
Step 2: Gently Melt the Base
Time to melt. Place the bowl in the microwave and heat it in 30-second bursts. Stir gently with your spatula after each interval. Using short bursts gives you control and prevents overheating. Keep going until there are just a few small, soft chunks left. At that point, just stir for a minute; the residual heat will melt the rest. You want a smooth, lump-free liquid. A double boiler on the stovetop works great too—just use low heat and stir often.
Step 3: Incorporate the Activated Charcoal
This step is key for that beautiful, consistent color. In a small cup, add your one to two teaspoons of activated charcoal. Now, pour in just enough 99% isopropyl alcohol (about a tablespoon) to create a smooth, liquid paste, like black ink. Mix it until there are zero clumps.
Pour this charcoal slurry into your melted soap base and stir gently but thoroughly until the color is completely uniform. By mixing the charcoal with alcohol first, you’ve dodged any pesky speckles or clumps. The alcohol will quickly evaporate from the warm soap.
Step 4: Add Your Nourishing Oils and Scent
Time for the personal touches. If you’re using a carrier oil, add your teaspoon now and stir it in. Next, the essential oils. It’s best to add these once the soap has cooled a bit, ideally around 125–130°F (about 52–54°C). If the base is too hot, your lovely scent can just evaporate. No thermometer? No problem. Just wait a minute or two after mixing in the charcoal. Add your 20 drops of tea tree oil (or your chosen blend) and give it one last gentle stir.
Step 5: The Perfect Pour
Your gorgeous charcoal soap is ready for its new home. Give the inside of your mold a light spritz with your alcohol spray—this can help the soap release even more easily. Now, carefully pour the soap mixture into each mold cavity. You’ll probably see some bubbles form on top. That’s totally normal. To get that pro-level smooth finish, give the surface a quick, light spritz of alcohol. Watch the bubbles magically disappear!
Step 6: Patience and Cooling
And now, the hardest part: waiting! Let the mold sit on a flat surface to cool and harden completely. This can take anywhere from a couple of hours to a full day, depending on your soap’s size and the room’s temperature. Resist the urge to pop it in the fridge or freezer. Rapid cooling can sometimes make the soap brittle or cause more “sweating” later on. Let it be. You’ll know it’s ready when it’s firm and cool to the touch.
The Grand Reveal: Unmolding and Presenting Your Soap
This is the most satisfying part. Once your soap is completely hard, it’s time to unmold. Gently pull the sides of the silicone mold away from the soap to break the air seal. Then, flip it over and press on the bottom of each cavity. Your beautiful soap bar should pop right out!
Take a second to admire what you’ve made. You have a set of stunning, handcrafted charcoal soaps. If you used a loaf mold, you can now slice it into bars. A straight cutter gives a clean, modern look, while a crinkle cutter adds a cool, rustic texture. The finished soap will have a rich color and feel solid and smooth. It will create a surprisingly lush, grayish lather that cleanses without stripping your skin, leaving behind a fresh, clean scent.
Taking It to the Next Level: Creative Variations
Once you’ve nailed the basic bar, why not get a little fancy? Melt and pour makes it easy to create some seriously impressive designs. Each variation below uses the same basic technique you just learned—just with different add-ins.
Variation 1: The Layered Rose Clay and Charcoal Detox Bar
[NEW IMAGE PLACEHOLDER: Add the layered rose-clay-and-charcoal bar image here — pink-and-black two-tone bars on marble.]
This creates a stunning two-toned bar. Rose clay is a gentle clay that adds a beautiful, natural pink hue.
📌 Recipe Card — Layered Rose Clay & Charcoal
- ½ lb white or clear soap base (for the charcoal layer)
- ½ lb shea butter soap base (for the rose clay layer)
- 1 tsp activated charcoal powder
- 2 tsp rose clay
- 15–20 drops ylang-ylang essential oil (or your favorite floral)
- Spray bottle of 99% isopropyl alcohol (the “glue” between layers)
First, make two separate soap batches. Melt half a pound of white or clear base and mix in your charcoal slurry and a warm, floral scent like ylang-ylang. Pour this into your molds, filling them halfway. Let this layer cool for 10–15 minutes until it forms a solid skin.
While it’s cooling, melt another half-pound of shea butter base. Mix two teaspoons of rose clay with alcohol to make a paste, and stir it into the shea butter base. To make the layers stick, temperature is key. Your pink soap should be around 125-130°F (52-54°C)—any hotter and it might melt the black layer. Before you pour, give the surface of the black layer a good spritz of isopropyl alcohol. This acts like glue. Carefully pour the pink soap on top and let it all cool completely before unmolding.
Variation 2: The Exfoliating Coffee and Charcoal Scrub Bar
[NEW IMAGE PLACEHOLDER: Add the coffee-and-charcoal scrub bar image here — black bars with visible coffee flecks, on a wooden board with coffee beans scattered around.]
If you love a good scrub, this one’s for you. An oatmeal and shea butter base would be amazing here.
📌 Recipe Card — Coffee & Charcoal Scrub Bar
- 1 lb oatmeal & shea butter soap base
- 1–2 tsp activated charcoal powder
- 1–2 Tbsp finely ground, used coffee grounds (fresh grounds bleed color)
- 1 Tbsp 99% isopropyl alcohol (for the charcoal slurry)
- 15–20 drops essential oil — peppermint or vanilla pairs beautifully with coffee
- Silicone soap mold
Follow the basic recipe, melting one pound of base and adding your charcoal slurry. Now, stir in one to two tablespoons of finely ground, used coffee grounds (fresh grounds can bleed color). Additives can sometimes sink, so to prevent this, let your soap base cool a bit until it’s the consistency of thin pudding before you pour. This thickness will help suspend the grounds evenly throughout the bar.

Variation 3: The Artistic Swirl or Marble Design
[NEW IMAGE PLACEHOLDER: Add the marble swirl bar image here — black-and-white marbled soap bars showing the swirl pattern, sliced from a loaf mold.]
For a free-form, artistic look, try a marble effect. This looks incredible in a silicone loaf mold.
📌 Recipe Card — Marble Swirl Bar
- 1 lb white melt and pour soap base (split into 2 pitchers)
- 1 tsp activated charcoal powder
- 1 Tbsp 99% isopropyl alcohol (for the charcoal slurry)
- 20 drops tea tree or eucalyptus essential oil
- Silicone loaf mold (this design needs the long shape)
- Wooden skewer or chopstick for swirling
Melt one pound of soap base and divide it between two pitchers. Leave one white. In the other, mix in your charcoal slurry to make it black. Now for the fun part: pour the two colors into your loaf mold alternately. A little white, a little black. Pouring from high up will cause the colors to blend more, while pouring close to the surface will create more defined ribbons. Once all the soap is in the mold, drag a skewer through it once or twice to create a swirl. Don’t overmix, or you’ll just get grey! Let it cool completely before slicing to reveal the unique pattern in each bar.
Pro Tips and Troubleshooting
Even with something this simple, a few things can pop up. Here’s a quick fix-it guide.
Problem: My soap is getting hard in the bowl too fast!
Super common. Don’t worry! Just pop it back in the microwave for a quick 10-15 second burst and stir. It’ll be pourable again in no time.
Problem: My soap has little water droplets on it.
That’s the “glycerin dew” we talked about. It’s just the soap attracting moisture, especially in humid weather. The fix? As soon as your bars are cool, wrap them tightly in plastic wrap. If they’ve already started to sweat, just pat them dry with a paper towel before wrapping.
Problem: My layers fell apart!
This usually happens for two reasons: the first layer got too cold before you poured the next one, or you forgot to spritz it with alcohol. That spritz of 99% isopropyl alcohol is the secret handshake between layers. Also, make sure your second layer isn’t too cool; you need a little warmth to help them fuse.
Problem: My charcoal is clumpy.
This almost always means the powder was added directly to the hot soap. Always, always, always mix your powders with a little isopropyl alcohol first. That smooth slurry is the non-negotiable trick to a silky, clump-free soap.
Your Next Creation Awaits
And there you have it! A set of beautiful, detoxifying charcoal soaps, ready to use or gift right away. You’ve learned that making high-quality soap at home doesn’t require a chemistry degree—you just jumped straight to the fun part.
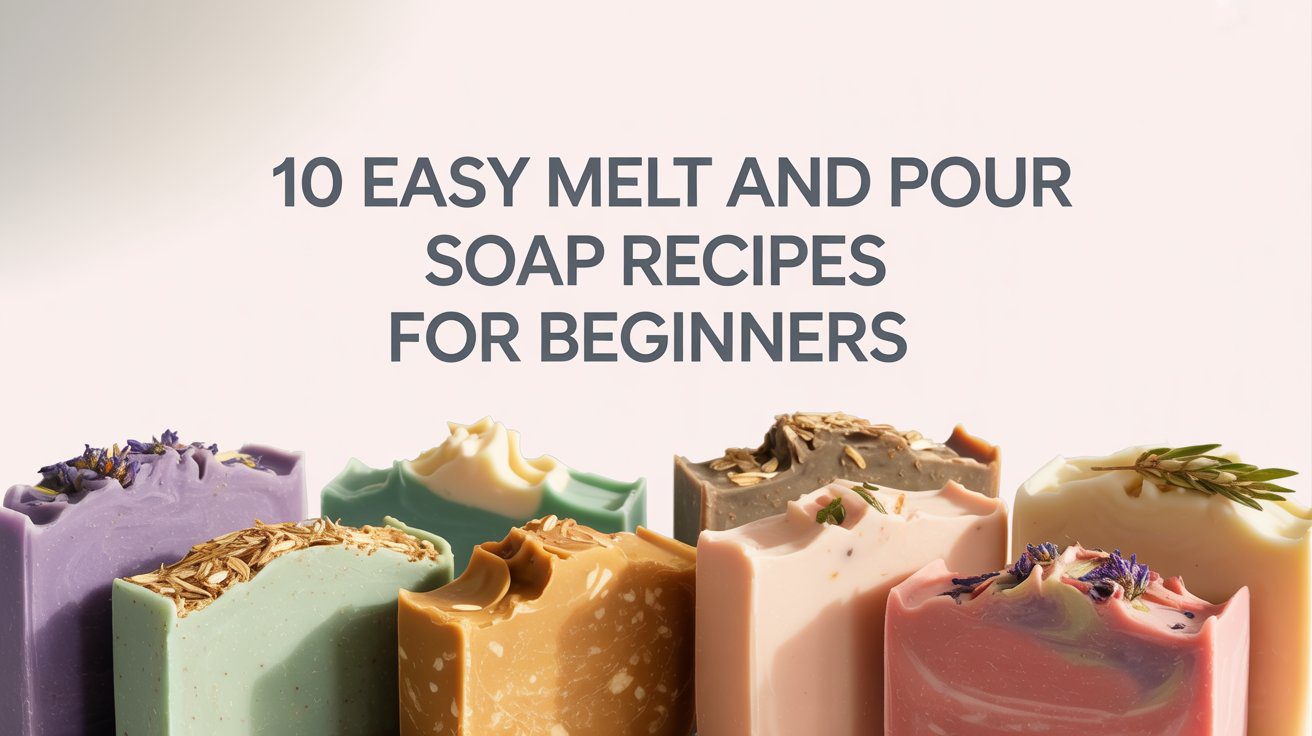
The possibilities from here are endless. Experiment with different bases, natural colorants, and all kinds of scent combinations. This is your canvas now. Hungry for more? Check out my roundup of 10 easy melt and pour soap recipes for beginners to keep the soap-making magic going.
If you had fun with this tutorial and feel inspired, I’d love to hear about it. Let me know in the comments if you’re going to give this recipe a try or if you have any questions. I’d absolutely love to see what you create. Happy soaping!
This website contains affiliate links. Some products are gifted by the brand to test. As an Amazon Associate, I earn from qualifying purchases. The content on this website was created with the help of AI.