This website contains affiliate links. Some products are gifted by the brand to test. As an Amazon Associate, I earn from qualifying purchases. The content on this website was created with the help of AI.
Turn Salvage Into Decor That Feels Curated, Not Cluttered
Ten real, budget-friendly ways to turn chipped paint, reclaimed wood, and salvaged metal into rustic-charm decor your whole house will love.
Shop the Funky Junk Decor EssentialsAffiliate links · As an Amazon Associate I earn from qualifying purchases.

There’s nothing better than turning something old and forgotten into something beautiful. Funky junk décor isn’t about buying more or finding perfect pieces — it’s about personality, texture, and story, where chipped paint, reclaimed wood, and salvaged metal come together to create rustic charm with a Pinterest-worthy vibe. Here is exactly how to turn ten of the most overlooked pieces around your house (or your next flea-market trip) into decor that makes your home feel cozy, creative, and authentically yours.
Every category of funky junk, in one skim
Wall Art From Salvage
Old boards and tin ceiling tiles become statement pieces with real texture.
Vintage Furniture, Reimagined
Ladders, crates, and old doors turn into storage and headboards with character.
One-of-a-Kind Statement Pieces
A window frame mirror and a suitcase table your guests will ask about.
Farmhouse Lighting & Accents
Mason jars, galvanized metal, and pallet wood for that lived-in glow.
Picture this: you walk a guest through your living room and every single piece they compliment turns out to be something you almost put out for the trash pickup.
Turn salvage into your home’s best feature
A reclaimed wood wall that reads boutique, not garage-sale

Those weathered boards you almost threw out? They’re your next statement piece. Arrange reclaimed wood into a chevron or herringbone pattern for an instant rustic focal point that feels handmade and high-end at the same time.
How To
- Lightly sand the wood to remove debris but keep the raw texture.
- Cut planks to size for your desired pattern.
- Mount them onto a plywood backing with nails or wood glue.
- Finish with a matte clear coat to protect the surface without adding shine.
Shop the Look
Style Dos & Don’ts
- Do mix wood tones for depth.
- Don’t sand away too much character.
- Do hang it where natural light can highlight the grain.
- Don’t use glossy sealers — matte finishes keep it authentic.
💡 Tip: mix wood tones for depth, but keep every finish matte — glossy sealers kill the reclaimed look.
Shelving with more personality than anything off a shelf

Old wooden crates instantly turn a blank wall into a cozy, functional display. Mount them above a tub for rolled towels, next to your desk for books, or in the kitchen for spices and plants — they add texture, warmth, and that lived-in rustic charm.
How To
- Pick sturdy, unfinished wooden crates with visible grain and imperfections.
- Lightly sand edges to remove splinters, keeping the natural texture.
- Brush on furniture wax to enhance color and protect the wood.
- Mount using black metal brackets and secure with wall anchors.
- Style with candles, towels, or small plants for a curated look.
Shop the Look
Style Dos & Don’ts
- Do mix crate sizes for depth and balance.
- Don’t overload with heavy items — let them breathe.
- Do keep the natural imperfections visible.
- Don’t paint over the patina — it’s what makes them special.
💡 Tip: let the crates breathe — a few well-chosen items always look better than a packed shelf.
A cozy corner that doubles as blanket storage

A vintage ladder adds warmth to any living room or bedroom and doubles as storage for your coziest throws. Picture it leaning against a soft, neutral wall — a creamy beige or faded greige — with years of character in its grain and bits of worn white paint clinging to the rungs. It instantly warms up a corner, the perfect blend of cozy and functional, holding soft throws in earthy tones and adding height and charm to your space.
How To
- Find a decorative wooden ladder with natural wear or chippy paint.
- Gently clean and seal it with a matte clear coat to preserve the finish.
- Lean or secure it against the wall using a ladder mounting kit if needed.
- Layer throws in complementary textures — linen, knit, and cotton.
- Add a woven basket at the base to store extra blankets.
Shop the Look
Style Dos & Don’ts
- Do lean it where the lighting is soft and warm.
- Don’t strip off old paint — let it show history.
- Do mix throw fabrics and tones for contrast.
- Don’t overload the rungs — give it breathing room.
💡 Tip: leave the old chipped paint alone — that history is the entire point of a ladder rack.
Picture this: a wall of reclaimed wood, a crate shelf full of candles, and a ladder draped in throws — and not one dollar spent at a furniture store.
Small pieces, big rustic payoff
A mirror with more history than anything off a shelf
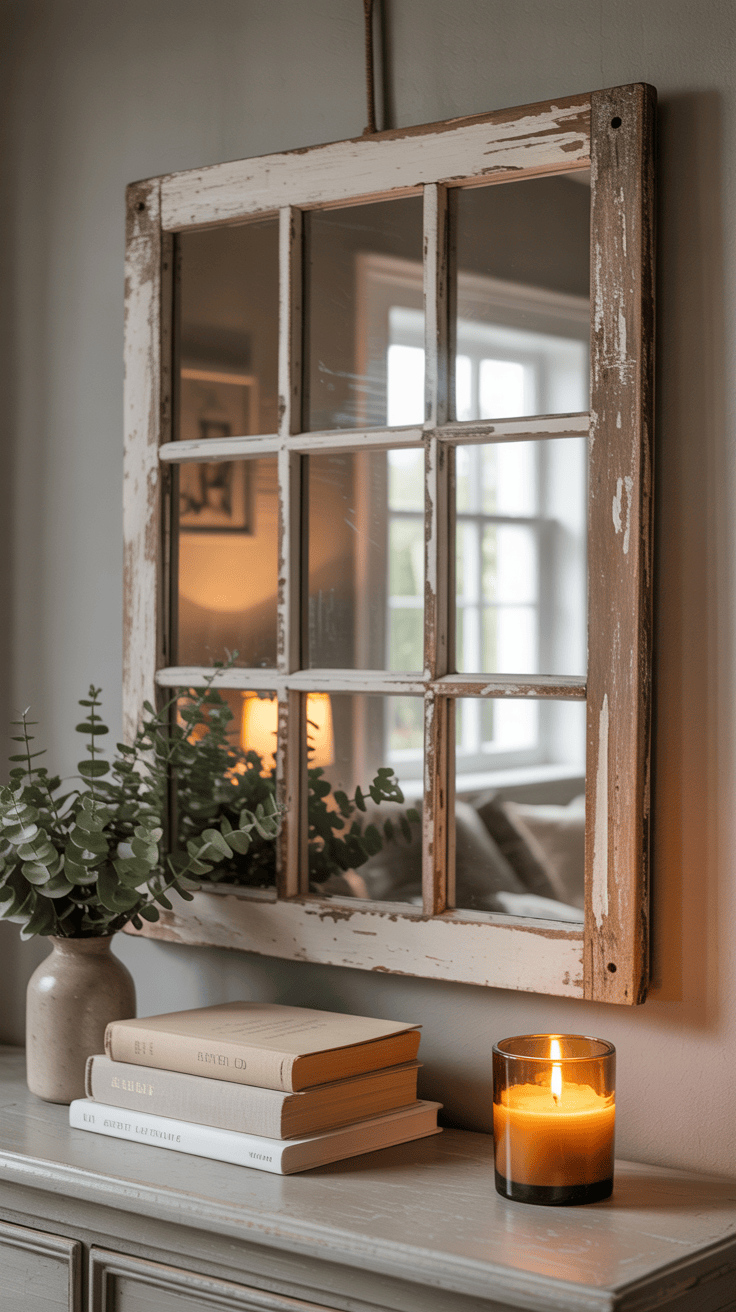
An old window frame can instantly become the star of your space. The chipped paint, soft edges, and paneled reflections bring that cottage-farmhouse charm to any room — especially when styled above a console or entryway table.
How To
- Find a solid vintage window frame with multiple panes.
- Gently sand and clean the frame, leaving some wear for authenticity.
- Brush on a thin layer of white chalk paint or soft neutral.
- Add mirror tiles behind each pane using adhesive strips.
- Mount securely with mirror hanging hardware or jute rope for a farmhouse touch.
Shop the Look
Style Dos & Don’ts
- Do hang it across from a window to amplify natural light.
- Don’t cover too much of the frame’s imperfections — they’re the charm.
- Do style with candles and greenery beneath for warmth.
- Don’t hang it too high — keep reflections eye-level for balance.
💡 Tip: hang the mirror across from a window and keep it eye-level — that’s what makes the reflection actually work for the room.
That dreamy farmhouse glow, entirely DIY

Nothing makes a space feel cozier than soft light glowing through glass jars. This farmhouse staple gives your kitchen, entryway, or breakfast nook that dreamy glow — warm, welcoming, and totally DIY-friendly.
How To
- Start with clear mason jars — wide-mouth works best for easy bulb fitting.
- Drill a small hole in each lid to fit your pendant light kit.
- Insert the sockets, secure the lids, and twist in warm Edison bulbs.
- Hang the cords from ceiling hooks at staggered heights for a relaxed, organic look.
- Plug in and adjust until the glow feels soft and even.
Shop the Look
Style Dos & Don’ts
- Do hang in odd-numbered clusters for balance.
- Don’t use bright white bulbs — go for amber glow.
- Do leave cords slightly uneven for charm.
- Don’t forget to secure lids tightly before hanging.
💡 Tip: odd-numbered clusters (three or five) read intentional — even numbers tend to look accidental.
Herb planters with real vintage texture

Galvanized metal planters add that perfect balance of texture and shine — rugged yet refined. They bring vintage farmhouse energy to patios, kitchens, and window sills, especially when filled with herbs or trailing greenery.
How To
- Choose galvanized metal planters or small metal buckets with character — dents and patina are a plus.
- Drill small drainage holes in the bottom.
- Add potting soil mix and your favorite herbs or succulents.
- Wrap the top with burlap ribbon for a cozy, layered finish.
- Display on a reclaimed wood tray or kitchen windowsill for that “Pinterest-perfect” touch.
Shop the Look
Style Dos & Don’ts
- Do pair them with natural wood or linen textures.
- Don’t polish off the aged patina — that’s the charm.
- Do group in sets of three for balance.
- Don’t overwater — rustic doesn’t mean soggy.
💡 Tip: group planters in odd-numbered sets of three and don’t overwater — rustic doesn’t mean soggy.
Picture this: mason jar lights glowing over your sink, herbs growing in a dented galvanized bucket, and a window-frame mirror catching the afternoon light — all pieces you’d have skipped past at a flea market a year ago.
Grab the whole funky junk decor shopping list in one place
Every reclaimed wood finish, mounting hardware, and vintage-style accent from this list, ready to shop in one stop.
Shop the full supply list →The pieces that make guests ask where you found them
A headboard nobody else will ever have

Nothing transforms a bedroom faster than a vintage door turned into a headboard. The mix of aged wood, chippy paint, and soft bedding gives the perfect balance of rustic charm and cozy retreat vibes.
How To
- Find a solid antique wood door with good structure and a bit of wear.
- Lightly sand and clean to remove dirt while preserving its aged texture.
- Whitewash or stain using whitewash paint or a soft neutral wood stain.
- Mount it horizontally behind the bed with heavy-duty mounting brackets or secure it to a headboard frame.
- Style with layered linen pillow covers and soft cotton bedding to complete the look.
Shop the Look
Style Dos & Don’ts
- Do embrace scratches, chips, and character.
- Don’t over-sand — texture tells the story.
- Do balance rough wood with soft, neutral bedding.
- Don’t skip sealing — protect your finish for longevity.
💡 Tip: don’t over-sand the door — the chips and scratches are the whole reason it looks one-of-a-kind.
A serving tray that makes Sunday coffee feel special

A handmade pallet wood tray is one of those timeless pieces that makes everything feel a little cozier. Whether you’re serving coffee on a Sunday morning or styling it with candles and greenery, it’s simple, rustic, and full of charm.
How To
- Cut pallet wood boards to your preferred tray size.
- Lightly sand the edges but keep the natural texture intact.
- Attach the boards together using wood glue or small screws.
- Add antique brass handles on each side for easy carrying.
- Stain with walnut wood stain and finish with food-safe wood oil.
Shop the Look
Style Dos & Don’ts
- Do add handles that complement your existing hardware.
- Don’t over-sand — you want it to feel rustic, not factory-made.
- Do go for deeper stains for rich contrast.
- Don’t skip the finish — sealing the wood keeps it beautiful and practical.
💡 Tip: go for a deeper walnut stain — it gives the pallet grain more contrast without hiding the texture.
Gallery-wall art made from salvaged tin

Distressed tin tiles bring instant vintage charm to any space — they’re the perfect mix of texture, history, and art. Whether you hang a single statement piece or create a full gallery wall, these ornate panels add warmth and depth without trying too hard.
How To
- Choose tin ceiling tiles with an aged or embossed design.
- Brush off dust and lightly clean with a damp cloth.
- Seal with a matte sealer spray to preserve the patina.
- Frame each tile in rustic wood frames or mount them directly to the wall using metal wall hooks.
- Arrange them in a grid, vertical row, or asymmetrical layout for a modern rustic twist.
Shop the Look
Style Dos & Don’ts
- Do mix tile patterns for an eclectic look.
- Don’t remove too much of the original finish — imperfections are the beauty.
- Do pair with soft linens or neutral walls for contrast.
- Don’t hang them too high — keep the artwork at eye level.
💡 Tip: mix a couple of different tin tile patterns together — a perfectly matched set reads less “found,” more “purchased.”
A side table with a hundred stories to tell
Old luggage makes for the kind of furniture piece that stops people in their tracks — functional, nostalgic, and totally one-of-a-kind. A vintage suitcase turned side table adds warmth and storytelling to your space, blending perfectly with modern rustic décor.
How To
- Choose a sturdy vintage suitcase with solid latches and handles.
- Attach wood table legs using a drill kit and wood screws.
- Add a decorative tray or fabric lining inside for storage.
- Top it with candles, a vase of greenery, or your favorite stack of books for that “travel-meets-farmhouse” vibe.
Shop the Look
Style Dos & Don’ts
- Do embrace scuffs and leather cracks — they tell the story.
- Don’t choose suitcases with a musty smell or soft sides.
- Do pair it with warm lighting or a cozy armchair.
- Don’t overload it — let the piece breathe as a statement accent.
💡 Tip: let the suitcase table breathe — one candle and a small stack of books beats a cluttered surface every time.
Picture this: a headboard nobody else on Pinterest has, a walnut-stained pallet tray carrying your morning coffee, a tin-tile gallery wall, and a suitcase table by the armchair — a room built entirely from things other people gave up on.
Loved this? Pin it.
Hover or tap the image and hit Save to keep this list of funky junk decor ideas on hand for your next project.
Picture this: six months from now you’re standing in a thrift store, phone out, pulling up this exact pin to remember which finish goes with which piece.
Start your first funky junk piece this weekend
Pick one item from this list, grab the supplies, and turn something you almost threw away into the piece everyone asks about.
Shop my funky junk decor supplies →This website contains affiliate links. Some products are gifted by the brand to test. As an Amazon Associate, I earn from qualifying purchases. The content on this website was created with the help of AI.
This website contains affiliate links. Some products are gifted by the brand to test. As an Amazon Associate, I earn from qualifying purchases. The content on this website was created with the help of AI.
