
This website contains affiliate links. Some products are gifted by the brand to test. As an Amazon Associate, I earn from qualifying purchases. The content on this website was created with the help of AI.
Pinterest strikes again — that “one quick scroll” turned into a full-blown farmhouse mood board, and honestly, I’m not even mad. Between the chippy paint, reclaimed wood, and everything wrapped in jute, these are the DIYs that made my home feel like home. Each one’s simple, budget-friendly, and looks straight out of your favorite Pinterest feed.
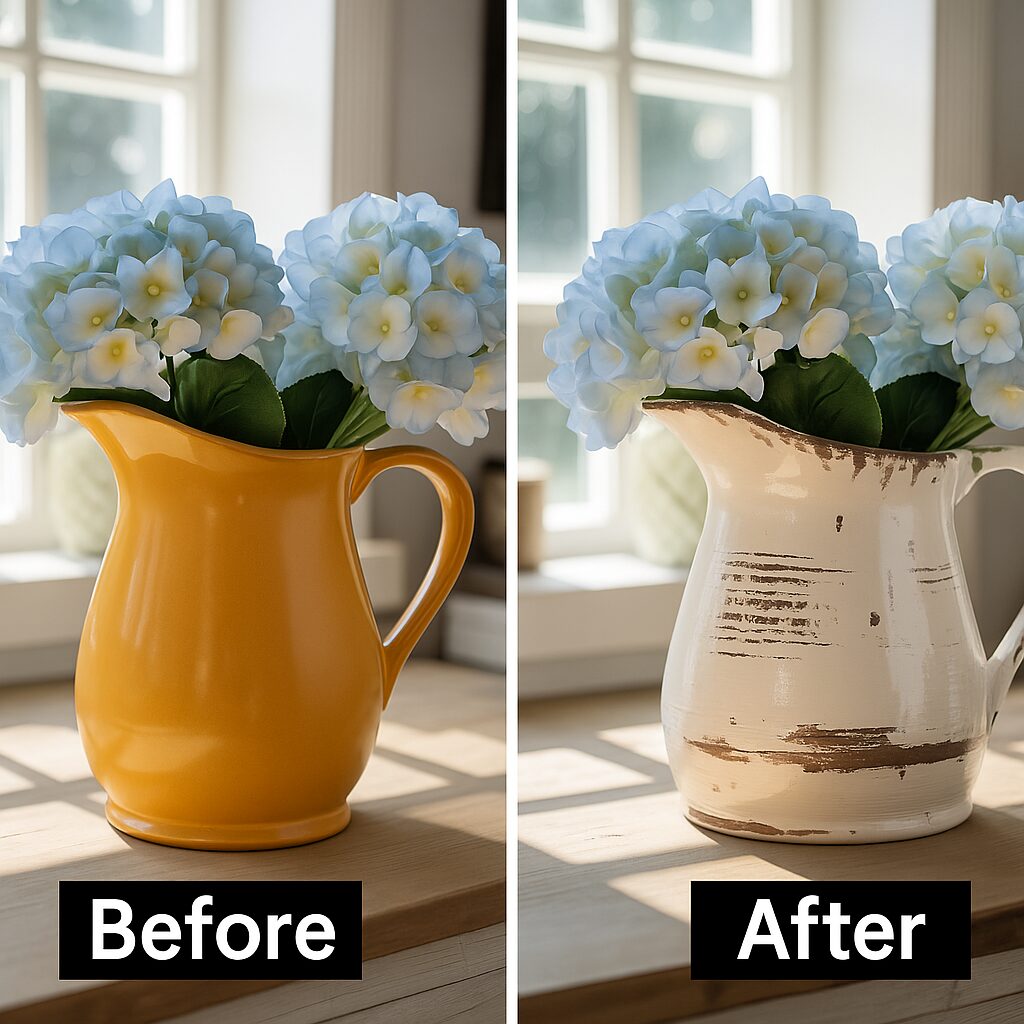
1. Chippy White Pitcher Centerpiece
That perfectly imperfect farmhouse look starts with an old ceramic pitcher and ends with something that looks straight out of Magnolia Market. This one gives that “I found it in a vintage shop” vibe — even if you made it in an afternoon.
How To:
- Find a ceramic or porcelain pitcher — thrifted, old, or new — anything with curves works.
- Mix about 1 tablespoon of baking soda into ½ cup of white chalk paint to give it that thick, textured “aged pottery” feel.
- Brush on the mixture in uneven strokes — don’t worry about perfection. You want it rustic.
- Let it dry for at least 2 hours. Then lightly sand around the handle, lip, and bottom to reveal natural distressing.
- If you want a layered patina, dab on a bit of antique glaze or light brown wax with a cloth.
- Finish by wrapping jute twine around the neck and tying a bow.
- Fill with faux hydrangeas, dried lavender, or neutral pampas grass and place it on your kitchen table or entryway console.
Shop the Look:
- Rust-Oleum Linen White Chalked Paint
- Arm & Hammer Baking Soda
- 3M Fine Grit Sandpaper Variety Pack
- Howard Restor-A-Finish in Dark Oak
- Natural Jute Twine Roll
- Artificial Hydrangea Stems
- Dried Lavender Bundles
- Natural Pampas Grass Stems
- Chalk Paint Brush Set
2. Aged Farmhouse Books Stack
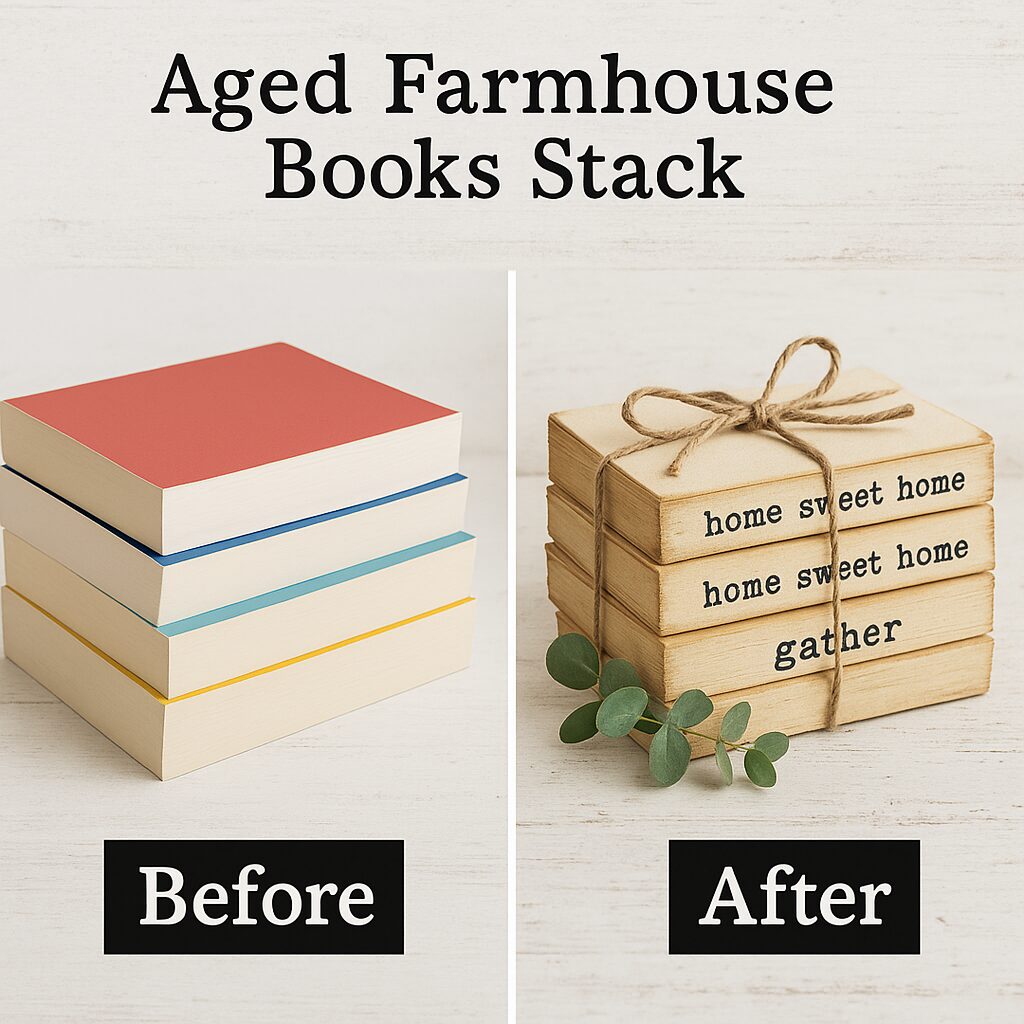
This is the easiest way to get that vintage farmhouse feel without hunting through antique stores. These little stacks look charming on a coffee table, entryway bench, or shelf — and they’re nearly free if you’ve got old books lying around.
How To:
- Grab three to five old paperback books (you can even use thrift store finds).
- Gently tear off the glossy covers — you’ll be left with beautiful, soft ivory paper.
- Brew a strong cup of black tea. Use a tea bag or sponge to rub the edges of the pages for that “aged” tone. Let dry completely.
- Stamp or handwrite simple farmhouse phrases on the spines — think “Home Sweet Home,” “Gather,” “Simply Blessed.”
- Stack the books, tie with jute twine or lace ribbon, and tuck in a bit of faux greenery or lavender sprigs.
Shop the Look:
- Paperback book set (for DIY crafts)
- Alphabet rubber stamps
- Black ink pad
- Natural jute twine roll
- Vintage lace ribbon
- Faux eucalyptus greenery
- Dried lavender bundle
- Tea bags for distressing
3. DIY Rustic Wood Tray
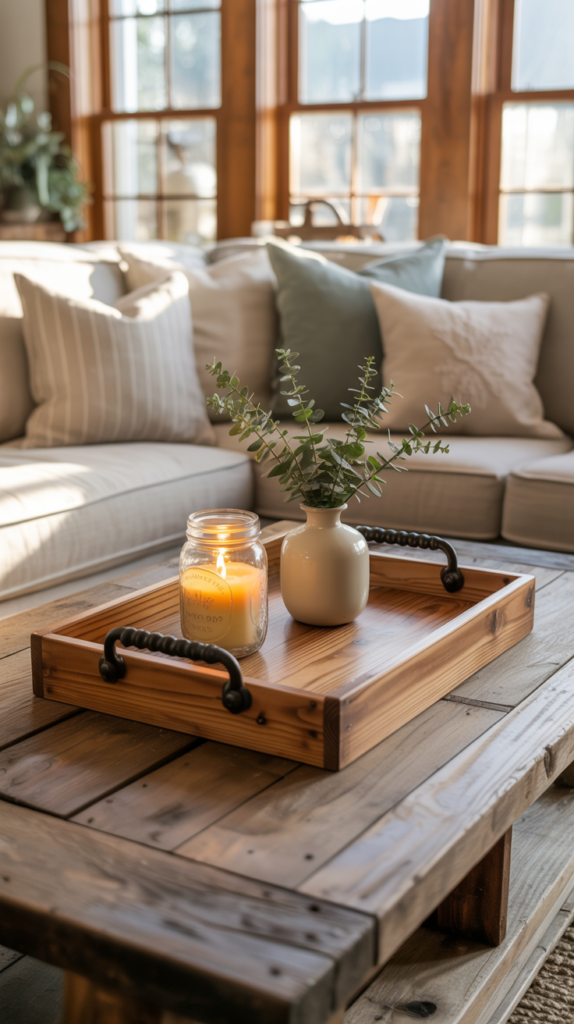
This one’s farmhouse gold — simple, practical, and stunning on a coffee table or kitchen counter. The beauty is in the imperfections: warm stain, matte handles, and a little hand-rubbed finish that makes it look like it’s been around for years.
How To:
- Cut or buy a pine board (about 18×12″) or grab a pre-cut serving board base.
- Sand all sides smooth using 120-grit sandpaper.
- Apply a coat of Early American wood stain with a soft rag — wipe off the excess and let it dry completely.
- Once dry, lightly dry-brush a bit of white chalk paint across the surface for a soft, weathered tone.
- Seal with matte polyurethane to protect the wood and add a velvety finish.
- Attach two black metal handles on either side using a cordless drill.
- Style it with a candle, a small vase, and a sprig of greenery — it’s the perfect everyday centerpiece.
Shop the Look:
- Pine craft board
- 120-grit sandpaper set
- Varathane Early American Wood Stain
- Rust-Oleum Linen White Chalked Paint
- Minwax Matte Polyurethane
- Matte black metal handles
- Cordless drill/driver set
- Decorative faux greenery stems
- Farmhouse soy candle
4. Mason Jar Lanterns with Twinkle Lights
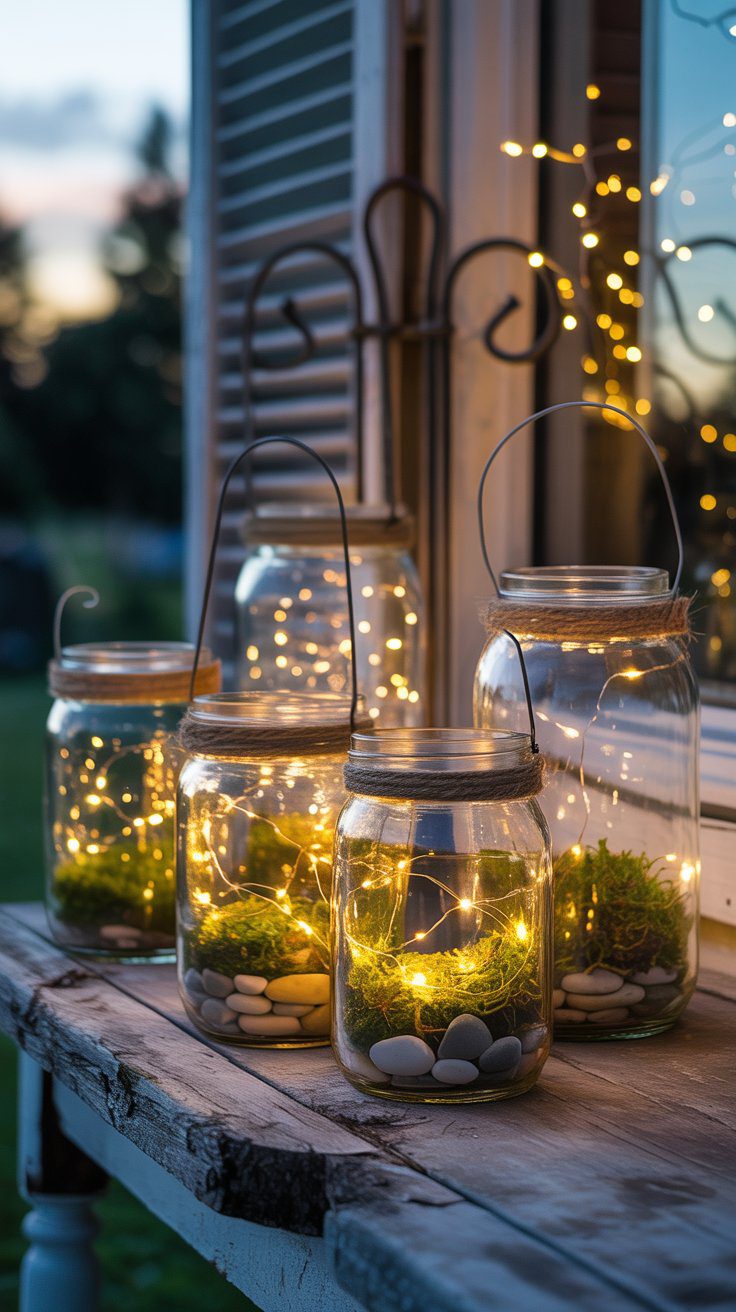
There’s just something magical about these. They give that soft, cozy glow that turns an ordinary evening into a farmhouse dream. Hang them from hooks, set them on your porch, or scatter them across a dining table for that warm, rustic light Pinterest always promises.
How To:
- Start with clean mason jars — any size works, but wide-mouth jars create the prettiest glow.
- Wrap jute rope or twine around the neck several times and secure with a dot of hot glue.
- Fill each jar with a handful of moss or small river pebbles at the bottom to add texture.
- Add a string of battery-operated fairy lights inside, tucking the switch toward the back.
- Optional: create a hanging version by attaching wire handles around the neck and hanging from wall hooks or shepherd’s hooks outdoors.
- Display them grouped together or in pairs for that perfect layered farmhouse lighting moment.
Shop the Look:
- Ball Wide Mouth Mason Jars, Set of 12
- Natural Jute Rope Roll
- Surebonder Hot Glue Gun Kit
- Battery Operated Fairy Lights, Warm White (Pack of 6)
- Decorative Green Moss
- River Pebbles, Natural Mix 5 lbs
- Craft Wire, 20-Gauge for Hanging Lanterns
- Shepherd’s Hooks for Hanging Lanterns, Set of 4
5. Farmhouse Window Frame Wall Décor
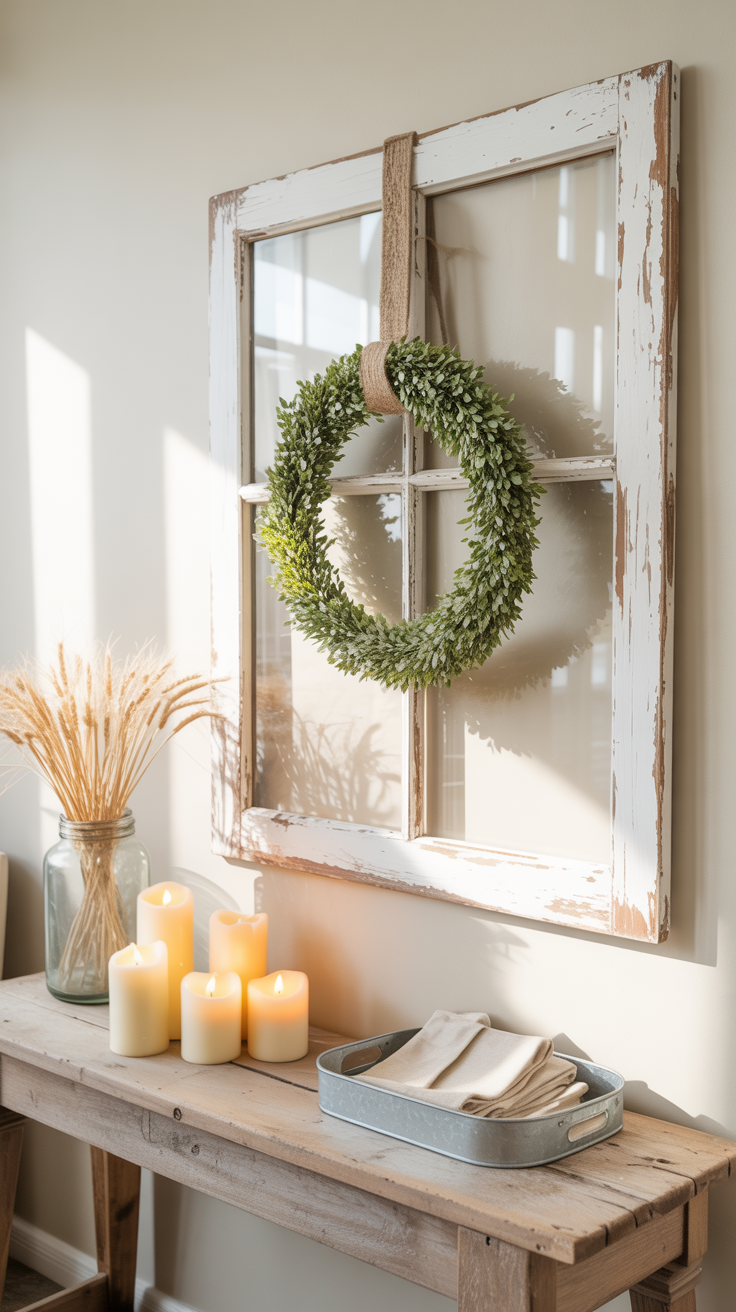
Nothing says “true farmhouse” like an old window frame with chippy paint and a wreath in the middle. It’s the perfect piece to fill an empty wall or layer above a console table — and it looks like it came straight out of a flea market find.
How To:
- Find an old window frame at a thrift store or build your own with 1×2 wood trim pieces.
- Cut your trim to size (measure the windowpane grid first), and use wood glue and brad nails to secure.
- Paint with white chalk paint, then distress the edges using fine-grit sandpaper until bits of raw wood peek through.
- To “age” it further, dry-brush a mix of gray and tan acrylic paint in random strokes.
- Hang a small green wreath or a farmhouse printable in the center using twine or ribbon.
- Mount it on the wall, lean it on a mantel, or layer it behind other décor for that dimensional look.
Shop the Look:
- 1×2 Pine Wood Trim Molding
- Rust-Oleum Linen White Chalked Paint
- 3M Fine Grit Sandpaper Variety Pack
- Craft Acrylic Paint Set – Neutral Farmhouse Tones
- Mini Greenery Wreath (Boxwood Style)
- Jute Twine Roll
- Brad Nailer Kit
- Wood Glue
6. Layered Cutting Board Display
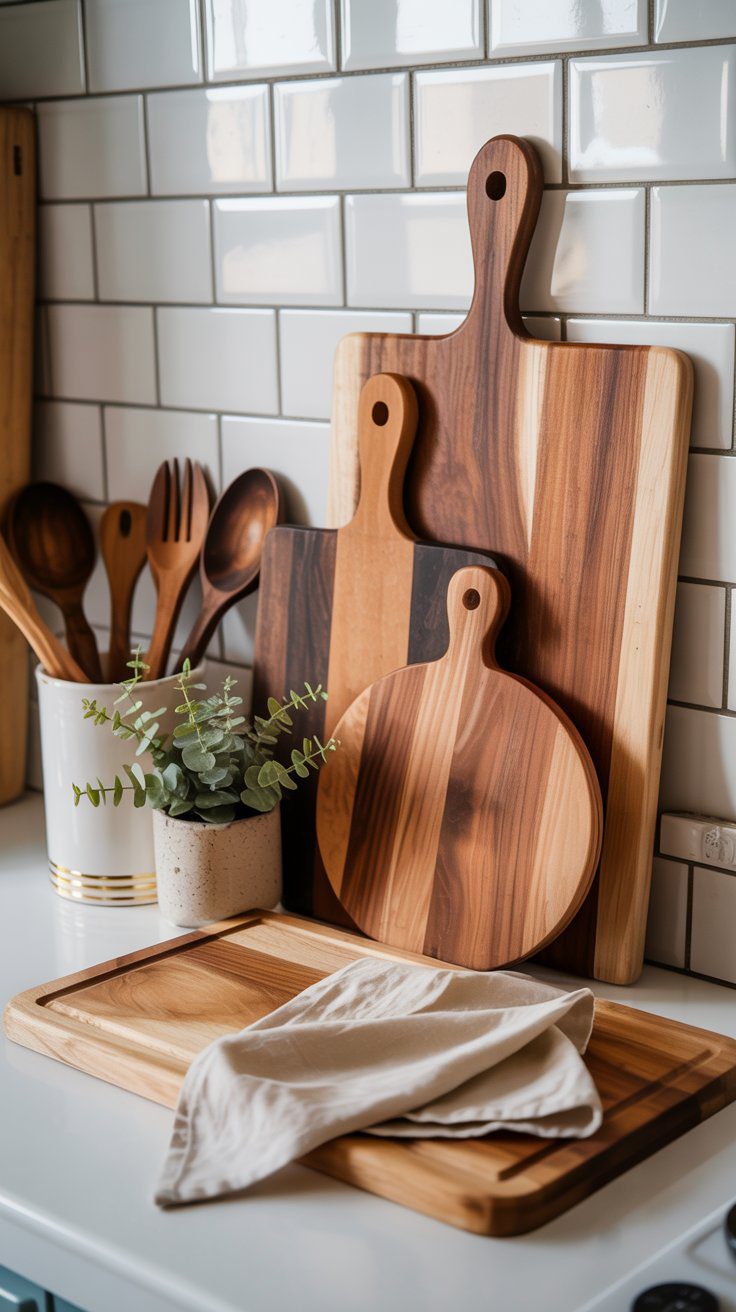
This is one of those simple styling tricks that instantly gives your kitchen that “farmhouse lived-in” warmth. Layered cutting boards create texture, depth, and color — turning a bare countertop into a cozy, styled space worthy of a magazine photo.
How To:
- Gather 3–4 wood cutting boards in various shapes and sizes (round, paddle, and rectangular).
- Sand any rough edges and oil them lightly to bring out the grain.
- Lean the largest board against your backsplash first, then layer smaller ones in front, overlapping them slightly.
- Add a ceramic utensil crock with wooden spoons or a small plant to break up the wood tones.
- Finish with a soft kitchen towel draped casually over the front board for that cozy, styled look.
Shop the Look:
- Acacia Wood Cutting Board Set, 3-Piece
- Round Mango Wood Paddle Board
- Food-Grade Mineral Oil for Wood
- White Ceramic Utensil Crock
- Wooden Spoon Set, 6-Piece
- Faux Eucalyptus Potted Plant
- Farmhouse Linen Kitchen Towels, Set of 3
7. Grain Sack Stripe Pillow Covers
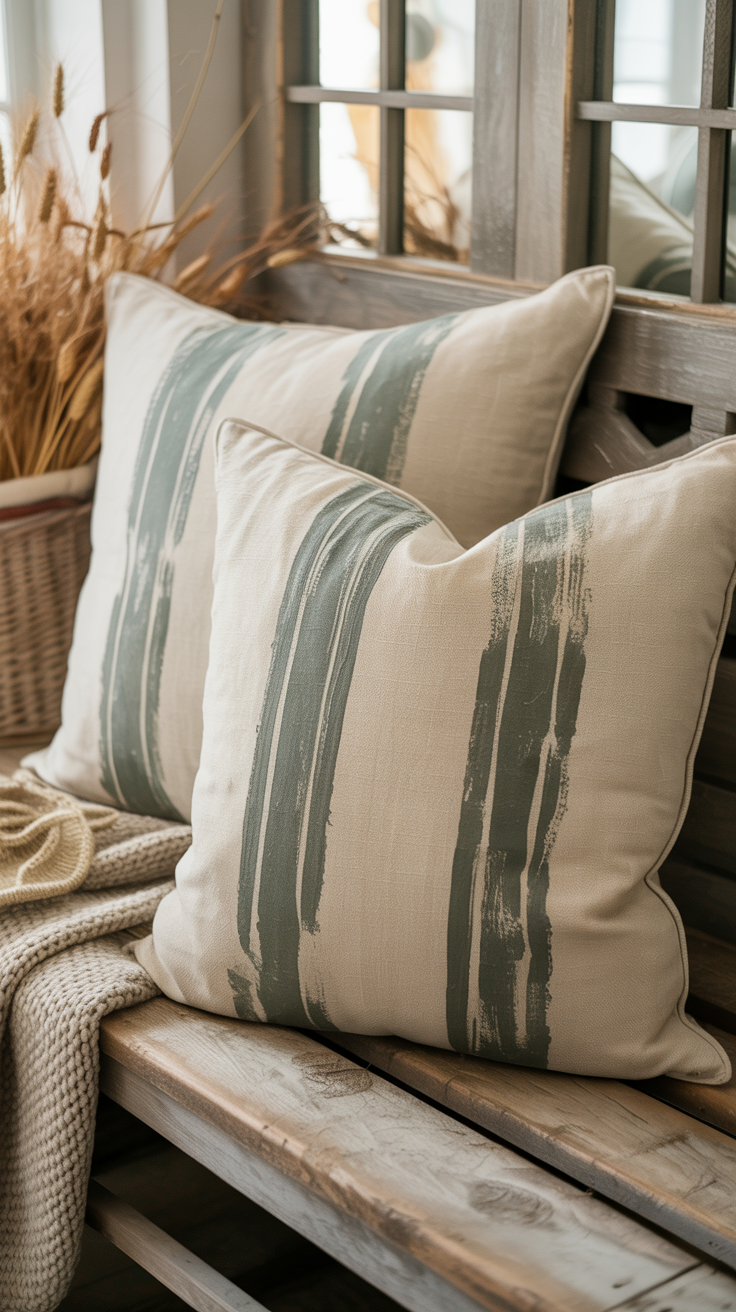
This classic farmhouse look never goes out of style — a little rustic, a little vintage, and perfectly cozy. These DIY grain sack stripe pillow covers are an easy weekend project that adds charm to your sofa, bench, or bed in minutes.
To paint grain sack stripes on fabric, start with clean, dry pillow covers or another cotton or linen surface. Lay the fabric flat on a protected surface and use painter’s tape to create evenly spaced stripes down the center or sides. Mix fabric paint with a touch of water for a slightly faded, vintage look. Apply the paint using a foam brush or stencil brush with light pressure, brushing along the fabric grain. Remove the tape carefully while the paint is still damp to get clean lines. Let it dry completely, then heat-set the design with an iron according to the paint’s instructions. The result should look worn and rustic, like an authentic vintage grain sack.
How To:
- Start with plain linen or cotton pillow covers in neutral tones (white, beige, or oatmeal).
- Measure your desired stripe pattern — typically two thin outer stripes and one thicker center stripe.
- Tape off your lines using painter’s tape.
- Mix fabric chalk paint or acrylic paint with textile medium for flexibility.
- Brush on the paint lightly; you want soft, rustic coverage, not solid lines.
- Peel the tape while the paint is still damp for crisp edges.
- Let dry for 24 hours, then heat set with an iron to lock in the color.
Shop the Look:
- Linen Throw Pillow Covers, 18×18 Set of 2
- ScotchBlue Painter’s Tape, Multi-Surface
- Rust-Oleum Fabric Chalk Paint
- Liquitex Textile Medium (for acrylic paint)
- Flat Bristle Paint Brush Set
- Steam Iron for Heat Setting
- Farmhouse Insert Pillows, Set of 2
8. Enamel-Look Tin Can Planters

This one is rustic on a dime. You can turn ordinary soup cans into vintage-style enamel planters that look straight out of an old farmhouse kitchen. They’re perfect for herbs, faux greenery, or even makeup brushes — anywhere you want that clean white-and-black enamel look.
We’re making enamel-look tin can planters — recycled soup cans painted white with black rims to mimic vintage enamelware.
In the house, they’d look charming grouped on a kitchen windowsill holding herbs, lined up on open shelves with faux greenery, or styled in a bathroom with cotton balls or makeup brushes. Their clean white-and-black finish adds a subtle farmhouse accent that fits anywhere from rustic kitchens to cozy laundry rooms.
How To:
- Rinse and peel labels from tin cans. Remove glue residue with warm soapy water and dry completely.
- Paint the cans with white chalk paint using a round brush for smooth texture.
- Once dry, use a fine detail brush to paint the top and bottom rims with black craft paint — this gives the enamel illusion.
- For a worn look, gently sand a few spots around the edges.
- Seal with clear matte spray sealer to protect the paint from chipping.
- Add faux herbs or real small plants for an easy farmhouse accent.
Shop the Look:
- Rust-Oleum Linen White Chalked Paint
- Apple Barrel Black Acrylic Craft Paint
- Detail Paint Brush Set
- 3M Fine-Grit Sandpaper Variety Pack
- Krylon Matte Clear Spray Sealer
- Faux Herb Plants in Pots, Set of 3
- Farmhouse Metal Label Tags (optional for labeling herbs)
9. DIY Blanket Ladder
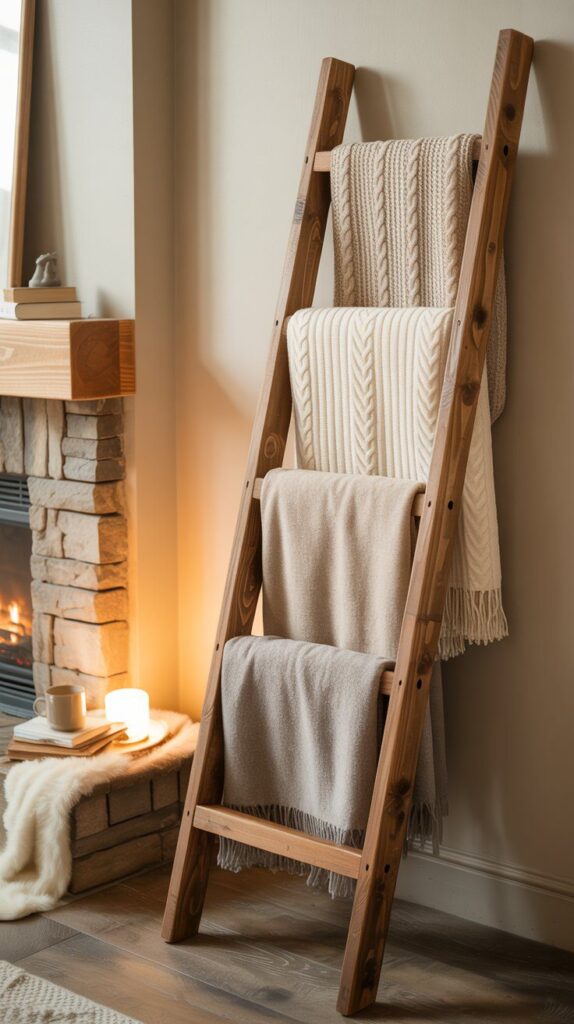
Every cozy farmhouse has one — the classic wooden ladder that’s more about charm than climbing. It’s perfect for draping throw blankets, quilts, or even towels in a guest bath. Best part? You can make it in under an hour for a fraction of the cost of buying one.
We’re making a DIY blanket ladder — a decorative wooden ladder built from pine boards, stained in a soft weathered oak finish.
In the house, it would lean casually against a wall, styled with folded throw blankets in neutral tones. It might sit beside a fireplace, near a reading chair, or in a bedroom corner. The look adds height, warmth, and cozy texture — the kind of farmhouse accent that feels both functional and beautifully lived-in.
How To:
- Cut two 1×3 pine boards to about 6 feet for the ladder sides.
- Cut four 1×2 boards to 16 inches each for the rungs.
- Space the rungs evenly (about 12–14 inches apart) and secure with wood screws through each side rail.
- Sand the entire piece smooth with fine-grit sandpaper.
- Stain using Weathered Oak wood stain for that soft, gray farmhouse tone.
- Wipe off the excess and let dry overnight.
- Lean your finished ladder against the wall and layer your coziest blankets — instant warmth and texture.
Shop the Look:
- 1×3 Pine Boards, 6-Foot
- 1×2 Pine Boards
- Wood Screws, 1 ¼ Inch
- 3M Fine Grit Sandpaper Variety Pack
- Minwax Weathered Oak Wood Stain
- Staining Rags, 24-Pack
- Cordless Drill/Driver Kit
- Throw Blanket Set, Neutral Farmhouse Colors
10. Farmhouse Entryway Hook Board
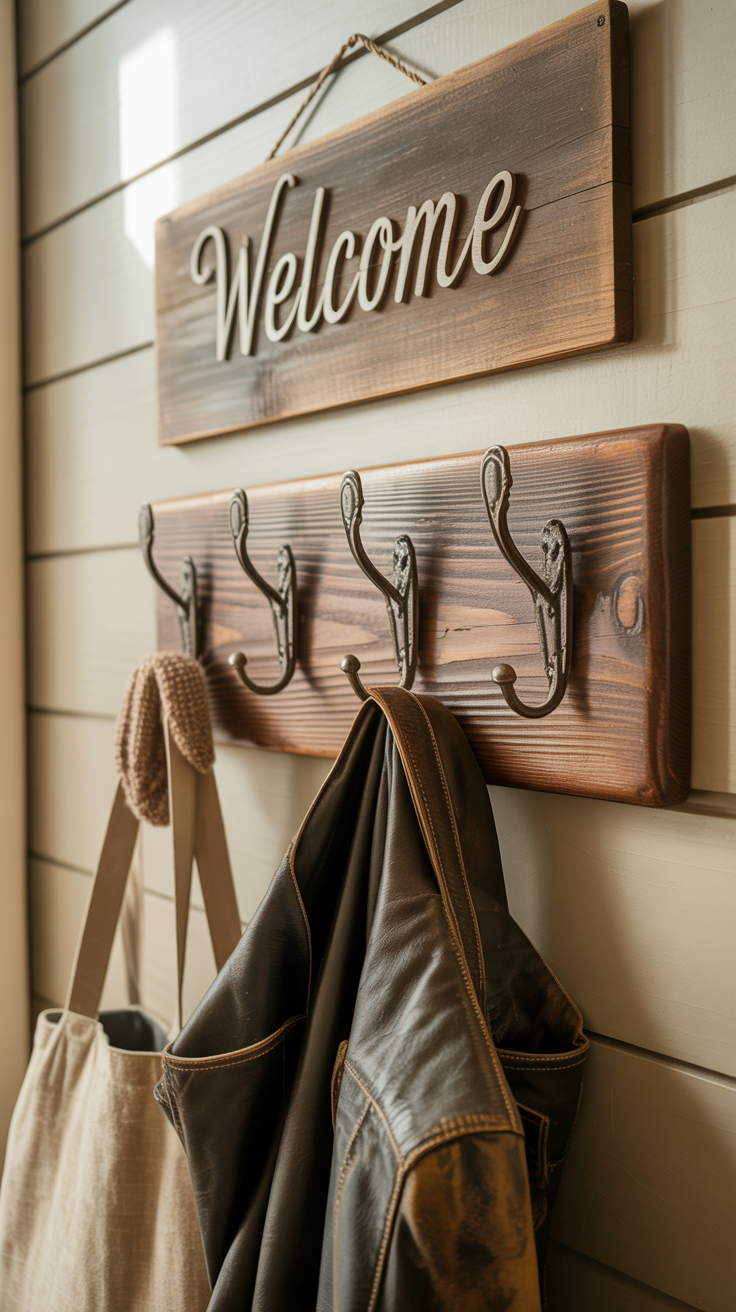
We’re making a farmhouse entryway hook board — a stained wooden plank fitted with vintage-style hooks.
In the house, it would hang near the door under a “Welcome” sign or mirror, holding coats, hats, or tote bags. The dark wood against the metal hooks gives it that warm, rustic charm — simple, functional, and perfectly styled to greet you the moment you walk in.
How To:
- Cut a wood plank to fit your wall space (around 36–48 inches wide works for most entryways).
- Sand the surface smooth, then apply a coat of Early American wood stain for that warm farmhouse tone. Wipe off any excess and let dry completely.
- Attach vintage-style metal hooks evenly spaced across the plank using a cordless drill.
- Mount the finished board securely to the wall under a mirror or “Welcome” sign using wall anchors and screws.
- Style with everyday essentials — a bag, scarf, or jacket — for that lived-in farmhouse charm.
Shop the Look:
Reclaimed Wood Plank, 36-Inch
Early American Wood Stain
Vintage Metal Wall Hooks
Cordless Drill Kit
Wall Anchors and Screws Set
Microfiber Cleaning Cloths
This setup matches the new image — a rustic wood board with metal hooks mounted on a white shiplap wall, styled under a “Welcome” sign holding a bag and jacket.
This website contains affiliate links. As an Amazon Associate, I earn from qualifying purchases.
This website contains affiliate links. Some products are gifted by the brand to test. As an Amazon Associate, I earn from qualifying purchases. The content on this website was created with the help of AI.
