
This website contains affiliate links. Some products are gifted by the brand to test. As an Amazon Associate, I earn from qualifying purchases. The content on this website was created with the help of AI.
Do you have a pile of scrap fabric collecting dust in a corner somewhere? Are you guilty of always looking for crafty ways to put those leftovers to good use? Well, you’ve come to the right place. I’m thrilled to share 7 Easy Fabric Crafts You Can Try Today that not only upcycle your unused fabric but also spruces up your living space or adds some personal touch to your gifting. Ready to dive into the world of fabric crafts? Let’s go!

1. Fabric Banner
This fabric banner is one of those projects that feels meaningful without being fussy. It is soft, colorful, and imperfect in the best way. You can use scraps, play with pattern, and end up with something that looks collected and intentional instead of crafty. It works for wall decor, a kids’ space, a craft room, or anywhere you want a simple message with warmth.
You might need
- Assorted cotton fabric strips
- Canvas or linen backing fabric
- Heat n Bond iron-on adhesive
- Fabric glue
- Craft tassels
- Felt flowers
- Wooden dowel rod
- Fabric scissors
- Iron
Cut colorful fabric strips in a mix of widths and lengths. Keep them uneven so the banner feels relaxed and handmade rather than measured.
Lay the strips side by side on your backing fabric, overlapping slightly if you want texture. Sew them down or use fabric glue, working from one side to the other so everything stays aligned.
Add your letters using Heat n Bond or fabric glue. Simple words like BE KIND, WELCOME, or HOME work best and stay readable once the banner is hung.
Attach tassels, bows, or felt flowers along the bottom edge or corners for extra detail. This is where personality shows up, so don’t overthink it.
Fold the top edge over the wooden dowel rod and secure it with stitching or glue. Add string or twine and hang it where it can move slightly and feel lived in.
2. Cozy Floor Pillows
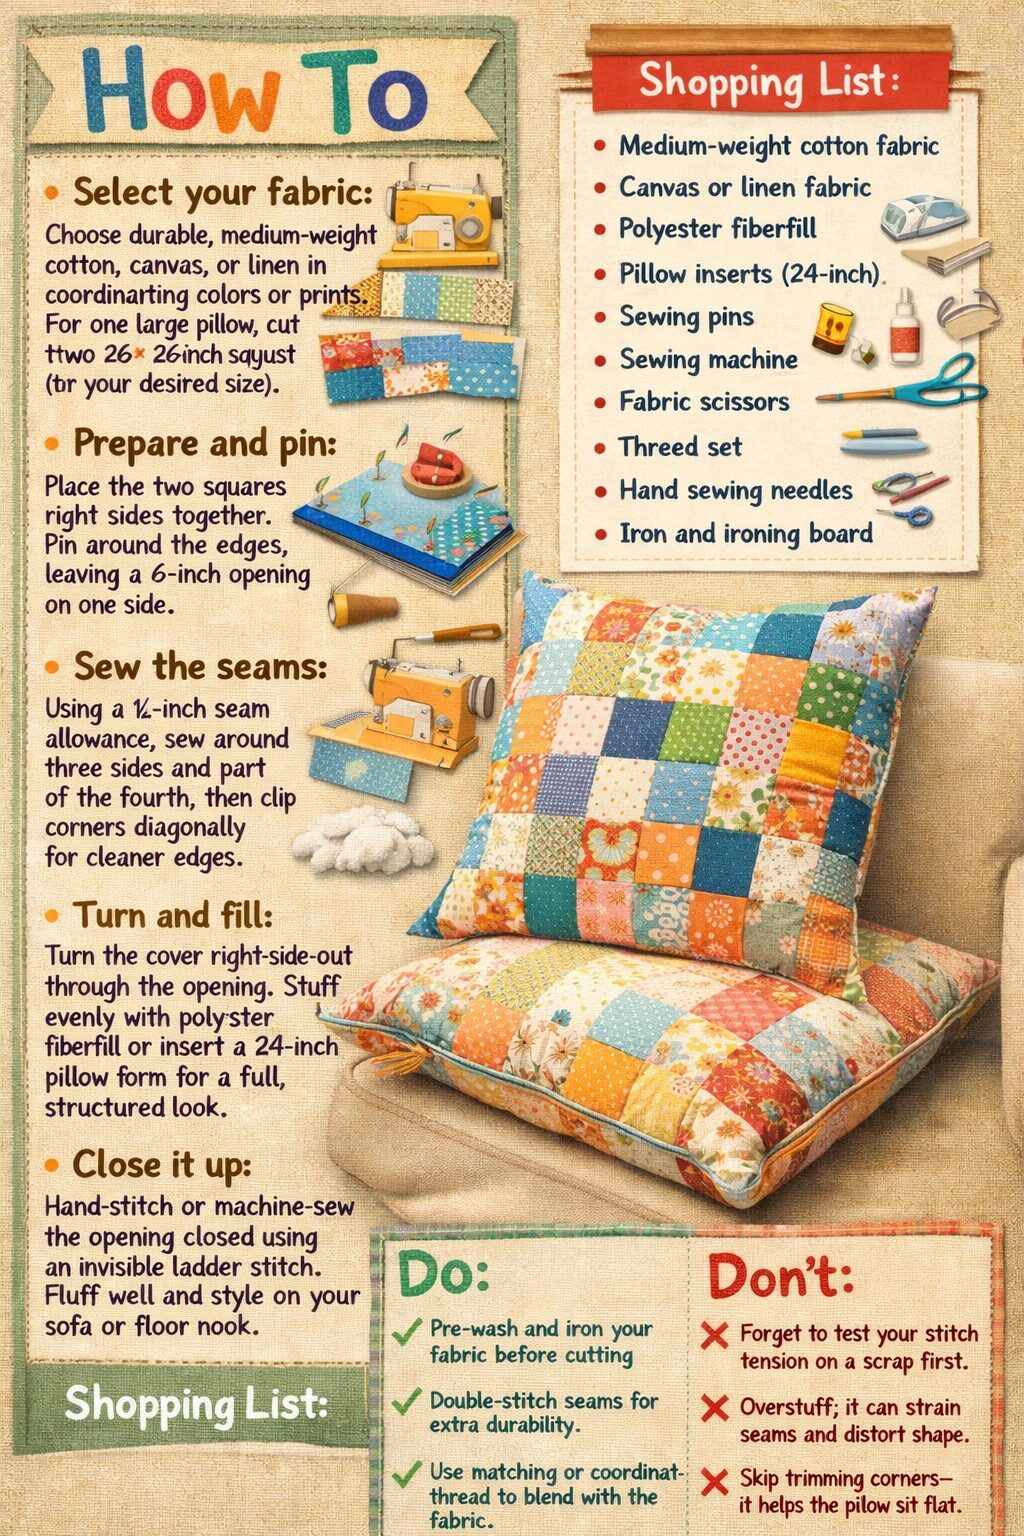
These cozy floor pillows are perfect for using up fabric scraps while adding something soft and lived-in to a room. They work on the floor, layered on a sofa, or tucked into a reading nook. Slight imperfections make them better. Think comfortable, durable, and meant to be used.
You might need
- Medium-weight cotton fabric
- Canvas or linen fabric: Canvas fabric | Linen fabric
- Polyester fiberfill
- 24-inch pillow inserts
- Sewing pins
- Sewing machine
- Fabric scissors
- Thread set
- Hand sewing needles
- Iron and ironing board: Iron | Ironing board
Select your fabric and cut two 26 × 26-inch squares for one large pillow; adjust the size if you want something smaller or larger. Medium-weight fabrics hold up best for floor use.
Place the two squares right sides together and pin around the edges, leaving a 6-inch opening on one side so you can turn the pillow and fill it later.
Sew around the edges using a ½-inch seam allowance, stitching three full sides and most of the fourth. Clip the corners diagonally to reduce bulk and help the pillow sit flat.
Turn the cover right-side-out through the opening. Fill evenly with polyester fiberfill for a softer pillow or insert a 24-inch pillow form if you want a fuller, more structured shape.
Close the opening with a hand-sewn ladder stitch or a careful machine stitch. Fluff, shape, and place it where it will get used.
3. Fabric Flowers
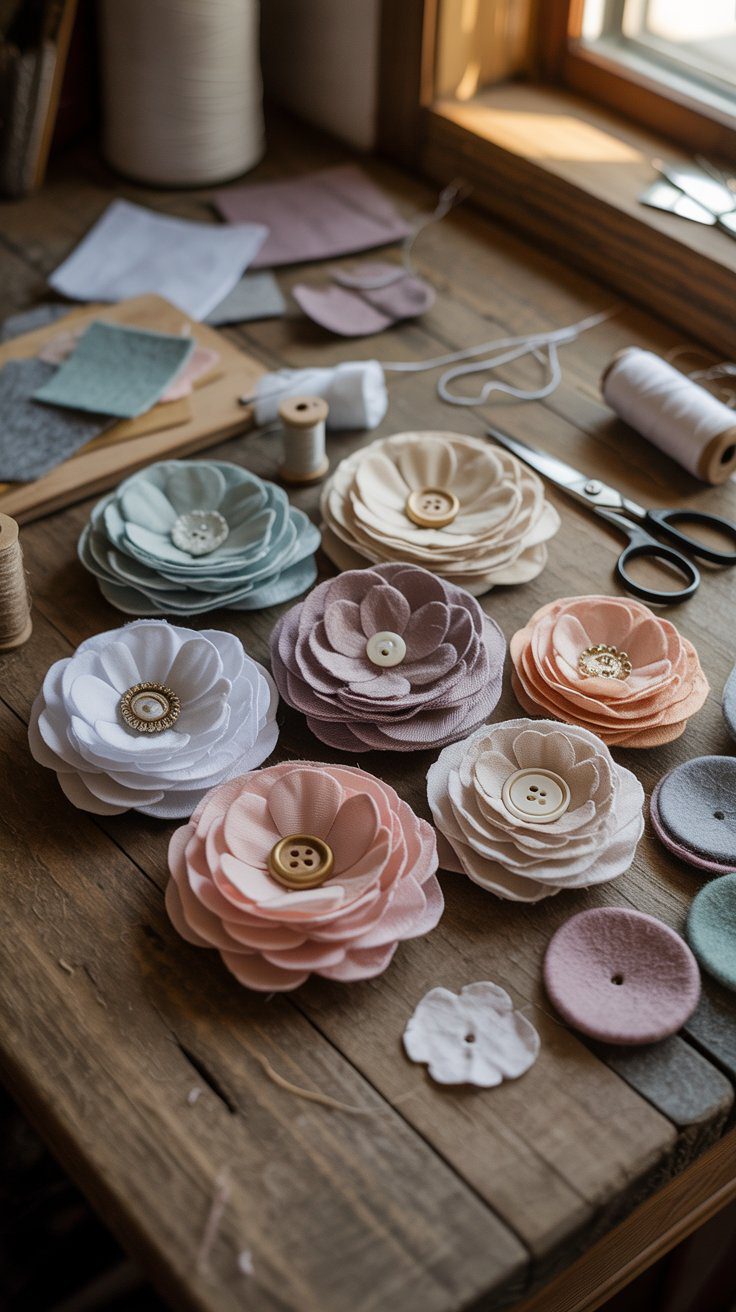
These fabric flowers are quick to make and endlessly flexible. You can keep them soft and neutral or bright and playful, depending on your fabric scraps. They work as small accents on everyday items or grouped together for bigger visual impact.
You might need
- Assorted cotton fabric bundle
- Linen fabric
- Fabric glue
- Hand sewing needles
- Thread set
- Decorative buttons
- Wooden beads
- Felt sheets
- Fabric scissors
- Hot glue gun
Choose three to four coordinating fabrics and cut circles in descending sizes for each flower. One large circle around 4 inches, one medium around 3 inches, and one small around 2 inches works well. Tracing a mug, jar lid, or cup keeps shapes consistent.
Fold each fabric circle in half, then in half again to form a triangle. Secure the pointed end with a small stitch or a tiny dot of fabric glue so the folds hold their shape.
Arrange the folded pieces in a circular pattern on a small felt backing, overlapping slightly to create fullness. Sew or glue the pointed ends down, working your way around until the flower looks balanced.
Attach a button, wooden bead, or fabric-covered button at the center to finish the flower and hide the seams. Make sure it is secured tightly if the flower will be handled often.
Use the finished flowers on hair clips, wreaths, napkin rings, or hot-glue them onto craft sticks for jar or shelf displays. They also work beautifully clustered together instead of used one at a time.
4. Fabric Wreath
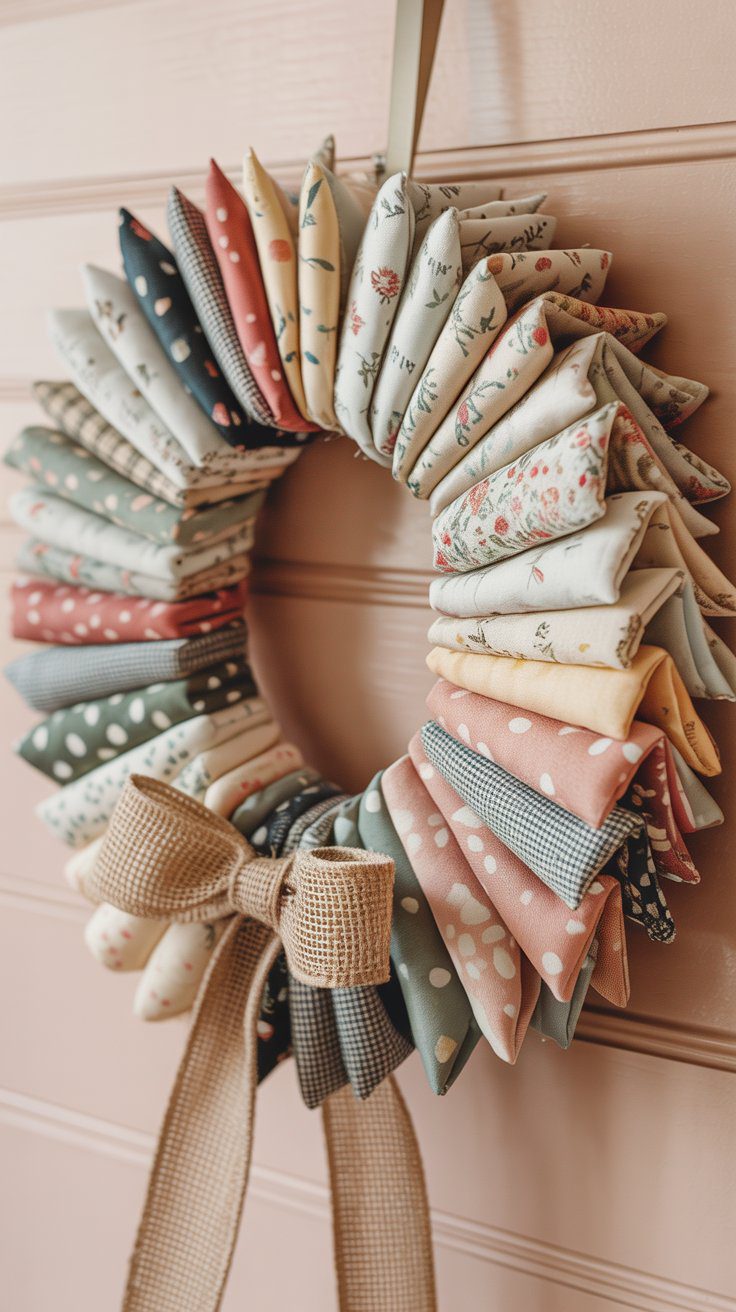
This fabric wreath is soft, full, and intentionally imperfect. It has that cozy, collected look that works on doors, gallery walls, or layered into seasonal decor. Once you get the folding rhythm down, it becomes an easy, repetitive project you can finish in short sessions.
You might need
- Foam wreath form (12–14 inch): 12-inch | 14-inch
- Muslin or burlap fabric: Muslin fabric | Burlap fabric
- Cotton fabric squares
- Hot glue gun
- Glue sticks
- Fabric scissors
- Ribbon for bow
- Floral wire
- Jute twine
- Heat-resistant craft mat
Start with a 12–14 inch foam wreath form and wrap it in muslin or burlap. This gives the hot glue something to grip and helps the fabric stay in place as you build layers.
Cut your cotton prints into 6×6-inch squares. You will need roughly 80–100 squares depending on how dense you want the wreath. Mix florals, polka dots, gingham, and subtle text prints for visual interest.
Fold each fabric square into a triangle, then fold again into a smaller triangle. Pinch the pointed end, add a small dot of hot glue, and press that point directly onto the wreath form.
Continue attaching folded pieces around the wreath, alternating colors and patterns as you go. Slight overlap creates a plush, full texture and hides the base completely.
Once the wreath is fully covered, add a ribbon bow to the bottom or side. Attach floral wire or jute twine to the back and hang it where the texture and color can really stand out.
5. Fabric Coasters
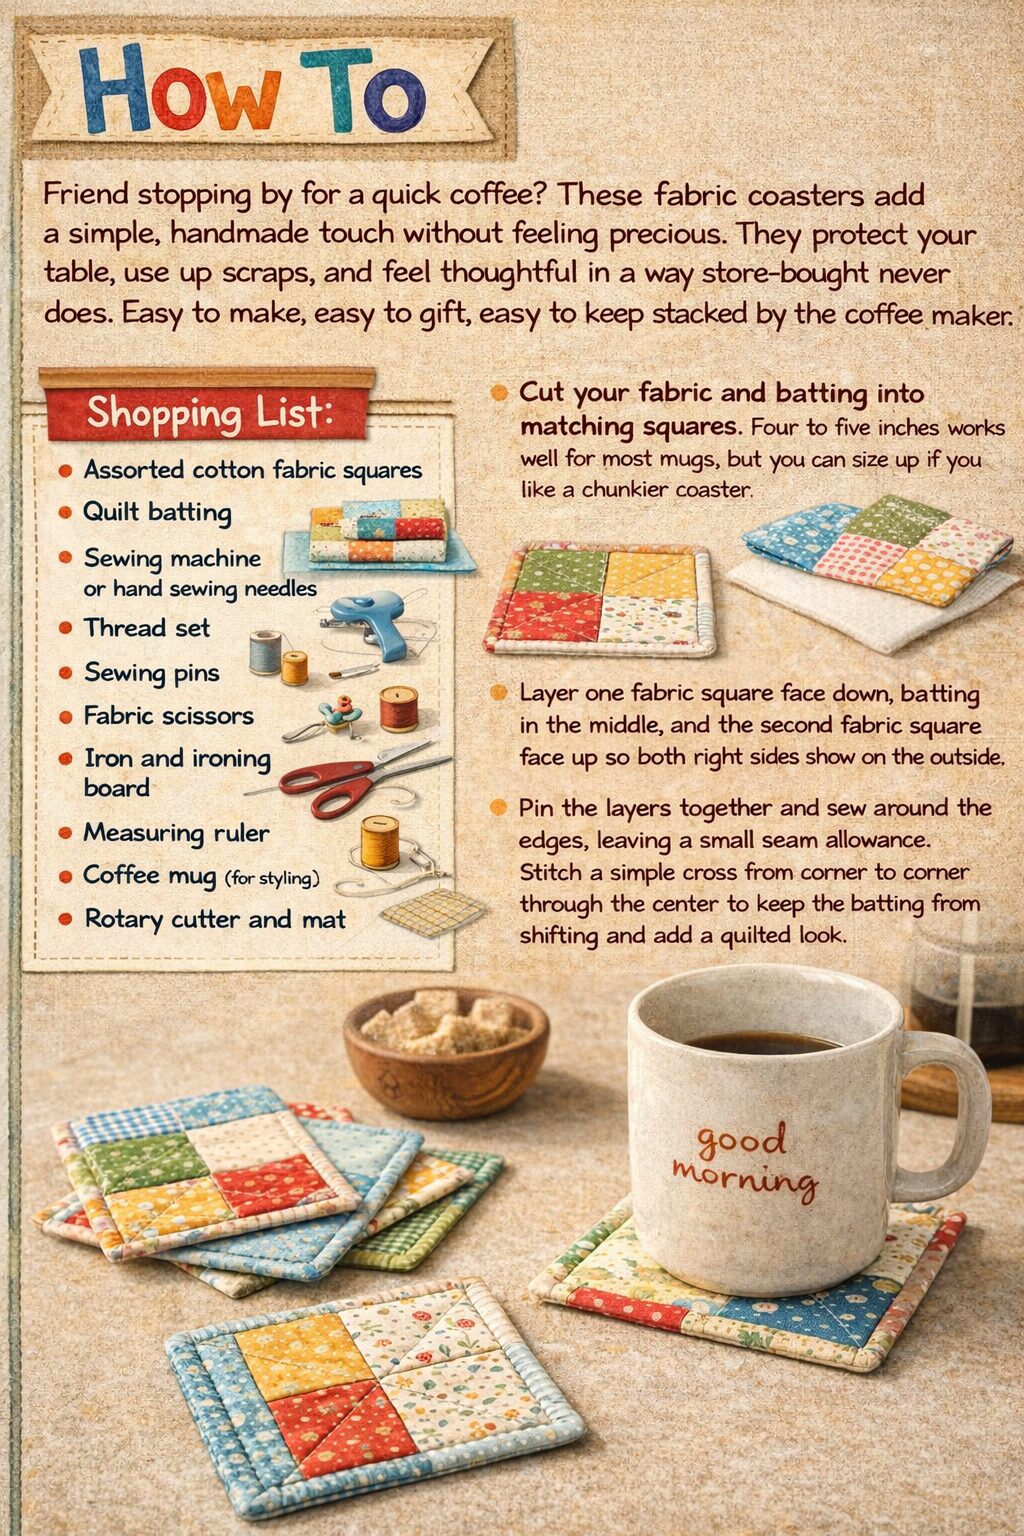
Friend stopping by for a quick coffee? These fabric coasters add a simple, handmade touch without feeling precious. They protect your table, use up scraps, and feel thoughtful in a way store-bought never does. Easy to make, easy to gift, easy to keep stacked by the coffee maker.
You might need
- Assorted cotton fabric squares
- Quilt batting
- Sewing machine or hand sewing needles: Sewing machine | Hand sewing needles
- Thread set
- Sewing pins
- Fabric scissors
- Iron and ironing board: Iron | Ironing board
- Rotary cutter and mat: Rotary cutter | Cutting mat
- Measuring ruler
- Coffee mug
Cut your fabric and batting into matching squares. Four to five inches works well for most mugs, but you can size up if you like a chunkier coaster.
Layer one fabric square face down, batting in the middle, and the second fabric square face up so both right sides show on the outside.
Pin the layers together and sew around the edges, leaving a small seam allowance. Stitch a simple cross from corner to corner through the center to keep the batting from shifting and add a quilted look.
Press flat with an iron and stack them near your coffee station. When a mug lands on one, it feels intentional, cozy, and just a little special.
6. Fabric Napkins
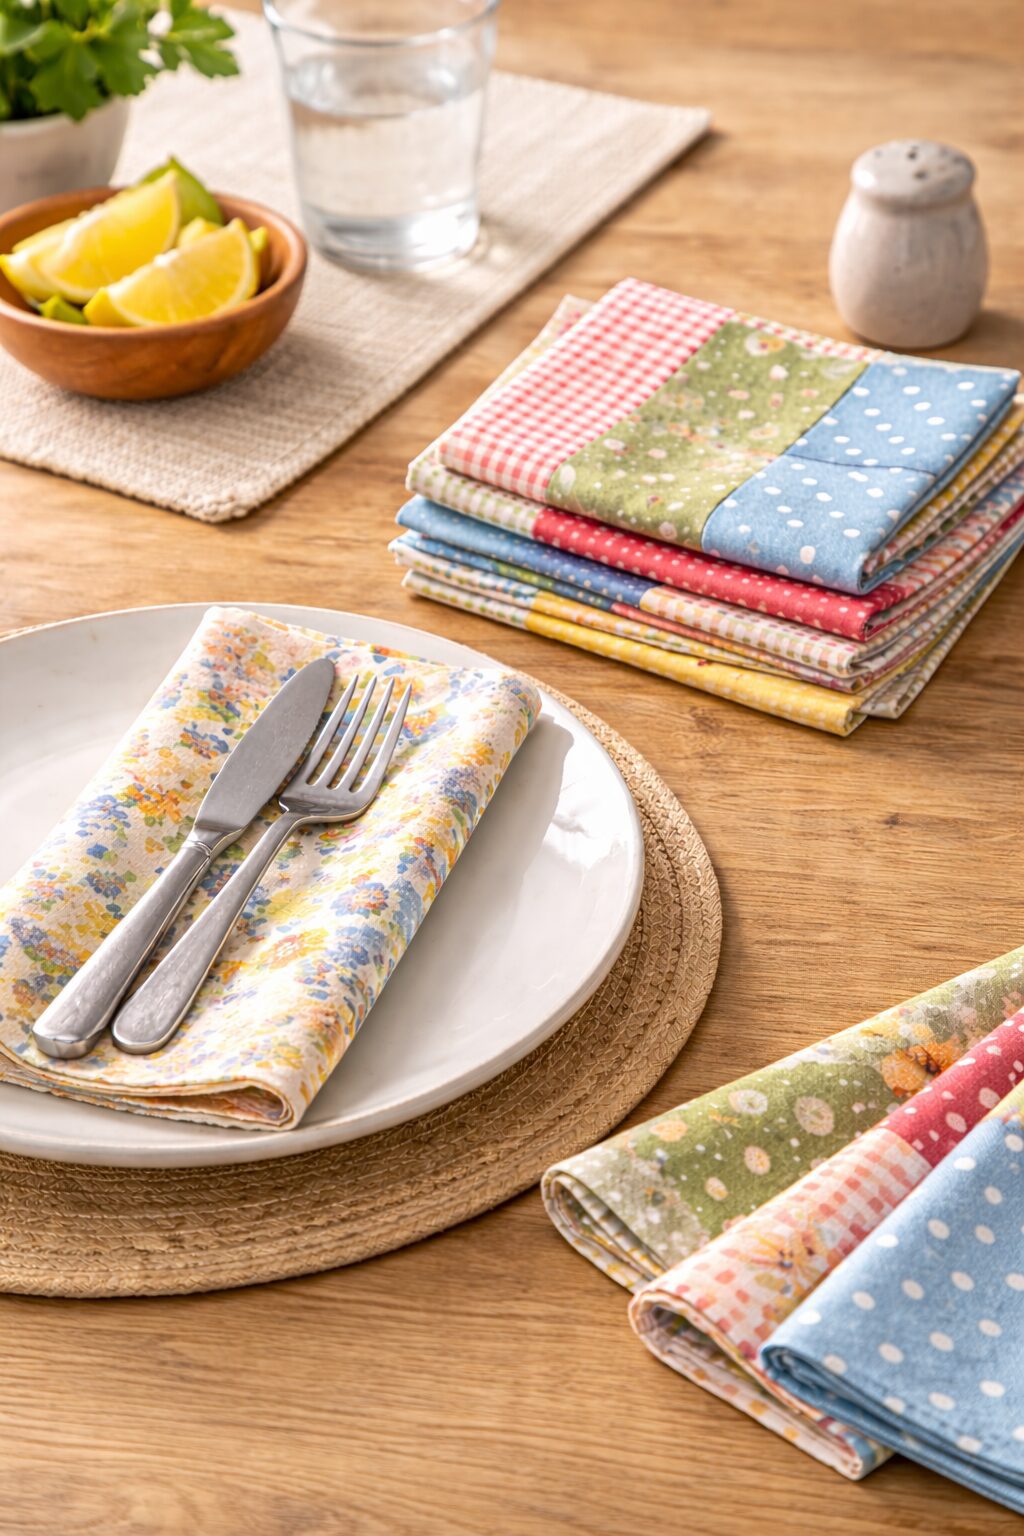
Add a touch of homemade love to your dining table with fabric napkins. They feel relaxed, reusable, and quietly special, the kind of detail that makes everyday meals feel cared for without trying too hard.
You might need
- Cotton fabric by the yard
- Linen fabric
- Sewing machine or hand sewing needles: Sewing machine | Hand sewing needles
- Thread set
- Fabric scissors
- Iron and ironing board: Iron | Ironing board
- Measuring tape
- Sewing pins
- Fabric marking chalk
Cut your fabric into large squares. Eighteen to twenty inches is a common size for dinner napkins, but you can adjust depending on how draped or casual you want them to feel.
Fold each edge over about half an inch, press with an iron, then fold again to hide the raw edge. Pin as you go so the folds stay even and clean.
Sew around the napkin close to the folded edge, taking your time at the corners so they lay flat and polished.
Press the finished napkins one final time and set them beside your plates. The mix of fabric, color, and texture brings warmth to the table and turns even the simplest meal into something that feels intentional.
7. Fabric Pin Board
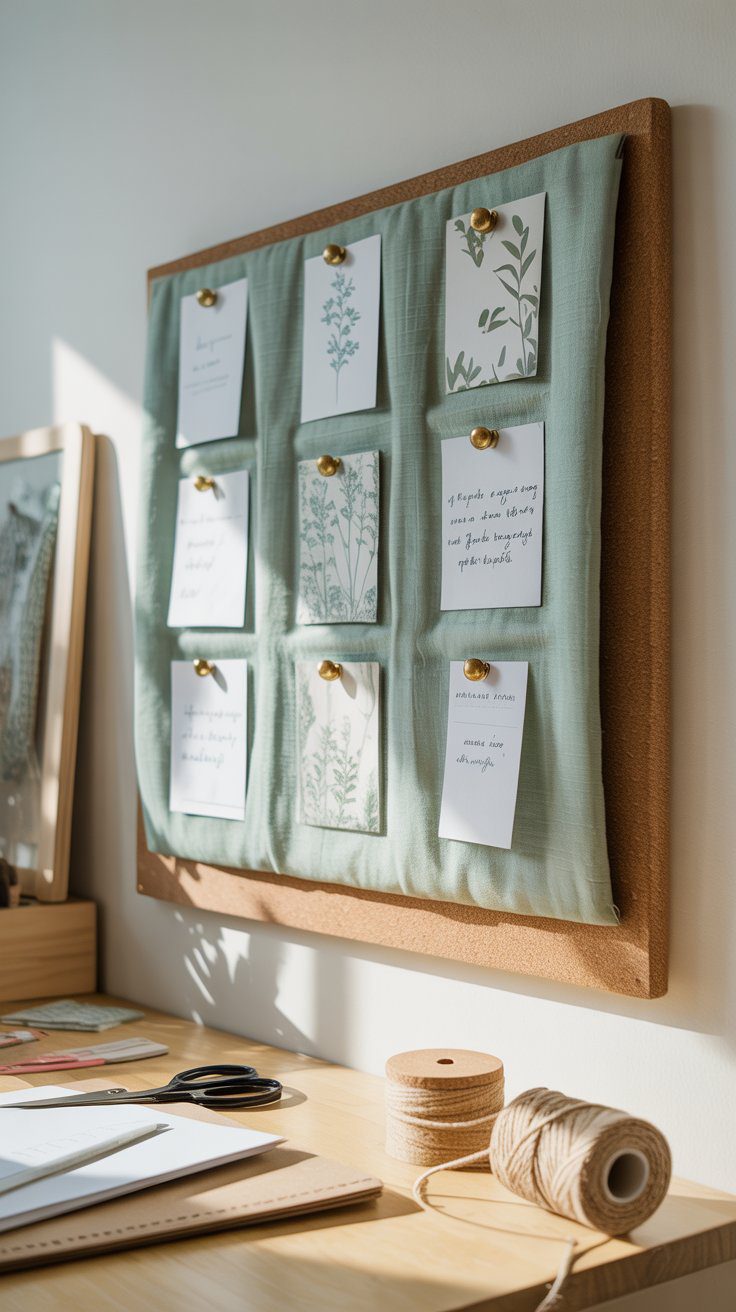
Stay organized without sacrificing style with a fabric pin board. It is practical, customizable, and easy to make, and it instantly turns everyday notes, reminders, and photos into part of your decor instead of visual clutter.
You might need
- Corkboard
- Decorative fabric by the yard
- Staple gun
- Staple refills
- Fabric scissors
- Measuring tape
- Push pins
- Iron
- Jute twine or ribbon: Jute twine | Ribbon
- Mounting hooks
Iron your fabric first so it is smooth and wrinkle-free. Lay the fabric face down on a flat surface and center the corkboard on top.
Pull one side of the fabric up and over the back edge of the corkboard. Staple it in place, starting at the center and working outward to keep tension even.
Repeat on the opposite side, pulling the fabric snug but not stretched. Continue with the remaining sides, adjusting as you go so the fabric stays taut and smooth on the front.
Trim away any excess fabric on the back once everything is fully secured. Add hanging hardware, then mount it on the wall and use push pins to display notes, photos, or reminders in a way that feels intentional and personal.
Conclusion
From cozy corner pillows to festive fabric wreaths, these seven fabric crafts not only allow you to tap into your creative side, but also provide a resourceful means to use up your fabric scraps. Who knew one could transform neglected fabric pieces into something so charming and practical? So don’t wait, pick a craft, gather your supplies, and start creating today! Happy crafting!
This website contains affiliate links. Some products are gifted by the brand to test. As an Amazon Associate, I earn from qualifying purchases. The content on this website was created with the help of AI.
