This website contains affiliate links. Some products are gifted by the brand to test. As an Amazon Associate, I earn from qualifying purchases. The content on this website was created with the help of AI.
Turn a Pile of Fallen Leaves Into Art People Ask Where You Bought It
Ten real, doable projects for the leaves already sitting in your yard right now — crowns, pendants, framed wall art, and cozy fall decor, no craft-store trip required.
Shop the leaf-art supply kit →
Your backyard is currently covered in free, gorgeous, completely underrated art supplies, and most of them are headed for the compost pile before anyone notices. Dried and pressed leaves are cheap, endlessly versatile, and just as friendly to a total beginner as they are to someone who already has a glue-gun scar or two. Here is exactly how to turn that pile of leaves into wearable pieces, framed wall art, and seasonal decor that reads boutique, not backyard.
Ten ideas, sorted by how you’ll wear or use them
Wearable leaf art
A crown and a pendant you can actually wear out the door.
Pressed and printed techniques
Embossing, calligraphy, tattoos, and leaf prints on paper or fabric.
Home and seasonal decor
Framed art, garlands, a thankful tree, and leaf-print textiles.
Preserve, protect, and play
Keep every project looking fresh for years, plus kid-friendly versions.
Start here — wearable leaf art
A leaf crown that looks made, not homemade

If you want one project that proves how far a handful of leaves can go, start here. A leaf crown is simple, eco-friendly, and gives any outfit a seasonal, editorial-shoot kind of flair.
What you need:
- Fresh or dried leaves — pick sturdy ones with well-defined veins
- Floral wire
- Floral tape
- Scissors
- Optional: ribbons, beads, or small flowers
How to build it:
- Cut floral wire long enough to fit comfortably around your head, twist the ends into a circle, and secure with floral tape.
- Layer leaves around the wire, largest at the bottom and smaller leaves on top, securing each stem with floral tape as you go.
- Tuck in flowers, beads, or ribbon between the leaves for extra polish.
- Adjust any leaves that shifted and secure loose ends with a final wrap of floral tape.
💡 Tip: A finished crown should feel lush and organic, like the leaves and flowers grew into a circle on their own — not stiff or overly engineered.
A leaf pendant you can wear every day
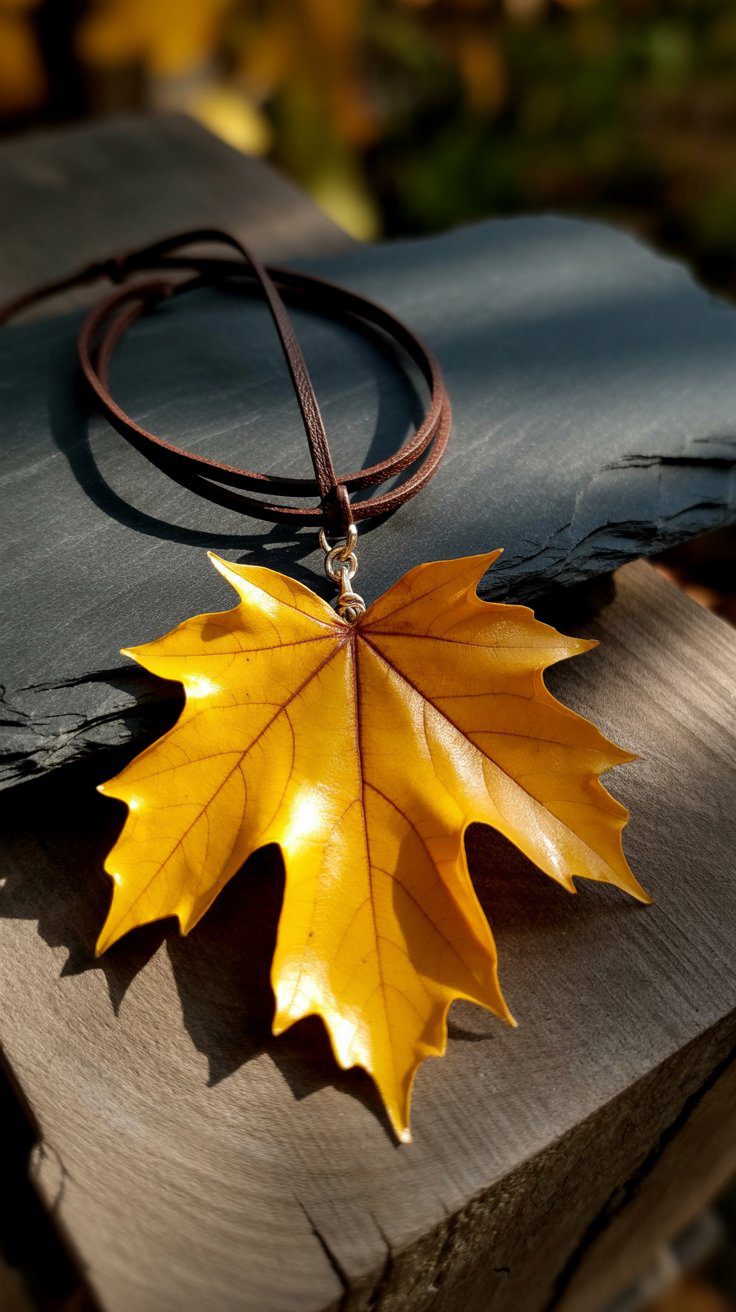
This is the pick for anyone who loves nature-inspired jewelry: a single dried leaf, sealed into a glossy little pendant you can wear long after the season changes.
What you need:
- A small to medium dried leaf
- A bezel pendant frame
- Mod Podge or a clear-drying glue
- Dimensional Magic or resin for sealing
- Leather cord or chain
- Optional: buttons, tiny metal flowers, or glitter
How to build it:
- Choose a flat leaf in good condition, trim the stem, and gently press it flat if it’s curled.
- Glue the leaf into the bezel frame with a thin layer of Mod Podge and let it dry 15 to 20 minutes.
- Seal it with a layer of Dimensional Magic or resin and let it cure overnight for a glossy, protected finish.
- Add any embellishments you like and let the glue dry completely.
- Thread the pendant onto a leather cord or chain, leaving about 1 inch extra to tie an adjustable loop closure.
💡 Tip: Let the resin cure the full overnight stretch. Rushing this step is the #1 reason a pendant ends up tacky instead of glass-smooth.
Leaf embossing for gilded, gallery-style detail
Leaf embossing turns a single leaf into a stamp. Paint a leaf’s veined underside, press it onto paper or fabric, and you get a crisp, botanical pattern with a hint of shine.
What you need:
- Dried leaves with strong, visible veins
- Acrylic paint plus a gold metallic paint for accents
- Paintbrushes
- Paper or fabric to stamp onto
Beginner-friendly and forgiving: if a print smudges, you have a whole yard of backup leaves.
Techniques worth trying at least once
Leaf calligraphy for whimsical lettering
If you already love hand-lettering, leaf calligraphy is the crossover project you didn’t know you needed — tucking dried leaves in and around your lettering so the words look like they grew out of a garden.
- Sketch your lettering lightly in pencil first, leaving gaps for leaves to tuck into the strokes
- Glue small, flat leaves along the tails of letters like g, y, and f
- Finish with a metallic gel pen for extra shine along the leaf edges
Leaf tattoos for a temporary, nature-inspired look
A delicate leaf’s vein pattern translated onto skin makes a surprisingly elegant temporary tattoo — a fun, low-commitment way to carry a bit of fall with you.
- Use temporary tattoo transfer paper designed for skin-safe use
- Trace or print a clean leaf silhouette before transferring
- Seal lightly so it holds up through a full day
Leaf prints and 3D impressions
This one covers three related techniques that all start with pressing a leaf into something soft. The leaf-hammering method is the most popular: sandwich a leaf between two sheets of paper and hammer gently to transfer its exact shape and veins as a detailed imprint. Try both card stock and fabric for different textures.
For color, load a leaf with tempera, gouache, or acrylic paint and press it onto paper or fabric. Misting the leaf with water first gives a soft, watercolor blend instead of a hard-edged print.
For a 3D version, press a leaf into air-dry clay to capture its texture permanently, then finish with metallic paint or a natural clay glaze for a lasting little dish or ornament.
💡 Tip: Seal any finished print with a fixative spray or laminate it so the color doesn’t fade or the leaf doesn’t crumble over time.
Grab the leaf-art supply kit in one place
Floral wire, resin, paints, and clay — the exact supplies used across all ten projects, gathered into one search so you’re not hunting through six browser tabs.
Shop the full supply list →Decorate your home with what you already found outside
Framed leaf wall art
Pressing leaves between two panes of glass is the fastest route to gallery-worthy wall art — it protects the leaves and frames them at the same time. Prefer something looser? Try leaf collaging: arranging pressed leaves directly on canvas or board in a shape you design yourself.
Mix sizes and colors for a striking composition — vibrant tones read lively, while earthy browns and golds read calm and collected. Either way, a framed leaf composition adds real depth to a plain wall.
Leaf garlands and wreaths
Arrange dried leaves in a natural, layered pattern around a sturdy base and you’ve got an elegant garland or wreath in under an hour. Tuck in pinecones, acorns, or berries for extra texture, then hang it on a wall or frame your entryway with it. If you want more ideas in this exact vein, this leaf garlands and crowns roundup is a great next stop for the holiday season.
A “thankful tree” leaf centerpiece
Gather dried leaves in a mix of shapes and colors, then attach them to a small branch or tabletop tree with Mod Podge. Have family members write a gratitude note on each leaf before it goes on — it turns a simple centerpiece into a meaningful one, and it’s an easy project to build together at the table.
Leaf-print fabric decor
Press leaves onto fabric with Mod Podge or a fabric medium and you can turn plain textiles into custom pillows, table runners, or placemats with real rustic charm — no sewing pattern required, just a leaf, some paint or medium, and a steady hand.
Keep every project looking fresh for years
A little preservation work up front means your leaf art still looks sharp long after the season ends.
- Glycerin soak: mix 1 part glycerin to 2 parts water, soak leaves up to a week, and they turn soft, flexible, and a beautiful translucent color instead of fading or going brittle.
- Resin casting: turns a flat leaf into a small three-dimensional sculpture and protects it completely.
- Lamination: the simplest option — sealing a leaf in clear laminate makes it sturdy and easy to handle or display.
- Display it well: shadow boxes add layered depth, floating frames highlight a leaf’s delicate edges, and a wall-mounted collage turns a whole collection into one statement piece.
All of this fits under a wider goal worth caring about: sustainable art and eco-conscious crafting. Use non-toxic adhesives, skip synthetic dyes when you can, and always collect fallen leaves rather than pulling them from a living plant.
Leaf crafts the whole family can do
Leaf art is one of the easiest ways to mix creativity and a little science lesson without it feeling like homework.
- Younger kids: leaf rubbings, leaf animal collages, and simple leaf prints — low mess, high payoff.
- Older kids: leaf crowns, leaf-themed dioramas, and leaf lanterns for a bigger project.
- What they’re learning: plant identification from leaf shapes, color mixing through paint, fine motor skills, and a genuine appreciation for the outdoors.
- Safety first: use child-safe materials and supervise anything involving scissors, glue guns, or hammering.
Loved this? Pin it.
Grab a handful of leaves and start your first project this weekend
Ten ideas, real materials, and a whole yard of free supplies waiting outside your door.
Shop my leaf-art supplies →This website contains affiliate links. Some products are gifted by the brand to test. As an Amazon Associate, I earn from qualifying purchases. The content on this website was created with the help of AI.
