This website contains affiliate links. Some products are gifted by the brand to test. As an Amazon Associate, I earn from qualifying purchases. The content on this website was created with the help of AI.
Have you always wanted to learn to sew, but felt totally overwhelmed by complicated patterns and confusing instructions? Does the idea of just threading a machine feel a little intimidating? I get it. It seems like every “beginner” project has a dozen secret steps nobody tells you about.
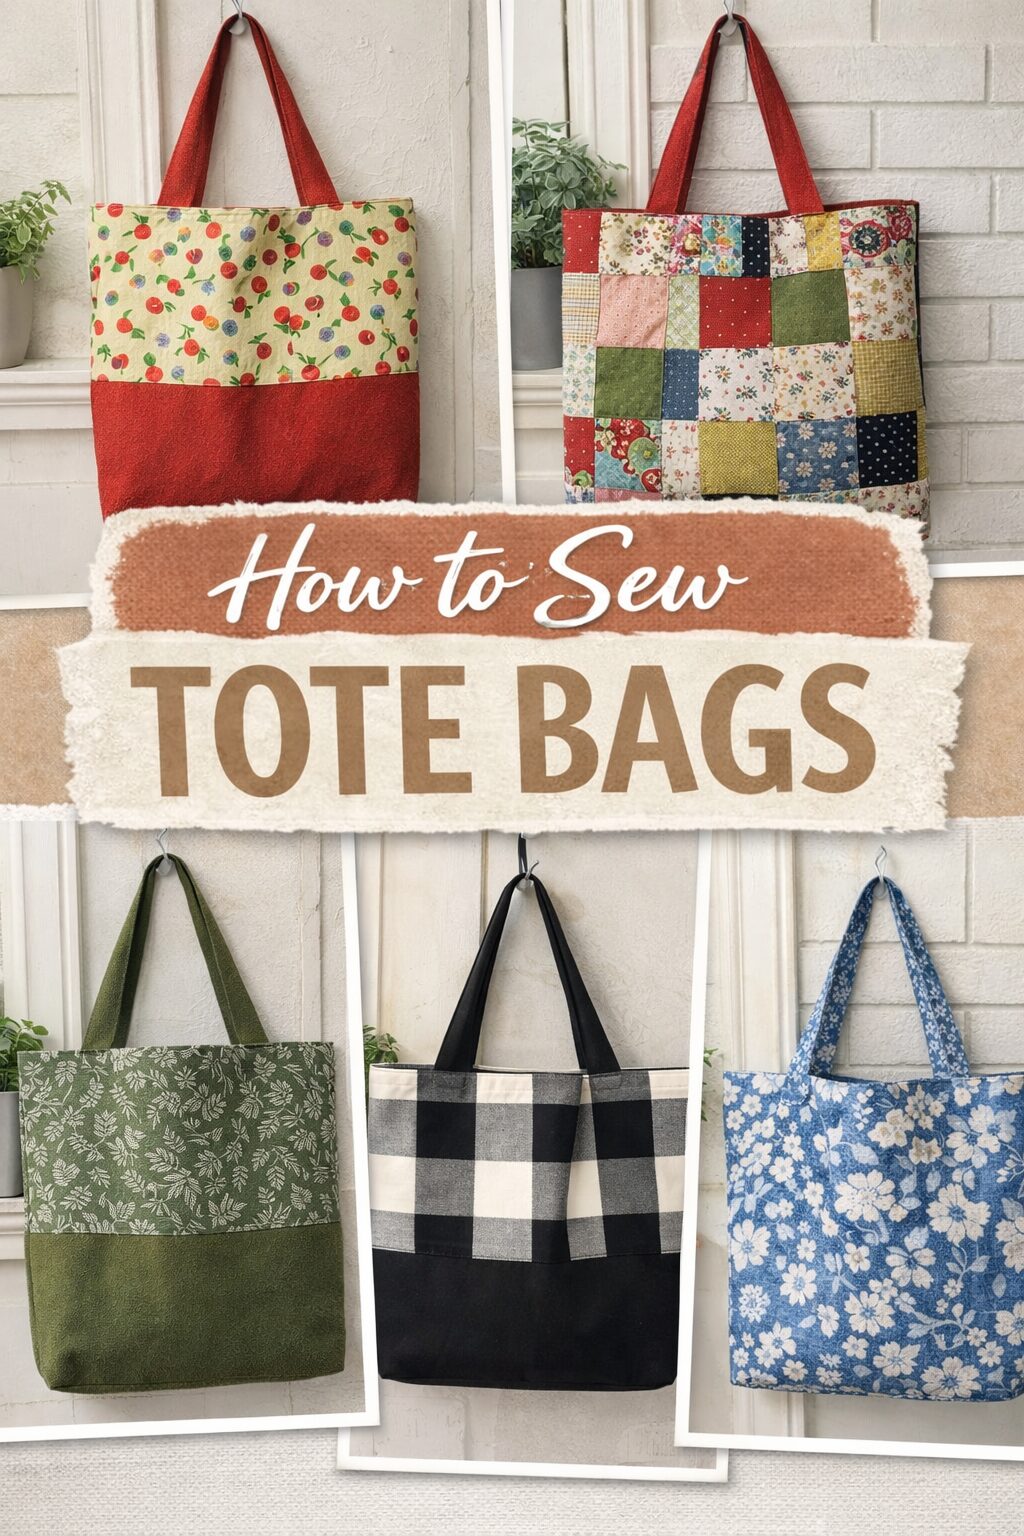
But what if I told you that you could turn a yard of your favorite fabric into a beautiful, sturdy, and super stylish tote bag using just a few simple, straight lines?
To help you turn your simple tote bag project into a formal sewing pattern, here is a structured layout based on your tutorial.
Pattern: The Essential Tote Bag
Skill Level: Beginner
Finished Dimensions: Approximately 13″ Wide x 15″ Tall (excluding handles)
Materials Required
- Fabric: 1 yard of medium-weight woven fabric (Canvas, denim, or duck cloth).
- Thread: All-purpose polyester thread.
- Tools: Sewing machine, iron and ironing board, rotary cutter/mat or fabric scissors, ruler, marking tool, and pins or clips.
Cutting Guide
- Main Body: Cut one rectangle 14″ x 32″.
- Handles: Cut two rectangles 3″ x 21″.
Construction Steps
| Step | Instruction | Tip |
| 1. Prep Handles | Fold long edges in by 1/2″, then fold the entire strip in half. Press well. | Pressing is the secret to professional results! |
| 2. Stitch Handles | Topstitch 1/8″ from the edge along both long sides. | Backstitch at the start and end of every seam. |
| 3. Main Body | Fold the 14″ x 32″ piece in half (right sides together) to create a 14″ x 16″ pouch. | The fold will be at the bottom of your bag. |
| 4. Side Seams | Sew both sides with a 3/8″ seam allowance. Finish edges with a zigzag stitch. | This prevents the inside from fraying over time. |
| 5. Box Corners | Pinch the bottom corners into a triangle. Measure 2″ across the seam, mark, and sew. | This gives your bag depth and a flat bottom. |
| 6. Top Hem | Fold the top edge down 1/2″, press. Fold again 1″, press, and pin. | This creates a clean, sturdy top opening. |
| 7. Attach Straps | Tuck strap ends 3″ from each side seam into the hem fold. Pin and sew. | Ensure the loops are pointing down toward the bag bottom. |
| 8. Reinforce | Stitch a “Box-X” pattern over each strap attachment point. | This ensures your handles can carry heavy loads. |
Final Finish
Turn the bag right side out and give it a final, thorough press to set the stitches and crisp up the edges.
In this guide, I’m going to walk you through every single step of sewing a tote bag, from cutting the fabric to the final stitch. There are no surprise techniques, no hidden steps. Just a straightforward process that works. By the end of this tutorial, you’ll have a gorgeous, functional bag you can be proud of, and more importantly, you’ll have the confidence to say, “I can sew.” This project really is that easy. So, grab that piece of fabric you’ve been saving for something special, and let’s get started.
Materials and Tools – Gathering Your Supplies

Alright, before we start making our amazing bag, we need to gather our supplies. Think of it as our “mise en place,” just like in cooking. Having everything ready makes the whole process so much smoother and way more fun. I’ll list what you need and explain why you need it, because understanding your tools is the first step to mastering them.
First up, the star of the show: your fabric. For this project, you’ll need one yard of a medium-weight woven fabric, assuming a standard 44-inch width. A full yard gives you plenty of room for the bag and straps without any stress. What’s “medium-weight”? Think canvas, duck cloth, denim, or even a sturdy upholstery fabric. These are perfect for beginners because they don’t stretch, they have enough body to hold a shape, and they’re a dream to sew. Today, I’m using this gorgeous 8-ounce duck canvas. It has a great texture and I know it’s going to last forever.
Now, for the most important pre-step of all: wash and dry your fabric before you do anything else. Seriously, don’t skip this! Cotton fabrics can shrink the first time they’re washed. If you make the bag first and then wash it, it could come out of the laundry all warped and puckered. Washing it now gets that shrinkage out of the way. After it’s dry, give it a good press with your iron to get rid of every wrinkle. Starting with smooth, flat fabric is non-negotiable for getting accurate cuts.
Next, you’ll need thread. An all-purpose polyester thread in a matching color is the easiest choice. Or, if you want your stitches to be a design feature, pick a contrasting color to make them pop. The choice is yours!
For tools, of course, you’ll need a sewing machine. Any basic machine that can do a straight stitch is perfect. No need for a fancy computerized model with a million stitches. Make sure you have a standard size 12 or 14 needle, which is great for these fabrics.
You will also absolutely need an iron and an ironing board. I’m not kidding, pressing your seams as you go is the real secret to making your projects look professional instead of homemade. It’s not optional! You’ll hear me say “press the seam” a lot, and I mean it every time. It’s a total game-changer.
For cutting, you have a couple of options. The most accurate way is with a rotary cutter, a self-healing mat, and a long acrylic ruler. This setup is amazing for getting perfectly straight cuts. But if you don’t have all that, don’t worry! A good, sharp pair of fabric scissors and a ruler or measuring tape will work just fine. Just take your time when you measure.
You’ll also want something to mark your fabric with, like tailor’s chalk or a disappearing ink fabric marker. And finally, grab some pins or sewing clips. These are essential for holding your fabric together so nothing wiggles around while you’re sewing.
So, to recap, that’s:
- One yard of medium-weight fabric like canvas or denim, pre-washed and ironed.
- Matching all-purpose thread.
- A sewing machine.
- An iron and ironing board.
- A rotary cutter and mat OR sharp fabric scissors.
- A ruler.
- A fabric marking tool.
- Pins or sewing clips.
Go ahead and gather all your supplies, and I’ll meet you back here to start cutting.
Cutting the Fabric
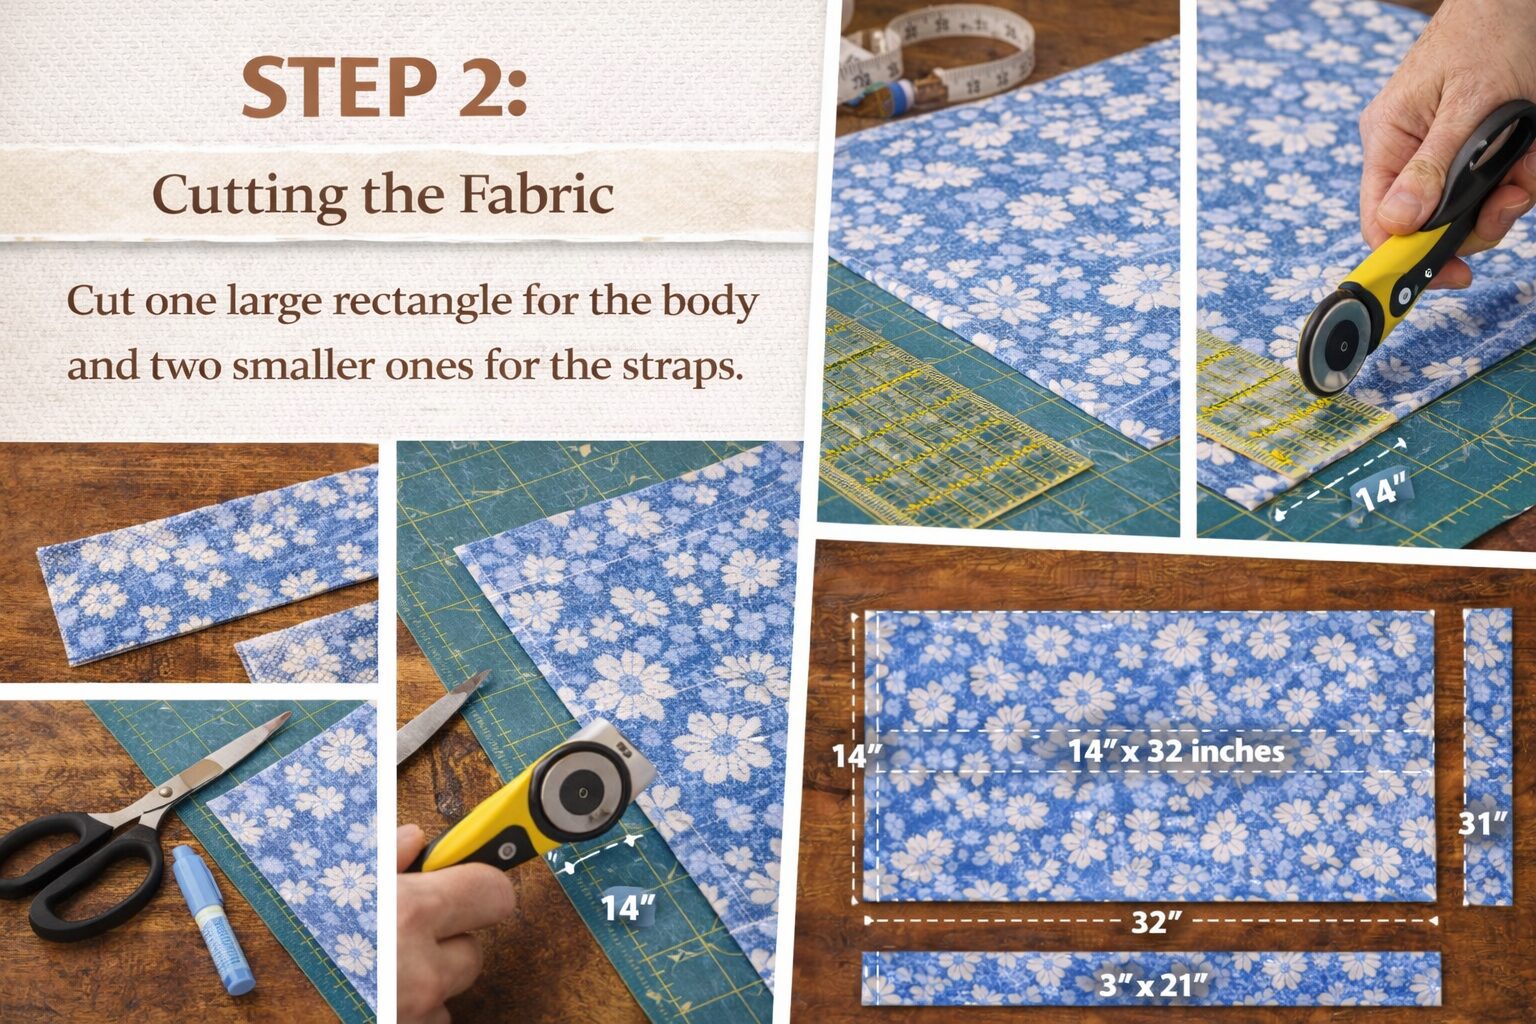
Welcome back! Now that we have all our supplies, it’s time for the first real step: cutting our fabric. This is where we lay the foundation for our bag, so we want to be precise. But don’t worry, we’re only making three simple cuts.
From our yard of fabric, we’re going to cut one large rectangle for the body and two smaller ones for the straps. That’s it!
Here are the dimensions:
- For the main body: one rectangle, 14 inches wide by 32 inches long.
- For the handles: two rectangles, each 3 inches wide by 21 inches long.
Let’s start with the large body piece. Lay your pressed fabric out on your cutting mat or a big, flat surface, making sure it’s completely smooth. Take your ruler and rotary cutter. First, create a perfectly straight edge to work from by trimming off the factory edge, or selvage. This gives you a true starting line. Now, measure 14 inches in from that clean edge and make your first long cut. Rotate your fabric, measure 32 inches along the length, and make your final cut. If you’re using scissors, just draw these lines on your fabric with a ruler and marking tool, and then carefully cut along them. A straight cut now prevents a crooked bag later.
Set that big piece aside. Now for the handles. We need two identical pieces, each 3 by 21 inches. Using the same method, measure and cut these two smaller rectangles from your remaining fabric. Remember the golden rule: measure twice, cut once!
Once you have your three pieces—one large body rectangle and two smaller handle rectangles—we can head to the machine. Let’s start with the handles.
Step 3: Creating the Straps
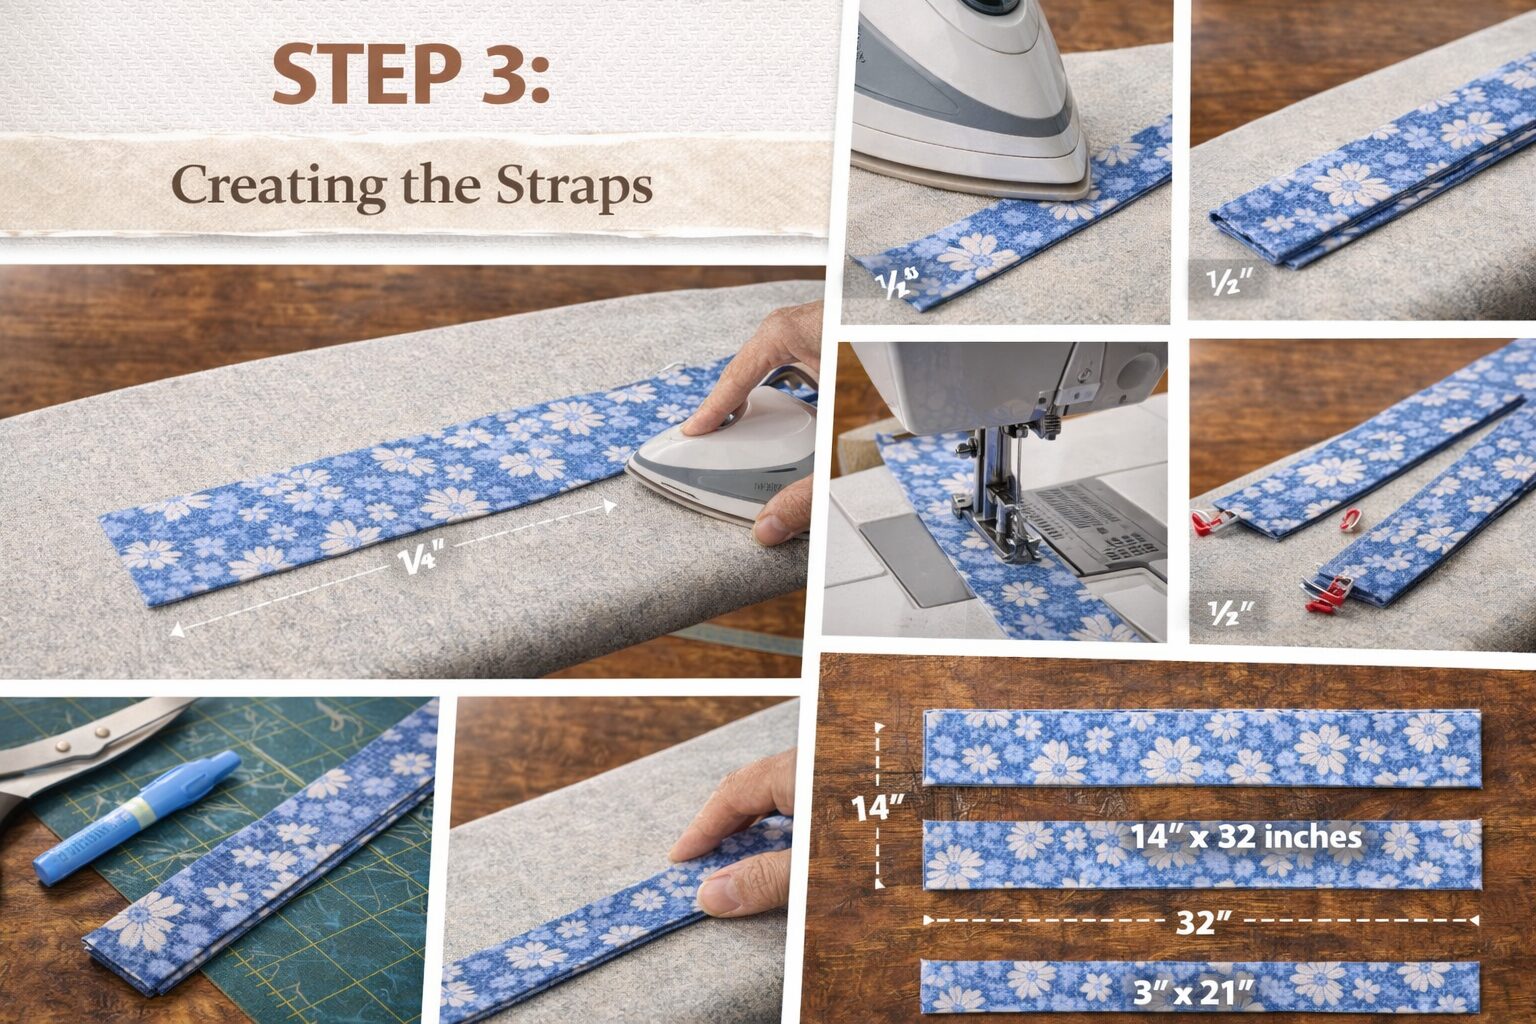
Alright, it’s time for our first bit of sewing! We’re going to make the straps first. It’s a great way to warm up, practice your stitching, and build some confidence before we tackle the main bag.
Grab one of your 3-by-21-inch fabric pieces and lay it on your ironing board with the wrong side up—so the “pretty” side is facing down. We’re going to fold the two long edges in toward the center. Fold one long edge over by half an inch and press it flat with your iron. Now, do the exact same thing on the other side. Fold it over by half an inch and press. You should now have a strip with two clean, folded edges.
Next, fold that entire strip in half lengthwise, bringing those two folded edges together to meet perfectly. Give it one more good press. This tucks all the raw edges away on the inside, leaving you with a beautifully finished strap that’s about one inch wide. Pin or clip it together to hold everything in place. Go ahead and repeat this whole process with your second handle piece.
Now, let’s lock it all down with some stitches. We’re going to topstitch along both long edges of each strap. This not only holds the strap together but also makes it super durable and gives it a professional look.
Take your first strap to the machine. We’re going to sew about 1/8 of an inch from the edge. A great tip for sewing straight is to watch the edge of your fabric against a guide on your presser foot, not the needle. Start at one end, lower your needle, and sew a few stitches. Then, use the reverse button to sew a few stitches backward. This is called backstitching, and it acts like a knot to keep your thread from unraveling.
Now, just sew all the way down the strap, keeping your line straight. When you get to the other end, remember to backstitch again. Flip the strap around and do the exact same thing on the other long edge, backstitching at the start and finish.
Your first strap is done! See how sturdy that looks? Now, repeat that whole process for the second strap. Once both straps are stitched, set them aside. Our confidence is up, and our straps are ready for action.
Step 4: Assembling the Main Bag Body
This is where the magic really starts to happen. We’re going to turn that big fabric rectangle into an actual bag.
Take your 14-by-32-inch piece and fold it in half widthwise, with the right sides of the fabric facing each other. So, the “pretty” sides are on the inside. You should now have a rectangle that’s 14 inches wide by 16 inches tall, with the fold at the bottom. Line up the raw edges on the two sides carefully and pin them together.
We’re going to sew these two side seams using a 3/8-inch seam allowance. That’s just the distance from your stitching to the edge of the fabric. Most machines have guide markings on the needle plate to help you. Starting at the top corner of one side, backstitch to lock your stitches, then sew a straight line all the way down to the bottom fold. Backstitch again at the end. Repeat this on the other side.
Now you have a fabric pouch! But to make sure our bag lasts, we need to finish those inside seams so they don’t fray. An easy way to do this is with a zigzag stitch. Just select a medium zigzag stitch on your machine and sew along the raw edge of each side seam, from top to bottom. This simple step will dramatically increase the lifespan of your bag.
Next, we’re going to give this bag some depth. This is called “boxing the corners,” and it’s what turns a flat pouch into a roomy tote. Keep the bag inside out. Pinch one of the bottom corners so that the side seam you just sewed lines up with the bottom fold of the bag. It should form a triangle. Use a ruler to measure 2 inches across the seam, and draw a straight line.
Take it to your machine and sew directly on that line you just drew. Do a little backstitch at the beginning and end. This little seam creates the corner of your bag. Go ahead and trim off the excess triangle fabric, leaving about a half-inch seam allowance. Now, do the exact same thing for the other bottom corner. Pinch, align the seams, measure, draw your line, and stitch.
Once you’ve boxed both corners, take your bag to the ironing board and press the side seams flat.
Step 5: Hemming the Top Edge
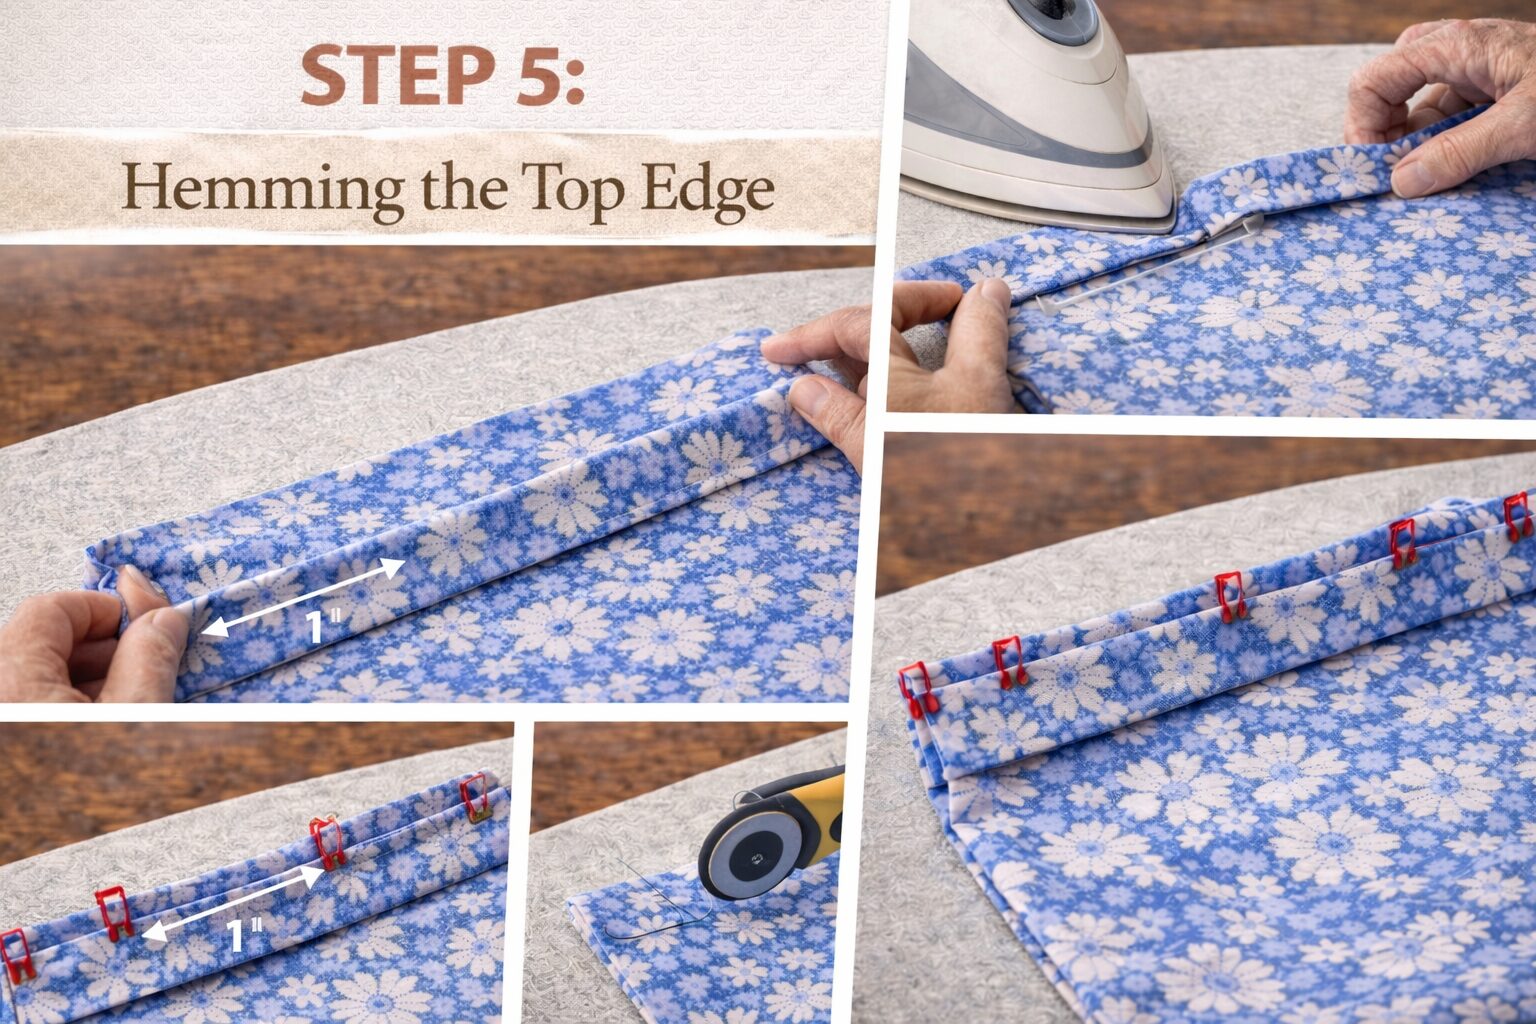
Our bag is really looking like a bag now! Let’s create a clean, finished edge along the top opening with a double-fold hem. It sounds fancy, but it’s just two simple folds.
With your bag still inside out, go to your ironing board. At the top opening, fold the raw edge down toward the wrong side by half an inch. Press this fold firmly all the way around the top. Now, we’re going to fold it again. Fold that same edge down one more time, this time by one full inch. This second fold tucks the raw edge away completely, giving you a beautiful, clean finish. Press this new fold firmly and use your pins or clips to hold it in place all around the top of the bag.
Before we sew the hem, we need to add our handles.
Step 6: Attaching the Straps
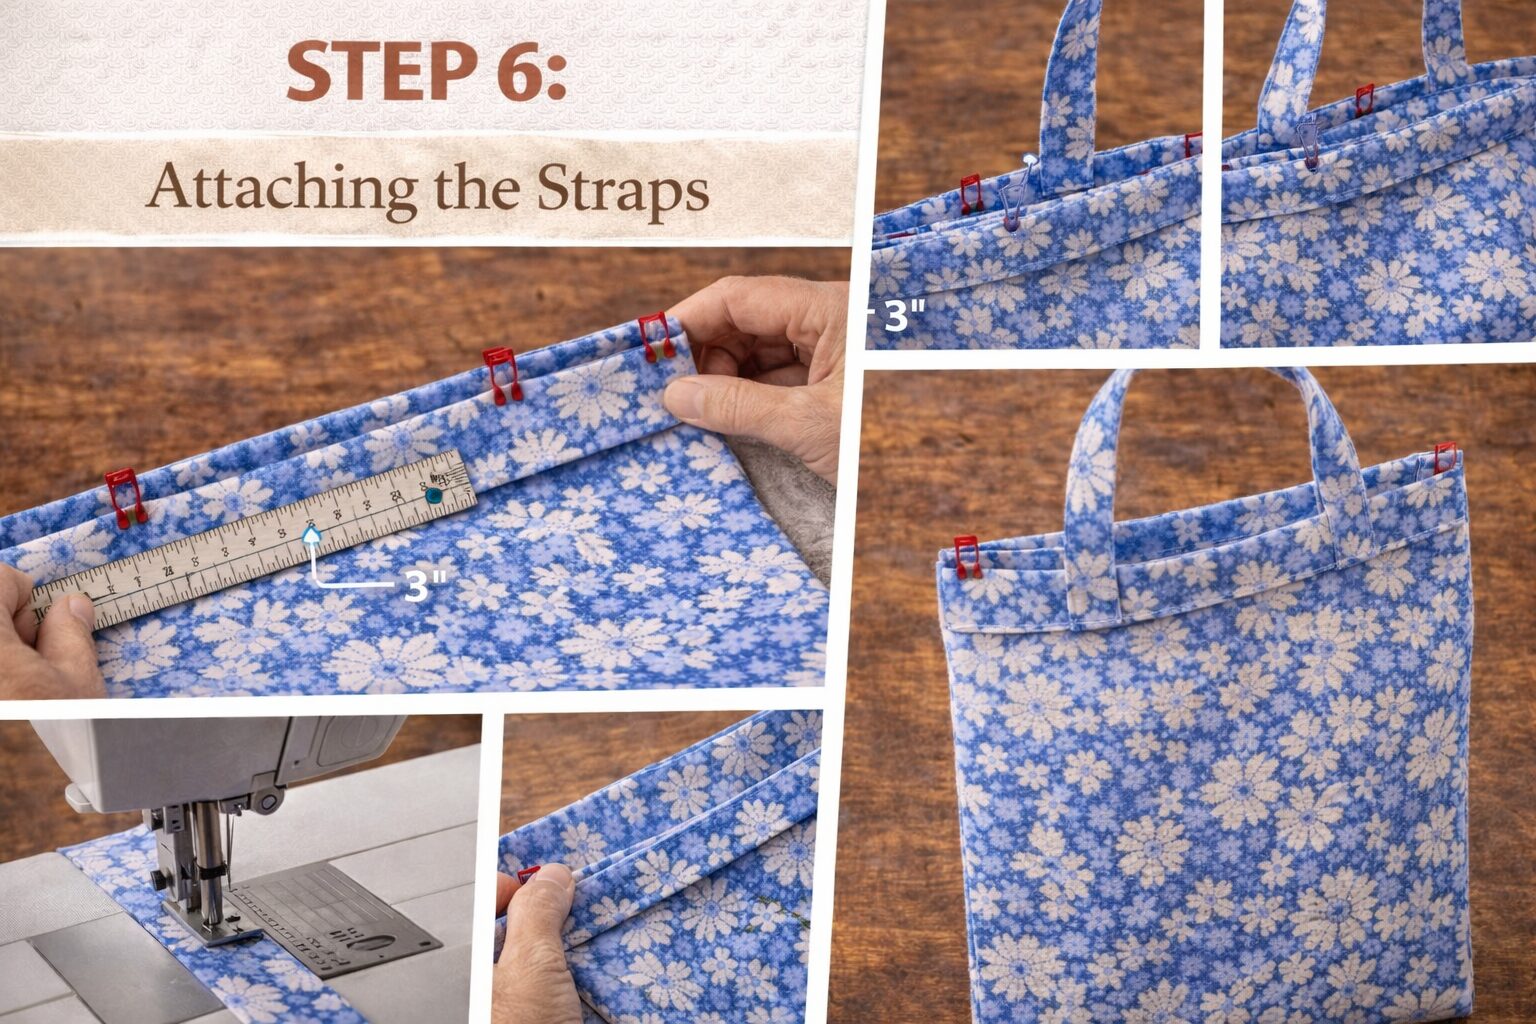
Time to bring it all together! Grab those two awesome straps you made earlier. We’re going to tuck them right into the hem we just pressed.
Take your bag, which is still inside out with the top hem pinned. With a ruler, measure 3 inches in from each side seam and make a small mark on the inside of the hem.
Now, take one strap. Place the raw ends of the strap inside the fold of the hem, centered over your 3-inch marks. The big loop of the handle should be pointing down, toward the bottom of the bag. This might feel weird and backward, but trust me, it’s the right way! Slide the ends of the strap up into the hem until they touch the top fold and pin them securely. Do the same for the other end of the strap at the other 3-inch mark.
Flip your bag over and do the exact same thing on the other side with your second strap. Measure 3 inches in from each seam and pin the handle ends in place. Just double-check that your straps aren’t twisted.
Let’s head back to the machine for one of our last steps. We’re going to topstitch the hem down, which will also lock our handles in place for good.
We’re going to sew close to the bottom edge of the hem we folded. Start at one of the side seams and position your needle about 1/8 of an inch from that inner folded edge. Backstitch to start, and then sew all the way around the top of the bag. When you get to the parts with the straps, your machine will be sewing through a lot of layers, so just slow down and gently guide it through. When you make it all the way back to where you started, overlap your stitches by about an inch and backstitch one last time.
Now for the big reveal! Turn your bag right side out. Pull the straps up, and would you look at that! You have a real tote bag!
The Final Touches & Wrap Up
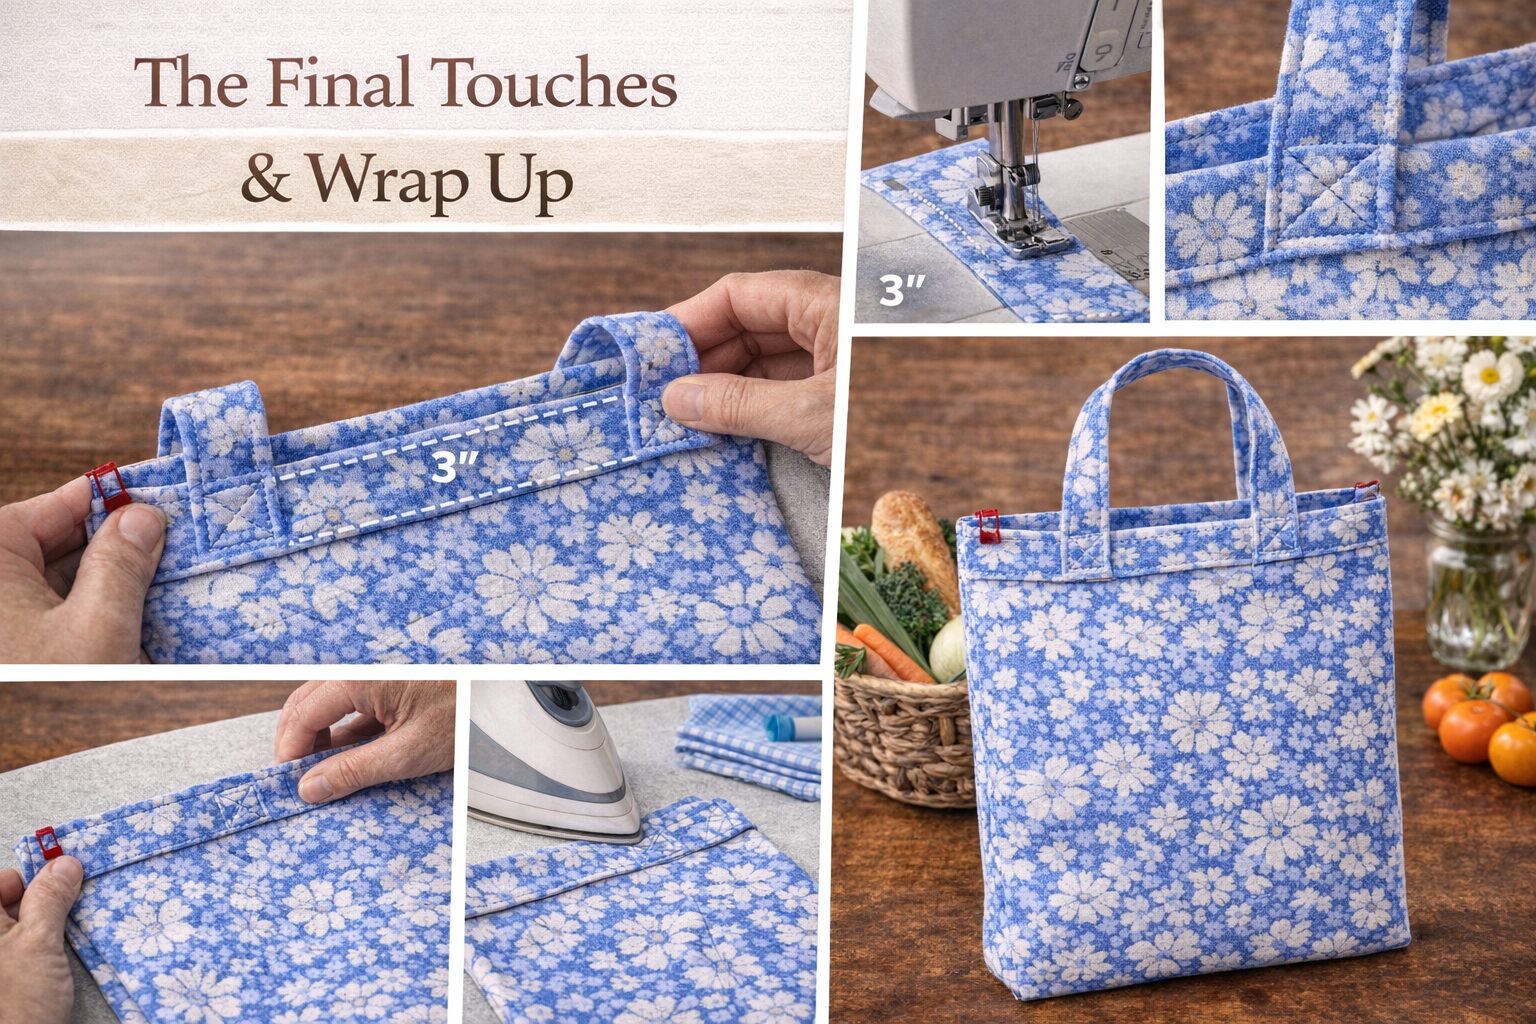
We have one last, crucial step to make this bag extra strong. The handles are attached, but to make sure they can handle heavy groceries or a pile of books, we’re going to add a small reinforcing stitch.
With your bag right-side-out, you’ll see where the straps are attached. We’re going to sew a small box with an “X” through it right on top of each strap attachment point. Take your bag to the machine. Starting at one bottom corner of where the strap joins the bag, stitch up to the top of the hem. Then, sew across the width of the strap, back down the other side, and finally across the bottom. That’s the box. Without cutting the thread, sew diagonally across the box to form an “X.” Backstitch when you’re done.
This little “box-X” stitch is an incredibly strong reinforcement. Repeat this for all four points where the straps meet the bag. This detail not only adds massive strength but also looks so professional.
The very last thing to do is give your bag one final, thorough press. Iron the body, the straps, and the top hem. This sets the stitches and gives it that crisp, “I-bought-this-at-a-cute-boutique” finish.
And that’s it. You did it. Seriously, step back and admire what you just made. You took a flat piece of fabric and turned it into a stylish, functional bag with your own two hands. You’ve proven that you can sew!
This bag is perfect for the farmers market, the library, or just as your new everyday carry-all. And the best part? The next time someone asks where you got your bag, you get to say, “Thanks, I made it myself.”
Thank you so much for sewing with me today. I hope you’re proud of what you created and that you feel ready to take on your next sewing project. Building a new skill is all about taking it one stitch at a time, and you totally nailed it.
This website contains affiliate links. Some products are gifted by the brand to test. As an Amazon Associate, I earn from qualifying purchases. The content on this website was created with the help of AI.
